Quantcast
Channel: ASP.NET Core – Software Engineering
Viewing all 269 articles
Browse latest View live

Using multiple APIs in Blazor with Azure AD authentication

$
0
0

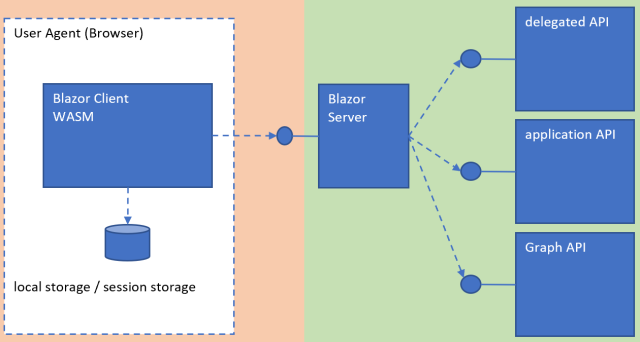
The post shows how to create a Blazor application which is hosted in an ASP.NET Core application and provides a public API which uses multiple downstream APIs. Both the Blazor client and the Blazor API are protected by Azure AD authentication. The Blazor UI Client is protected like any single page application. This is a public client which cannot keep a secret.

Each downstream API uses a different type of access token in this demo. One API delegates to a second API using the on behalf of flow. The second API uses a client credentials flow for APP to APP access and the third API uses a delegated Graph API. Only the API created for the Blazor WASM application is public. All other APIs require a secret to access the API. A certificate could also be used instead of a secret.

Code: https://github.com/damienbod/AzureADAuthRazorUiServiceApiCertificate

Posts in this series

Setup

The applications are setup very similar to the previous post in this series. Four Azure App Registrations are setup for the different applications. The Blazor WASM client uses a public SPA Azure App registration. This has one API exposed here, the access_as_user scope from the Blazor server Azure App registration. The WASM SPA has no access to the further downstream APIs. We want to have as few as possible access tokens in the browser. The Blazor Server application uses a secret to access the downstream APIs which are exposed in the API Azure App registration.
Blazor Server

The Blazor server (API) and client (UI) applications were setup using the Visual Studio templates. The Client application is hosted as part of the server and so deployed together. The Blazor server application is otherwise a simple API project. The API uses Microsoft.Identity.Web as the Azure AD client. The application requires user secrets for the protected downstream APIs.

<Project Sdk="Microsoft.NET.Sdk.Web">

  <PropertyGroup>
    <TargetFramework>net5.0</TargetFramework>
    <UserSecretsId>BlazorAzureADWithApis.Server-B86B9EF3-5CCE-46B7-A115-E5D3ACB43477</UserSecretsId>
    <WebProject_DirectoryAccessLevelKey>1</WebProject_DirectoryAccessLevelKey>
  </PropertyGroup>

  <ItemGroup>
    <ProjectReference Include="..\Client\BlazorAzureADWithApis.Client.csproj" />
    <ProjectReference Include="..\Shared\BlazorAzureADWithApis.Shared.csproj" />
  </ItemGroup>
  
  <ItemGroup>
    <PackageReference Include="Microsoft.AspNetCore.Components.WebAssembly.Server" Version="5.0.1" />
    <PackageReference Include="Microsoft.Identity.Web.MicrosoftGraphBeta" Version="1.4.0" />
    <PackageReference Include="Microsoft.AspNetCore.Authentication.JwtBearer" Version="5.0.1" NoWarn="NU1605" />
    <PackageReference Include="Microsoft.AspNetCore.Authentication.OpenIdConnect" Version="5.0.1" NoWarn="NU1605" />
    <PackageReference Include="Microsoft.Identity.Web" Version="1.4.0" />
    <PackageReference Include="Microsoft.Identity.Web.UI" Version="1.4.0" />
  </ItemGroup>

</Project>

The ConfigureServices method adds the required services for the Azure AD API authorization. The access to the downstream APIs are implemented as scoped services. The ValidateAccessTokenPolicy policy is used to validate the access token used for the public API in this project. This is the API which the Blazor WASM client uses.

public void ConfigureServices(IServiceCollection services)
{
	services.AddScoped<GraphApiClientService>();
	services.AddScoped<ServiceApiClientService>();
	services.AddScoped<UserApiClientService>();

	services.AddMicrosoftIdentityWebApiAuthentication(Configuration)
		 .EnableTokenAcquisitionToCallDownstreamApi()
		 .AddInMemoryTokenCaches();

	services.AddControllers(options =>
	{
		var policy = new AuthorizationPolicyBuilder()
			.RequireAuthenticatedUser()
			.Build();
		options.Filters.Add(new AuthorizeFilter(policy));
	});

	services.AddAuthorization(options =>
	{
		options.AddPolicy("ValidateAccessTokenPolicy", validateAccessTokenPolicy =>
		{
			// Validate ClientId from token
			// only accept tokens issued ....
			validateAccessTokenPolicy.RequireClaim("azp", "ad6b0351-92b4-4ee9-ac8d-3e76e5fd1c67");
		});
	});

	services.AddControllersWithViews();
	services.AddRazorPages();
}

The Configure method adds the middleware for the APIs like any ASP.NET Core API. It also adds the middleware for the Blazor UI.

public void Configure(IApplicationBuilder app, IWebHostEnvironment env)
{
	// ...

	app.UseHttpsRedirection();
	app.UseBlazorFrameworkFiles();
	app.UseStaticFiles();

	app.UseRouting();

	app.UseAuthentication();
	app.UseAuthorization();

	app.UseEndpoints(endpoints =>
	{
		endpoints.MapRazorPages();
		endpoints.MapControllers();
		endpoints.MapFallbackToFile("index.html");
	});
}

A user secret is required for the protected downstream APIs. These APIs cannot be accessed from the public Blazor UI. The less access tokens you use in the public zone, the better.

{
  "AzureAd": {
    "ClientSecret": "your client secret from the API App registration"
  }
}

The DelegatedUserApiCallsController is the API which can be used to access the downstream API. This API accepts access tokens which the Blazor UI requested. The controller calls the API services for further API calls, in this case a delegated user API request.

using System.Collections.Generic;
using System.Threading.Tasks;
using BlazorAzureADWithApis.Server.Services;
using Microsoft.AspNetCore.Authentication.JwtBearer;
using Microsoft.AspNetCore.Authorization;
using Microsoft.AspNetCore.Mvc;
using Microsoft.Identity.Web.Resource;

namespace BlazorAzureADWithApis.Server.Controllers
{
    [Authorize(Policy = "ValidateAccessTokenPolicy", AuthenticationSchemes = JwtBearerDefaults.AuthenticationScheme)]
    [ApiController]
    [Route("[controller]")]
    public class DelegatedUserApiCallsController : ControllerBase
    {
        private UserApiClientService _userApiClientService;
        static readonly string[] scopeRequiredByApi = new string[] { "access_as_user" };

        public DelegatedUserApiCallsController(UserApiClientService userApiClientService)
        {
            _userApiClientService = userApiClientService;
        }

        [HttpGet]
        public async Task<IEnumerable<string>> Get()
        {
            HttpContext.VerifyUserHasAnyAcceptedScope(scopeRequiredByApi);
            return await _userApiClientService.GetApiDataAsync();
        }
    }
}

The service uses the IHTTPClientFactory to manage the HttpClient connections. The ITokenAcquisition interface is used to get the access tokens for the downstream API using the correct scope. The downstream APIs are implemented to require a secret.

using Microsoft.Identity.Web;
using System;
using System.Collections.Generic;
using System.Net.Http;
using System.Net.Http.Headers;
using System.Text.Json;
using System.Threading.Tasks;

namespace BlazorAzureADWithApis.Server.Services
{
    public class UserApiClientService
    {
        private readonly IHttpClientFactory _clientFactory;
        private readonly ITokenAcquisition _tokenAcquisition;

        public UserApiClientService(
            ITokenAcquisition tokenAcquisition,
            IHttpClientFactory clientFactory)
        {
            _clientFactory = clientFactory;
            _tokenAcquisition = tokenAcquisition;
        }

        public async Task<IEnumerable<string>> GetApiDataAsync()
        {

            var client = _clientFactory.CreateClient();

            var scopes = new List<string> { "api://b2a09168-54e2-4bc4-af92-a710a64ef1fa/access_as_user" };
            var accessToken = await _tokenAcquisition.GetAccessTokenForUserAsync(scopes);

            client.BaseAddress = new Uri("https://localhost:44395");
            client.DefaultRequestHeaders.Authorization = new AuthenticationHeaderValue("Bearer", accessToken);
            client.DefaultRequestHeaders.Accept.Add(new MediaTypeWithQualityHeaderValue("application/json"));

            var response = await client.GetAsync("ApiForUserData");
            if (response.IsSuccessStatusCode)
            {
                var data = await JsonSerializer.DeserializeAsync<List<string>>(
                    await response.Content.ReadAsStreamAsync());

                return data;
            }

            throw new Exception("oh no...");
        }
    }
}

Blazor Client

The Blazor Client project implements the WASM UI. This project uses the Microsoft.Authentication.WebAssembly.Msal to authenticate against Azure AD.

<Project Sdk="Microsoft.NET.Sdk.BlazorWebAssembly">

  <PropertyGroup>
    <TargetFramework>net5.0</TargetFramework>
    <ServiceWorkerAssetsManifest>service-worker-assets.js</ServiceWorkerAssetsManifest>
  </PropertyGroup>

  <ItemGroup>
    <PackageReference Include="Microsoft.AspNetCore.Components.WebAssembly" Version="5.0.1" />
    <PackageReference Include="Microsoft.AspNetCore.Components.WebAssembly.DevServer" Version="5.0.1" PrivateAssets="all" />
    <PackageReference Include="Microsoft.Authentication.WebAssembly.Msal" Version="5.0.1" />
    <PackageReference Include="Microsoft.Extensions.Http" Version="5.0.0" />
    <PackageReference Include="System.Net.Http.Json" Version="5.0.0" />
  </ItemGroup>

  <ItemGroup>
    <ProjectReference Include="..\Shared\BlazorAzureADWithApis.Shared.csproj" />
  </ItemGroup>

  <ItemGroup>
    <ServiceWorker Include="wwwroot\service-worker.js" PublishedContent="wwwroot\service-worker.published.js" />
  </ItemGroup>

</Project>

The Program class builds the services for the WASM application in the static Main method. The scope which will be used to access the API for this WASM client is defined here. The IHttpClientFactory is used to create HttpClient instances for the API calls. The app.settings.json configuration is saved in the wwwroot folder. The BlazorAzureADWithApis.ServerAPI HttpClient uses the BaseAddressAuthorizationMessageHandler to add the access tokens in the Http Header for the API calls.

using Microsoft.AspNetCore.Components.WebAssembly.Authentication;
using Microsoft.AspNetCore.Components.WebAssembly.Hosting;
using Microsoft.Extensions.Configuration;
using Microsoft.Extensions.DependencyInjection;
using Microsoft.Extensions.Logging;
using System;
using System.Collections.Generic;
using System.Net.Http;
using System.Text;
using System.Threading.Tasks;

namespace BlazorAzureADWithApis.Client
{
    public class Program
    {
        public static async Task Main(string[] args)
        {
            var builder = WebAssemblyHostBuilder.CreateDefault(args);
            builder.RootComponents.Add<App>("#app");

            builder.Services.AddHttpClient("BlazorAzureADWithApis.ServerAPI", client => client.BaseAddress = new Uri(builder.HostEnvironment.BaseAddress))
                .AddHttpMessageHandler<BaseAddressAuthorizationMessageHandler>();

            // Supply HttpClient instances that include access tokens when making requests to the server project
            builder.Services.AddScoped(sp => sp.GetRequiredService<IHttpClientFactory>().CreateClient("BlazorAzureADWithApis.ServerAPI"));

            builder.Services.AddMsalAuthentication(options =>
            {
                builder.Configuration.Bind("AzureAd", options.ProviderOptions.Authentication);
                options.ProviderOptions.DefaultAccessTokenScopes.Add("api://2b50a014-f353-4c10-aace-024f19a55569/access_as_user");
            });

            await builder.Build().RunAsync();
        }
    }
}

The App.razor component defines how the application should login and the component to use for this.

<CascadingAuthenticationState>
    <Router AppAssembly="@typeof(Program).Assembly" PreferExactMatches="@true">
        <Found Context="routeData">
            <AuthorizeRouteView RouteData="@routeData" DefaultLayout="@typeof(MainLayout)">
                <NotAuthorized>
                    @if (!context.User.Identity.IsAuthenticated)
                    {
                        <RedirectToLogin />
                    }
                    else
                    {
                        <p>You are not authorized to access this resource.</p>
                    }
                </NotAuthorized>
            </AuthorizeRouteView>
        </Found>
        <NotFound>
            <LayoutView Layout="@typeof(MainLayout)">
                <p>Sorry, there's nothing at this address.</p>
            </LayoutView>
        </NotFound>
    </Router>
</CascadingAuthenticationState>

The RedirectToLogin component is used to redirect to the authentication provider, in our case Azure AD.

@inject NavigationManager Navigation
@using Microsoft.AspNetCore.Components.WebAssembly.Authentication
@code {
    protected override void OnInitialized()
    {
        Navigation.NavigateTo($"authentication/login?returnUrl={Uri.EscapeDataString(Navigation.Uri)}");
    }
}

A razor component can then be used to call the API client which uses the access token acquired from Azure AD. This uses the HttpClient which was defined in the Main method and uses the BaseAddressAuthorizationMessageHandler.

@page "/delegateduserapicall"
@using Microsoft.AspNetCore.Authorization
@using Microsoft.AspNetCore.Components.WebAssembly.Authentication
@attribute [Authorize]
@inject HttpClient Http

<h1>Data from Delegated User API</h1>

@if (apiData == null)
{
    <p><em>Loading...</em></p>
}
else
{
    <table class="table">
        <thead>
            <tr>
                <th>Data</th>
            </tr>
        </thead>
        <tbody>
            @foreach (var data in apiData)
            {
                <tr>
                    <td>@data</td>
                </tr>
            }
        </tbody>
    </table>
}

@code {
    private string[] apiData;

    protected override async Task OnInitializedAsync()
    {
        try
        {
            apiData = await Http.GetFromJsonAsync<string[]>("DelegatedUserApiCalls");
        }
        catch (AccessTokenNotAvailableException exception)
        {
            exception.Redirect();
        }
    }

}

Running the code

Start the three applications from Visual Studio and click the login link. A popup will open and you can login to Azure AD and give your consent for this client. Before this will work, you will need to setup your own Azure App registrations and set the configurations in the projects. Also add your user secret to the Blazor Server, User and Service API projects.

The API can be called using the acces token for this API. The delegated access token then calls the downstream API using the delegated acces token and the data is returned.

Links

https://docs.microsoft.com/en-us/aspnet/core/blazor/security

https://docs.microsoft.com/en-us/aspnet/core/blazor/security/webassembly/hosted-with-azure-active-directory

https://github.com/AzureAD/microsoft-authentication-library-for-dotnet/wiki

https://docs.microsoft.com/en-us/azure/active-directory/develop/scenario-protected-web-api-verification-scope-app-roles


Azure AD Access Token Lifetime Policy Management in ASP.NET Core

$
0
0

This article shows how the lifespan of access tokens can be set and managed in Azure AD using ASP.NET Core Razor pages with Microsoft Graph API and token lifetime policies. A TokenLifetimePolicy can be created for the whole tenant or used for specific Azure App Registrations.

Code: Azure AD Token Management

Posts in this series

App Registrations and Token Lifetime Policies

When creating Azure applications, you sometimes need to reduce the access token lifespan or increase this depending on your requirements. Normally this is set per Azure App registration and application. In Azure, token lifetime policies can be created for this purpose and applied or assigned to the different applications.

Only Azure App registrations with a SignInAudience of AzureADMyOrg or AzureADMultipleOrgs can be assigned a policy. An Azure App registration can only be assigned a single policy. If your application has a SignInAudience with the value AzureADandPersonalMicrosoftAccount, a policy cannot be assigned.

Setting up the Azure App registration

A private Azure App registration was created to manage and create the token policies. A secret is required to use this application. It would be good to require MFA for this type of application. The application requires three scopes from the delegated Graph API:

  • Policy.Read.All
  • Policy.ReadWrite.ApplicationConfiguration
  • Application.ReadWrite.All

Three Nuget packages are used to implement the Azure AD auth; Microsoft.Identity.Web, Microsoft.Identity.Web.MicrosoftGraphBeta and Microsoft.Identity.Web.UI.

The ConfigureServices uses the AddMicrosoftIdentityWebAppAuthentication method to authenticate with Azure AD and uses the Azure App registration setup for this application. The secret is added to the user secrets for the development and the rest in in the appsettings.json file.

public void ConfigureServices(IServiceCollection services)
{
	services.AddTransient<TokenLifetimePolicyGraphApiService>();
	services.AddHttpClient();

	services.AddOptions();

	services.AddMicrosoftIdentityWebAppAuthentication(Configuration)
		.EnableTokenAcquisitionToCallDownstreamApi()
		.AddInMemoryTokenCaches();

	services.AddRazorPages().AddMvcOptions(options =>
	{
		var policy = new AuthorizationPolicyBuilder()
			.RequireAuthenticatedUser()
			.Build();
		options.Filters.Add(new AuthorizeFilter(policy));
	}).AddMicrosoftIdentityUI();
}

The TokenLifetimePolicyGraphApiService service is used to access the Microsoft Graph API. In this example, the beta version is used. The ITokenAcquisition and the IHttpClientFactory interfaces are used to setup the service. The ITokenAcquisition is provided and setup in the Microsoft.Identity.Web package and is implemented like any other downstream API. The IHttpClientFactory is used to manage the HttpClient instances which is created for the API access in .NET.

public class TokenLifetimePolicyGraphApiService
{
	private readonly string graphUrl = 
		"https://graph.microsoft.com/beta";

	private readonly string[] scopesPolicy = new string[] {
			"Policy.Read.All", 
			"Policy.ReadWrite.ApplicationConfiguration" };

	private readonly string[] scopesApplications = new string[] {
			"Policy.Read.All", 
			"Policy.ReadWrite.ApplicationConfiguration", 
			"Application.ReadWrite.All" };


	private readonly ITokenAcquisition _tokenAcquisition;
	private readonly IHttpClientFactory _clientFactory;

	public TokenLifetimePolicyGraphApiService(
		ITokenAcquisition tokenAcquisition,
		IHttpClientFactory clientFactory)
	{
		_clientFactory = clientFactory;
		_tokenAcquisition = tokenAcquisition;
	}

The GetGraphClient method gets an access token for the defined scopes using the ITokenAcquisition interface and adds the access token to the GraphServiceClient instance using the DelegateAuthenticationProvider.

private async Task<GraphServiceClient> GetGraphClient(string[] scopes)
{
	var token = await _tokenAcquisition.GetAccessTokenForUserAsync(
	 scopes).ConfigureAwait(false);

	var client = _clientFactory.CreateClient();
	client.BaseAddress = new Uri(graphUrl);
	client.DefaultRequestHeaders.Accept.Add(new MediaTypeWithQualityHeaderValue("application/json"));

	GraphServiceClient graphClient = new GraphServiceClient(client)
	{
		AuthenticationProvider = new DelegateAuthenticationProvider(async (requestMessage) =>
		{
			requestMessage.Headers.Authorization = new AuthenticationHeaderValue("bearer", token);
		})
	};

	graphClient.BaseUrl = graphUrl;
	return graphClient;
}

CRUD access token lifetime policies

The Microsoft Graph API can be used to get, create, update and delete the policies. The Graph API .NET implementation provides classes to request most Azure resources. The TokenLifetimePolicies is used to get (Http GET request) the policies or a single policy using an Id.

public async Task<IPolicyRootTokenLifetimePoliciesCollectionPage> GetPolicies()
{
	var graphclient = await GetGraphClient(scopesPolicy).ConfigureAwait(false);

	return await graphclient
		.Policies
		.TokenLifetimePolicies
		.Request()
		.GetAsync()
		.ConfigureAwait(false);
}

public async Task<TokenLifetimePolicy> GetPolicy(string id)
{
	var graphclient = await GetGraphClient(scopesPolicy).ConfigureAwait(false);

	return await graphclient.Policies
		.TokenLifetimePolicies[id]
		.Request()
		.GetAsync()
		.ConfigureAwait(false);
}

The CreatePolicy method creates a new TokenLifetimePolicy. The Definition takes a list of strings and multiple definitions can be added. We will only create a single definition for AccessTokenLifetime types. The definition is a Json string. If the IsOrganizationDefault is true, this is a policy for the Azure AD tenant or directory.

public async Task<TokenLifetimePolicy> CreatePolicy(TokenLifetimePolicy tokenLifetimePolicy)
{
	var graphclient = await GetGraphClient(scopesPolicy).ConfigureAwait(false);

	//var tokenLifetimePolicy = new TokenLifetimePolicy
	//{
	//    Definition = new List<string>()
	//    {
	//        "{\"TokenLifetimePolicy\":{\"Version\":1,\"AccessTokenLifetime\":\"05:30:00\"}}"
	//    },
	//    DisplayName = "AppAccessTokenLifetimePolicy",
	//    IsOrganizationDefault = false
	//};

	return await graphclient
		.Policies
		.TokenLifetimePolicies
		.Request()
		.AddAsync(tokenLifetimePolicy)
		.ConfigureAwait(false);
}

The UpdatePolicy method uses the Id of the TokenLifetimePolicy and updates the values of the policy.

public async Task<TokenLifetimePolicy> UpdatePolicy(TokenLifetimePolicy tokenLifetimePolicy)
{
	var graphclient = await GetGraphClient(scopesPolicy).ConfigureAwait(false);

	return await graphclient
		.Policies
		.TokenLifetimePolicies[tokenLifetimePolicy.Id]
		.Request()
		.UpdateAsync(tokenLifetimePolicy)
		.ConfigureAwait(false);
}

The DeletePolicy method deletes the policy.

public async Task DeletePolicy(string policyId)
{
	var graphclient = await GetGraphClient(scopesPolicy).ConfigureAwait(false);

	await graphclient
		.Policies
		.TokenLifetimePolicies[policyId]
		.Request()
		.DeleteAsync()
		.ConfigureAwait(false);
}

Now the Razor pages can be implemented to use the Graph API service methods.

The Index Razor page uses the TokenLifetimePolicyGraphApiService to get all the policies and display these using a view DTO.

public class IndexModel : PageModel
{
	private readonly TokenLifetimePolicyGraphApiService _tokenLifetimePolicyGraphApiService;

	public IndexModel(TokenLifetimePolicyGraphApiService tokenLifetimePolicyGraphApiService)
	{
		_tokenLifetimePolicyGraphApiService = tokenLifetimePolicyGraphApiService;
	}

	public List<TokenLifetimePolicyDto> TokenLifetimePolicyDto { get; set; }

	public async Task OnGetAsync()
	{
		var policies = await _tokenLifetimePolicyGraphApiService.GetPolicies();
		TokenLifetimePolicyDto = policies.CurrentPage.Select(policy => new TokenLifetimePolicyDto
		{
			Definition = policy.Definition.FirstOrDefault(),
			DisplayName = policy.DisplayName,
			IsOrganizationDefault = policy.IsOrganizationDefault.GetValueOrDefault(),
			Id = policy.Id
		}).ToList();
	}
}

The policies are displayed using a HTML table and bootstrap 4.

@page
@model TokenManagement.Pages.AadTokenPolicies.IndexModel

@{
    ViewData["Title"] = "Index";
    Layout = "~/Pages/Shared/_Layout.cshtml";
}

<p>
    <a asp-page="Create"><i class="far fa-plus-square"></i> Create new TokenLifetimePolicy </a>
</p>
<table class="table">
    <thead class="thead-light">
        <tr>
            <th>
                @Html.DisplayNameFor(model => model.TokenLifetimePolicyDto[0].Definition)
            </th>
            <th>
                @Html.DisplayNameFor(model => model.TokenLifetimePolicyDto[0].DisplayName)
            </th>
            <th>
                @Html.DisplayNameFor(model => model.TokenLifetimePolicyDto[0].IsOrganizationDefault)
            </th>
            <th></th>
        </tr>
    </thead>
    <tbody>
        @foreach (var item in Model.TokenLifetimePolicyDto)
        {
            <tr>
                <td>
                    @Html.DisplayFor(modelItem => item.Definition)
                </td>
                <td>
                    @Html.DisplayFor(modelItem => item.DisplayName)
                </td>
                <td>
                    <input asp-for="@item.IsOrganizationDefault" disabled class="big_checkbox" />
                </td>
                <td>
                    <div class="form-group" style="width:140px">
                        <a asp-page="./Edit" asp-route-id="@item.Id"><i class="far fa-edit fa-2x"></i></a>
                        <a asp-page="./Details" asp-route-id="@item.Id"><i class="far fa-folder-open fa-2x"></i></a>
                        <a asp-page="./Delete" asp-route-id="@item.Id"><i class="far fa-trash-alt fa-2x"></i></a>
                    </div>
                </td>
            </tr>
        }
    </tbody>
</table>
	

The table uses font awesome icons to update, delete, create or view the details of a policy.

The Edit policy is implemented in a standard Razor page. The get method selects the policy using the Id and requests the data using the Graph API service. The Post method requests a policy post update.

public class EditModel : PageModel
    {
        private readonly TokenLifetimePolicyGraphApiService _tokenLifetimePolicyGraphApiService;

        public EditModel(TokenLifetimePolicyGraphApiService tokenLifetimePolicyGraphApiService)
        {
            _tokenLifetimePolicyGraphApiService = tokenLifetimePolicyGraphApiService;
        }

        [BindProperty]
        public TokenLifetimePolicyDto TokenLifetimePolicyDto { get; set; }

        public async Task<IActionResult> OnGetAsync(string id)
        {
            if (id == null)
            {
                return NotFound();
            }

            var policy = await _tokenLifetimePolicyGraphApiService.GetPolicy(id);
            TokenLifetimePolicyDto = new TokenLifetimePolicyDto
            {
                Definition = policy.Definition.FirstOrDefault(),
                DisplayName = policy.DisplayName,
                IsOrganizationDefault = policy.IsOrganizationDefault.GetValueOrDefault(),
                Id = policy.Id
            };

            if (TokenLifetimePolicyDto == null)
            {
                return NotFound();
            }
            return Page();
        }

        public async Task<IActionResult> OnPostAsync()
        {
            if (!ModelState.IsValid)
            {
                return Page();
            }

            // get existing
            var policy = await _tokenLifetimePolicyGraphApiService
				.GetPolicy(TokenLifetimePolicyDto.Id);
				
            var tokenLifetimePolicy = new TokenLifetimePolicy
            {
                Id = TokenLifetimePolicyDto.Id,
                Definition = new List<string>()
                {
                    TokenLifetimePolicyDto.Definition
                },
                DisplayName = TokenLifetimePolicyDto.DisplayName,
                IsOrganizationDefault = TokenLifetimePolicyDto.IsOrganizationDefault,
            };


            await _tokenLifetimePolicyGraphApiService.UpdatePolicy(tokenLifetimePolicy);

            return RedirectToPage("./Index");
        }
    }

The Edit Razor page can process the html form and update the policy.

Assigning Azure App registrations to policies

Now that a TokenLifetimePolicy can be managed for access tokens, the policies need to be assigned to Azure App registrations. An Azure App registration can only be assigned one policy and has to have a SignInAudience with a AzureADMyOrg or AzureADMultipleOrgs value.

The PolicyAppliesTo method is used to find all Azure App registrations where the policy has been assigned.

public async Task<IStsPolicyAppliesToCollectionWithReferencesPage> PolicyAppliesTo(string tokenLifetimePolicyId)
{
	var graphclient = await GetGraphClient(scopesPolicy).ConfigureAwait(false);

	var appliesTo = await graphclient
		.Policies
		.TokenLifetimePolicies[tokenLifetimePolicyId]
		.AppliesTo
		.Request()
		.GetAsync()
		.ConfigureAwait(false);

	return appliesTo;
}

The AssignTokenPolicyToApplicationUsingGraphId method uses the TokenLifetimePolicy Graph API id and assigns this policy to the application using the Azure App registration Graph Id.

public async Task AssignTokenPolicyToApplicationUsingGraphId(string applicationGraphId, string tokenLifetimePolicyId)
{
	var graphclient = await GetGraphClient(scopesApplications).ConfigureAwait(false);

	var policy = await GetPolicy(tokenLifetimePolicyId);

	await graphclient
		.Applications[applicationGraphId]
		.TokenLifetimePolicies
		.References
		.Request()
		.AddAsync(policy)
		.ConfigureAwait(false);
}

The RemovePolicyFromApplication method uses the Azure App registration AppId and removes the policy from the application. The AppId is the Id you would find in the Azure portal. The Microsoft Graph API Id for the application could also be used and would be better because it would save a HTTP request. If you were to adapt this service, you might be dealing with AppIds.

public async Task RemovePolicyFromApplication(string appId, string tokenLifetimePolicyId)
{
	var graphclient = await GetGraphClient(scopesApplications).ConfigureAwait(false);

	var app2 = await graphclient
		.Applications
		.Request()
		.Filter($"appId eq '{appId}'")
		.GetAsync()
		.ConfigureAwait(false);

	var id = app2[0].Id;

	await graphclient
		.Applications[id]
		.TokenLifetimePolicies[tokenLifetimePolicyId]
		.Reference
		.Request()
		.DeleteAsync()
		.ConfigureAwait(false);
}

The GetApplicationsSingleOrMultipleOrg method returns all the Azure App registrations in the tenant which have been or can be assigned a policy. The TokenLifetimePolicies is also returned.

public async Task<IGraphServiceApplicationsCollectionPage> GetApplicationsSingleOrMultipleOrg()
{
	var graphclient = await GetGraphClient(scopesApplications).ConfigureAwait(false);

	// AzureADMyOrg and AzureADMultipleOrgs
	return await graphclient
		.Applications
		.Request()
		.Expand("TokenLifetimePolicies")
		.Filter($"signInAudience eq 'AzureADMyOrg' or signInAudience eq 'AzureADMultipleOrgs'")
		.GetAsync()
		.ConfigureAwait(false);
}

The Details Razor Page uses the methods to remove a policy from an Azure App registration or view the applications which have been assigned the selected policy. From this page, new applications can be assigned to the policy.

public class DetailsModel : PageModel
{
	private readonly TokenLifetimePolicyGraphApiService _tokenLifetimePolicyGraphApiService;

	public DetailsModel(TokenLifetimePolicyGraphApiService tokenLifetimePolicyGraphApiService)
	{
		_tokenLifetimePolicyGraphApiService = tokenLifetimePolicyGraphApiService;
	}

	public TokenLifetimePolicyDto TokenLifetimePolicyDto { get; set; }

	public List<PolicyAssignedApplicationsDto> PolicyAssignedApplications { get; set; }

	public async Task<IActionResult> OnGetAsync(string id)
	{
		if (id == null)
		{
			return NotFound();
		}

		var policy = await _tokenLifetimePolicyGraphApiService.GetPolicy(id);
		TokenLifetimePolicyDto = new TokenLifetimePolicyDto
		{
			Definition = policy.Definition.FirstOrDefault(),
			DisplayName = policy.DisplayName,
			IsOrganizationDefault = policy.IsOrganizationDefault.GetValueOrDefault(),
			Id = policy.Id
		};

		if (TokenLifetimePolicyDto == null)
		{
			return NotFound();
		}

		var applications = await _tokenLifetimePolicyGraphApiService.PolicyAppliesTo(id);
		PolicyAssignedApplications = applications.CurrentPage.Select(app => new PolicyAssignedApplicationsDto
		{
			Id = app.Id,
			DisplayName = (app as Microsoft.Graph.Application).DisplayName,
			AppId = (app as Microsoft.Graph.Application).AppId,
			SignInAudience = (app as Microsoft.Graph.Application).SignInAudience

		}).ToList();
		return Page();
	}

	public async Task<IActionResult> OnPostAsync()
	{
		var appId = Request.Form["item.AppId"];
		var policyId = Request.Form["TokenLifetimePolicyDto.Id"];
		if (!ModelState.IsValid)
		{
			return Page();
		}

		await _tokenLifetimePolicyGraphApiService
			.RemovePolicyFromApplication(appId, policyId);

		return Redirect($"./Details?id={policyId}");
	}
}

The AssignNewApplicationToPolicyModel Razor page is used to assign new applications to the selected policy. A HTML bootstrap 4 drop down is created and only Azure App registrations which can be assigned a new policy are added to the list. The post method uses the AssignTokenPolicyToApplicationUsingGraphId service to assign the policy to the application.

using Microsoft.AspNetCore.Mvc;
using Microsoft.AspNetCore.Mvc.RazorPages;
using Microsoft.AspNetCore.Mvc.Rendering;
using System.Collections.Generic;
using System.Linq;
using System.Threading.Tasks;

namespace TokenManagement.Pages
{
    public class AssignNewApplicationToPolicyModel : PageModel
    {
        private readonly TokenLifetimePolicyGraphApiService _tokenLifetimePolicyGraphApiService;

        public AssignNewApplicationToPolicyModel(TokenLifetimePolicyGraphApiService tokenLifetimePolicyGraphApiService)
        {
            _tokenLifetimePolicyGraphApiService = tokenLifetimePolicyGraphApiService;
        }

        public TokenLifetimePolicyDto TokenLifetimePolicyDto { get; set; }

        public string ApplicationGraphId { get; set; }
        public List<SelectListItem> ApplicationOptions { get; set; }

        public async Task<IActionResult> OnGetAsync(string id)
        {
            if (id == null)
            {
                return NotFound();
            }

            var policy = await _tokenLifetimePolicyGraphApiService.GetPolicy(id);
            TokenLifetimePolicyDto = new TokenLifetimePolicyDto
            {
                Definition = policy.Definition.FirstOrDefault(),
                DisplayName = policy.DisplayName,
                IsOrganizationDefault = policy.IsOrganizationDefault.GetValueOrDefault(),
                Id = policy.Id
            };

            var singleAndMultipleOrgApplications = await _tokenLifetimePolicyGraphApiService.GetApplicationsSingleOrMultipleOrg();
            
            ApplicationOptions = singleAndMultipleOrgApplications.CurrentPage
                .Where(app => app.TokenLifetimePolicies != null && app.TokenLifetimePolicies.Count <=0)
                .Select(a =>
                    new SelectListItem
                    {
                        Value = a.Id,
                        Text = $"{a.DisplayName}" // AppId: {a.AppId}, 
                    }).ToList();

            if (TokenLifetimePolicyDto == null)
            {
                return NotFound();
            }
            return Page();
        }

        public async Task<IActionResult> OnPostAsync()
        {
            var applicationGraphId = Request.Form["ApplicationGraphId"];
            var policyId = Request.Form["TokenLifetimePolicyDto.Id"];
            if (!ModelState.IsValid)
            {
                return Page();
            }

            await _tokenLifetimePolicyGraphApiService
                .AssignTokenPolicyToApplicationUsingGraphId(applicationGraphId, policyId);

            return Redirect($"./Details?id={policyId}");
        }
    }
}

The view of the Razor page shows the details of the policy and the form with the drop down to assign a new application.

@page
@model TokenManagement.Pages.AssignNewApplicationToPolicyModel
@{
}

<div class="card bg-light mb-3">
    <div class="card-header">Token Lifetime Policy</div>
    <div class="card-body">
        <dl class="row">
            <dt class="col-sm-4">
                @Html.DisplayNameFor(model => model.TokenLifetimePolicyDto.Definition)
            </dt>
            <dd class="col-sm-8">
                @Html.DisplayFor(model => model.TokenLifetimePolicyDto.Definition)
            </dd>
            <dt class="col-sm-4">
                @Html.DisplayNameFor(model => model.TokenLifetimePolicyDto.DisplayName)
            </dt>
            <dd class="col-sm-8">
                @Html.DisplayFor(model => model.TokenLifetimePolicyDto.DisplayName)
            </dd>
            <dt class="col-sm-4">
                @Html.DisplayNameFor(model => model.TokenLifetimePolicyDto.IsOrganizationDefault)
            <dd class="col-sm-8">
                <input asp-for="TokenLifetimePolicyDto.IsOrganizationDefault" disabled class="big_checkbox" />
            </dd>
        </dl>
    </div>
</div>

<br />

<div class="card">
    <div class="card-body">
        <div class="alert alert-info" role="alert">
            Only <b>AzureADMyOrg</b> and <b>AzureADMultipleOrgs</b> Azure App registrations can be assigned a policy. An application can only be assigned a single policy.
            If your application is not in the drop down, it is already assigned, or is an <b>AzureADandPersonalMicrosoftAccount</b> Azure App registration.
            Check the <a asp-area="" asp-page="/AzureAppRegistrations">AAD App registrations</a> to see all.
        </div>
        <div class="row">
            <div class="col-md-12">
                <form method="post">
                    <div asp-validation-summary="ModelOnly" class="text-danger"></div>
                    <input type="hidden" asp-for="TokenLifetimePolicyDto.Id" />
                    <div class="form-group">
                        <label class="control-label">Select App registration</label>
                        <select asp-for="ApplicationGraphId" asp-items="Model.ApplicationOptions"
                                class="form-control">
                        </select>
                    </div>

                    <br />

                    <div class="form-group">
                        <button type="submit" class="btn btn-primary"><i class="fas fa-link"></i> Assign TokenLifetimePolicy to selected App registration</button>
                    </div>
                </form>
            </div>
        </div>
    </div>
</div>

The Razor page can then be used to assign new applications to the access token lifetime policy.

Testing

Now the policies and the applications can be tested. A policy of 30 mins is assigned to one of the Azure App registrations. The ASP.NET Core API application which uses this App registration is started and the Microsoft.Identity.Web Nuget package is used to get the access token.

var accessToken = await _tokenAcquisition
       .GetAccessTokenForUserAsync(new[] { scope });

The access token can be copied and viewed at jwt.ms as long as it’s not decrypted. The token has a lifespan of 35 minutes. The 30 minutes we set in the policy and 5 mins which azure AD adds itself to all tokens issued.

Now using this, the access tokens lifespan can be controlled for you Azure AD applications. You want to keep the access tokens as short as possible for example when using SPA applications like Angular, react or Blazor.

Links

https://docs.microsoft.com/en-us/azure/active-directory/develop/active-directory-configurable-token-lifetimes#configurable-token-lifetime-properties

https://stackoverflow.com/questions/65278010/how-to-set-the-access-token-lifetime-for-an-app-using-the-microsoft-graph-api

https://docs.microsoft.com/en-us/graph/api/tokenlifetimepolicy-post-tokenlifetimepolicies?view=graph-rest-1.0&tabs=http

https://docs.microsoft.com/en-us/graph/api/serviceprincipal-post-claimsmappingpolicies?view=graph-rest-1.0&tabs=http

https://github.com/AzureAD/microsoft-identity-web

Protecting legacy APIs with an ASP.NET Core Yarp reverse proxy and Azure AD OAuth

$
0
0

This article shows how a legacy API could be protected using an ASP.NET Core Yarp reverse proxy and Azure AD OAuth. The security is implemented using Azure AD and Microsoft.Identity.Web. Sometimes it is not possible to update an existing or old API within a reasonable price and the financially best way to use it in a public domain or using modern security is to use a reverse proxy and isolate the API through the proxy. Securing the API directly would always be the best solution if this is possible.

Code: https://github.com/damienbod/AspNetCoreYarp

Setup

The Yarp ASP.NET Core application uses the Microsoft.Identity.Web Nuget package to secure the reverse proxy and if a HTTP request has a valid access token, the HTTP request is forwarded to the legacy API. To test the reverse proxy, a simple ASP.NET Core Razor page application is used to authenticate against Azure AD, to get an access token using the ITokenAcquisition interface and use the access token to access the reverse proxy API.

ASP.NET Core Yarp reverse proxy

To implement the reverse proxy and secure it using the Azure AD IdentityProvider, we use two Nuget packages, Microsoft.ReverseProxy and Microsoft.Identity.Web.

<Project Sdk="Microsoft.NET.Sdk.Web">

  <PropertyGroup>
    <TargetFramework>net5.0</TargetFramework>
  </PropertyGroup>

  <ItemGroup>
    <PackageReference Include="Microsoft.ReverseProxy" 
        Version="1.0.0-preview.7.20562.2" />
    <PackageReference Include="Microsoft.Identity.Web" Version="1.4.1" />
  </ItemGroup>

</Project>

In the Startup class of the ASP.NET Core Web application, the AddReverseProxy extension method is used to add the Yarp reverse proxy. The AddMicrosoftIdentityWebApiAuthentication adds the security bits for the JWT Bearer token auth using Azure AD and Azure App registrations.

public void ConfigureServices(IServiceCollection services)
{
	services.AddMicrosoftIdentityWebApiAuthentication(Configuration);

	services.AddReverseProxy()
		.LoadFromConfig(Configuration.GetSection("ReverseProxy"));
}

The Yarp reverse proxy is added to the Configure method like any other middleware or endpoints. The authentication and authorization middleware is added before the endpoints and after the routing.

public void Configure(IApplicationBuilder app)
{
	app.UseRouting();

	app.UseAuthentication();
	app.UseAuthorization();

	app.UseEndpoints(endpoints =>
	{
		endpoints.MapReverseProxy();
	});
}

The configuration for the reverse proxy is added in the app.settings. This could also be added as code configuation. In this demo, one specific route is setup. The “/api/crazy” is used to map the HTTP requests to the cluster1. This route uses the default authorization as only one default JWT Bearer auth is setup. The cluster1 forwards requests to the legacy API, which in this demo is the localhost with the port 44316.

"ReverseProxy": {
	"Routes": [
	  {
		"RouteId": "route1",
		"ClusterId": "cluster1",
		"AuthorizationPolicy": "Default",
		"Match": {
		  "Path": "/api/crazy"
		}
	  }
	],
	"Clusters": {
	  "cluster1": {
		"Destinations": {
		  "cluster1/destination1": {
			"Address": "https://localhost:44316/"
		  }
		}
	  }
	}
},

The Microsoft.Identity.Web package uses the AzureAd configuration like in the documentation.

 "AzureAd": {
    "Instance": "https://login.microsoftonline.com/",
    "Domain": "your domain",
    "TenantId": "your tenant id",
    "ClientId": "your app registration client id"
  }

The legacy APIs should match the reverse proxy configuration. This demo using the api/crazy route.

Testing ASP.NET Core Client

To test the reverse proxy with authentication, a ASP.NET Core Razor page UI was implemented. This project authenticates against Azure AD using an Azure App registration. The ITokenAcquisition is then used to acquire a token for the proxy. A HttpClient sends a GET request to the API. All goes good, the data is returned. The UI application only knows the proxy URL.

private readonly IHttpClientFactory _clientFactory;
private readonly ITokenAcquisition _tokenAcquisition;
private readonly IConfiguration _configuration;

public LegacyViaProxyService(IHttpClientFactory clientFactory, 
	ITokenAcquisition tokenAcquisition, 
	IConfiguration configuration)
{
	_clientFactory = clientFactory;
	_tokenAcquisition = tokenAcquisition;
	_configuration = configuration;
}

public async Task<JArray> GetApiDataAsync()
{
	try
	{
		var client = _clientFactory.CreateClient();

		var scope = _configuration["AspNetCoreProxy:ScopeForAccessToken"];
		var accessToken = await _tokenAcquisition.GetAccessTokenForUserAsync(new[] { scope });

		client.BaseAddress = new Uri(_configuration["AspNetCoreProxy:ApiBaseAddress"]);
		client.DefaultRequestHeaders.Authorization = new AuthenticationHeaderValue("Bearer", accessToken);
		client.DefaultRequestHeaders.Accept.Add(new MediaTypeWithQualityHeaderValue("application/json"));

		var response = await client.GetAsync("api/crazy");
		if (response.IsSuccessStatusCode)
		{
			var responseContent = await response.Content.ReadAsStringAsync();
			var data = JArray.Parse(responseContent);

			return data;
		}

		throw new ApplicationException($"Status code: {response.StatusCode}, Error: {response.ReasonPhrase}");
	}
	catch (Exception e)
	{
		throw new ApplicationException($"Exception {e}");
	}
}

The ASP.NET Core Razor page UI project initializes the authentication using the AddMicrosoftIdentityWebAppAuthentication method and the EnableTokenAcquisitionToCallDownstreamApi method .

public void ConfigureServices(IServiceCollection services)
{
	services.AddTransient<LegacyViaProxyService>();
	services.AddHttpClient();

	services.AddOptions();

	string[] initialScopes = Configuration.GetValue<string>(
          "AspNetCoreProxy:ScopeForAccessToken")?.Split(' ');

	services.AddMicrosoftIdentityWebAppAuthentication(Configuration)
		.EnableTokenAcquisitionToCallDownstreamApi(initialScopes)
		.AddInMemoryTokenCaches();

The Azure AD settings are added to the app.settings. The ClientSecret is required so that the application can be validated. The ClientSecret is added to the user secrets of the project in Visual Studio.

"AzureAd": {
    "Instance": "https://login.microsoftonline.com/",
    "Domain": "your domain",
    "TenantId": "your tenant id",
    "ClientId": "your app registration client id"
    "CallbackPath": "/signin-oidc",
    "SignedOutCallbackPath ": "/signout-callback-oidc",
    //"ClientSecret": "your secret from your user secrets.."
},
"AspNetCoreProxy": {
    "ScopeForAccessToken": "api://your app registration client id for api/access_as_user",
    "ApiBaseAddress": "https://localhost:44345"
},

When all three applications are started, if you open the proxy with the correct address, a 401 is returned. This is what we want.

If the UI application logs into Azure AD and sends a HTTP request to the Yarp reverse proxy, the data from the legacy API is returned. Now the legacy app can be isolated and only made only visible to the proxy service.

Yarp is in preview and looks really promising. It fulfils many other use cases, typical to a reverse proxy. Go check out the yarp github repo and try it out. Here’s a link to the getting started documentation.

Links:

https://microsoft.github.io/reverse-proxy/articles/getting_started.html

https://github.com/microsoft/reverse-proxy

Introducing YARP Preview 1

https://channel9.msdn.com/Shows/On-NET/YARP-The-NET-Reverse-proxy

https://github.com/AzureAD/microsoft-identity-web/wiki

Using ASP.NET Core Controllers and Razor Pages from a separate shared project or assembly

$
0
0

This post shows how to use shared projects or shared assemblies for ASP.NET Core API Controllers or ASP.NET Core Razor Pages. Sometimes shared logic for different ASP.NET Web API or Web App projects can be implemented in a shared project. The shared project controllers, Razor Pages, services can be referenced and used in the host web application.

Code: https://github.com/damienbod/SharedAspNetCore

Using ASP.NET Core Controllers from a shared project

Using shared API Controllers in ASP.NET Core is fairly simple. To set this up, a .NET 5 class library was created to implement the shared Controllers for the ASP.NET Core API. The FrameworkReference Microsoft.AspNetCore.App is required and the Swashbuckle.AspNetCore Nuget package was added for the API definitions in the Controller.

<Project Sdk="Microsoft.NET.Sdk">

  <PropertyGroup>
    <OutputType>Library</OutputType>
    <TargetFramework>net5.0</TargetFramework>
  </PropertyGroup>

  <ItemGroup>
    <FrameworkReference Include="Microsoft.AspNetCore.App" />
  </ItemGroup>

  <ItemGroup>
    <PackageReference Include="Swashbuckle.AspNetCore" Version="5.6.3" />
  </ItemGroup>
</Project>

The shared Controller was implemented using the ControllerBase class and the ApiController attribute. The controller uses a scoped service to get the data.

[ApiController]
[Route("[controller]")]
public class SharedApiController : ControllerBase
{
	private readonly ILogger<SharedApiController> _logger;
	private readonly SomeSharedService _someSharedService;

	public SharedApiController(SomeSharedService someSharedService,
		ILogger<SharedApiController> logger)
	{
		_logger = logger;
		_someSharedService = someSharedService;
	}

	[HttpGet]
	public ActionResult<string> Get()
	{ 
		return Ok(_someSharedService.GetData());
	}
}

The SharedApiExtensions class is used to add all services to the IoC for the shared project. The extension method just adds a scoped service SomeSharedService.

public static class SharedApiExtensions
{

	public static IServiceCollection AddSharedServices(
		this IServiceCollection services)
	{
		services.AddScoped<SomeSharedService>();

		return services;
	}
} 

The project was then added to the host Web API project as a project reference.

The ConfigureServices method of the host web application is used to call the AddSharedServices extension method and add the services to the IoC.

public void ConfigureServices(IServiceCollection services)
{

	services.AddControllers();
	services.AddSwaggerGen(c =>
	{
		c.SwaggerDoc("v1", new OpenApiInfo { 
			Title = "AspNetCoreApi", Version = "v1" });
	});

	services.AddSharedServices();
}

When the application is started, the Controller from the shared project can be used. The Controller is discovered and no further code configuration is required which is pretty cool.

Using Razor Pages from a Shared Project

Using Razor Pages from a shared project is slightly different. You can create a Razor class library for the shared UI elements. This is a project of type Microsoft.NETSdk.Razor. The project again includes the FrameworkReference Microsoft.AspNetCore.App.

<Project Sdk="Microsoft.NET.Sdk.Razor">

  <PropertyGroup>
    <TargetFramework>net5.0</TargetFramework>
    <AddRazorSupportForMvc>true</AddRazorSupportForMvc>
  </PropertyGroup>

  <ItemGroup>
    <FrameworkReference Include="Microsoft.AspNetCore.App" />
  </ItemGroup>
  
</Project>

When creating a Razor class library for Razor Pages in Visual Studio, you must check the checkbox Support pages and views.

The shared Razor Pages can be added as required inside the shared project. The example Razor Page uses a service to get the data.

namespace SharedRazorPages.MyFeature.Pages
{
    public class Page1Model : PageModel
    {
        private readonly SomeSharedPageService _someSharedPageService;

        public Page1Model(SomeSharedPageService someSharedPageService)
        {
            _someSharedPageService = someSharedPageService;
        }

        public List<string> Data = new List<string>();

        public void OnGet()
        {
            Data = _someSharedPageService.GetData();
        }
    }
}

A _ViewStart.cshtml is required so that the default layout page can be used or a specific layout for the Razor Pages inside thed shared project.

@{
    Layout = "_Layout";
}

The SharedRazorPagesExtensions is used to register all the services required inside the shared project. The static class uses just one single scoped service.

using Microsoft.Extensions.DependencyInjection;
using SharedRazorPages.Services;

namespace SharedRazorPages
{
    public static class SharedRazorPagesExtensions
    {
    
        public static IServiceCollection AddSharedRazorPagesServices(
           this IServiceCollection services)
        {
            services.AddScoped<SomeSharedPageService>();

            return services;
        }
    }  
}

The AddSharedRazorPagesServices extension method can then be used in the host ASP.NET Core Razor Page application to add the services and the UI items from the shared project can be used.

public void ConfigureServices(IServiceCollection services)
{
	services.AddRazorPages();

	services.AddSharedRazorPagesServices();
}

When the application is run, the view can use either Razor Pages from the shared project, or it’s own.

ASP.NET Core supports other UI elements like static files, typescript and so on which can also be implemented inside a shared assembly, project. See the Microsoft docs for details.

Links:

https://docs.microsoft.com/en-us/aspnet/core/razor-pages/ui-class

https://docs.microsoft.com/en-us/aspnet/core/fundamentals/dependency-injection

https://docs.microsoft.com/en-us/aspnet/core/mvc/advanced/app-parts

ASP .NET Core code sharing between Blazor, MVC and Razor Pages

Implement OAUTH Device Code Flow with Azure AD and ASP.NET Core

$
0
0

The post shows how the Device Code flow (RFC 8628) could be implemented in an ASP.NET Core web application which uses Azure AD as an identity provider. An Azure App registration is used to setup the client. This solution would be useful for input constrained devices which have a browser and need to authenticate identities.

Code: Device Code Flow with Azure AD

When or why use this flow?

The OAuth Device code flow is a good solution for authentication when the client has input constraints or only a console. As an example, this solution would work really well on a game console, a TV, industrial machine PC, or a layer 7 gateway.

Create the Azure App Registration

The Azure App registration is setup in the tenant or the directory for Mobile and desktop applications. This is a public client which requires no secret. For testing, the localhost redirect url was added.

The Allow public client flows option is set to yes. The Device code flow is supported in Azure AD with this Azure App registration configuration.

In the API permissions, the required scopes are added. The standard scopes, email, openid and profile are added. These can be added from the Graph settings in the delegated scopes. Only delegated scopes are used for the public client.

Azure AD is now configured and setup to support the OAuth Device code flow, RFC 8628. The clientId and the tenantId are required to configure the client which uses this app registration.

Setup the Device Code flow client

The client can be implemented using different Nuget packages, or even completely implemented yourself. The specifications for this are an RFC and is simple to follow. I would recommend using a client Nuget package or library and not implement this yourself. This demo uses the IdentityModel Nuget package to support the flow. The client UI is implemented using an ASP.NET Core Razor page web application and some javascript packages. The Microsoft.AspNetCore.Authentication.OpenIdConnect Nuget package is also required.

<ItemGroup>
  <PackageReference 
    Include="Microsoft.AspNetCore.Authentication.OpenIdConnect" 
    Version="5.0.2" />
  <PackageReference Include="IdentityModel" Version="5.0.0" />
</ItemGroup>

The startup class or the ASP.NET Core Razor page application uses the ConfigureServices to setup the services. A session is used as well as the specific implementation services. After the application has received an authenticated identity from Azure AD, the data for this identity is stored in a cookie. The cookie stores the claims and the tokens returned from the Azure AD identity provider.

public void ConfigureServices(IServiceCollection services)
{
	// ... 

	services.AddScoped<DeviceFlowService>();
	services.AddScoped<AuthenticationSignInService>();
	services.AddHttpClient();
	services.Configure<AzureAdConfiguration>(
	   Configuration.GetSection("AzureAd"));

	services.AddSession(options =>
	{
		options.IdleTimeout = TimeSpan.FromSeconds(60);
		options.Cookie.HttpOnly = true;
	});

	services.AddAuthentication(options =>
	{
		options.DefaultScheme = 
		   CookieAuthenticationDefaults.AuthenticationScheme;
	})
	.AddCookie();

	services.AddAuthorization();
	services.AddSingleton<IHttpContextAccessor, HttpContextAccessor>();

	services.AddRazorPages();
}

The Configure method configures the middleware like any other ASP.NET Core Razor page application with authentication. The seesion middleware is also applied.

public void Configure(IApplicationBuilder app, IWebHostEnvironment env)
{
	app.UseStaticFiles();
	app.UseCookiePolicy();
	app.UseSession();

	app.UseStaticFiles();

	app.UseRouting();

	app.UseAuthentication();
	app.UseAuthorization();

	app.UseEndpoints(endpoints =>
	{
		endpoints.MapRazorPages();
	});
}

Implement the Device code flow client

Azure AD requires an instance, tenantId and a clientId to setup the configuration for the device code client. I based this on the Microsoft.Identity.Web configurations.

{
  "AzureAd": {
    "Instance": "https://login.microsoftonline.com/",
    "TenantId": "7ff95b15-dc21-4ba6-bc92-824856578fc1",
    "ClientId": "f81baf3d-f8f3-4976-8b5a-798ff57daab5"
  },
}

The DiscoveryDocumentRequest class from the IdentityModel nuget package is used to request the well-known endpoints of the Azure AD tenant. The endpoint validation is disabled because Azure AD uses different domains.

private readonly AzureAdConfiguration _azureAdConfiguration;
private readonly IHttpClientFactory _clientFactory;
private readonly DiscoveryDocumentRequest _discoveryDocumentRequest;

public DeviceFlowService(IOptions<AzureAdConfiguration> azureAdConfiguration, 
	IHttpClientFactory clientFactory)
{
	_azureAdConfiguration = azureAdConfiguration.Value;
	_clientFactory = clientFactory;
	var idpEndpoint = $"{_azureAdConfiguration.Instance}{_azureAdConfiguration.TenantId}/v2.0";
	_discoveryDocumentRequest = new DiscoveryDocumentRequest
	{
		Address = idpEndpoint,
		Policy = new DiscoveryPolicy
		{
			// turned off => Azure AD uses different domains.
			ValidateEndpoints = false
		}
	};
}

To begin the authorization process, like in the RFC 8628, a device code is requested using the RequestDeviceAuthorizationAsync method. This requests a device code and some other information to request the access token and id_token on a separate device where you can use strong authentication or whatever.

public async Task<DeviceAuthorizationResponse> GetDeviceCode()
{
	var client = _clientFactory.CreateClient();

	var disco = await HttpClientDiscoveryExtensions
		.GetDiscoveryDocumentAsync(client, _discoveryDocumentRequest);

	if (disco.IsError)
	{
		throw new ApplicationException($"Status code: {disco.IsError},
		  Error: {disco.Error}");
	}

	var deviceAuthorizationRequest = new DeviceAuthorizationRequest
	{
		Address = disco.DeviceAuthorizationEndpoint,
		ClientId = _azureAdConfiguration.ClientId
	};
	deviceAuthorizationRequest.Scope = "email profile openid";
	var response = await client.RequestDeviceAuthorizationAsync(deviceAuthorizationRequest);

	if (response.IsError)
	{
		throw new Exception(response.Error);
	}

	return response;
}

The PollTokenRequests method uses the device code and polls the identity provider/ secure token server until it receives a valid token or times out. While this is running, the user can open the link provided and enter the code plus the required authentication for the identity. The user can use strong authentication with MFA, FIDO2 and so on. After a successful authentication, the tokens are returned to the application.

public async Task<TokenResponse> PollTokenRequests(string deviceCode, int interval)
{
	var client = _clientFactory.CreateClient();

	var disco = await HttpClientDiscoveryExtensions
	   .GetDiscoveryDocumentAsync(client, _discoveryDocumentRequest);

	if (disco.IsError)
	{
		throw new ApplicationException($"Status code: {disco.IsError},
     		Error: {disco.Error}");
	}

	while (true)
	{
		if(!string.IsNullOrWhiteSpace(deviceCode))
		{
			var response = await client
			  .RequestDeviceTokenAsync(new DeviceTokenRequest
			{
				Address = disco.TokenEndpoint,
				ClientId = _azureAdConfiguration.ClientId,
				DeviceCode = deviceCode
			});

			if (response.IsError)
			{
				if (response.Error == "authorization_pending" 
				  || response.Error == "slow_down")
				{
					Console.WriteLine($"{response.Error}...waiting.");
					await Task.Delay(interval * 1000);
				}
				else
				{
					throw new Exception(response.Error);
				}
			}
			else
			{
				return response;
			}
		}
		else
		{
			await Task.Delay(interval * 1000);
		}
	}
}

The LoginModel Razor page uses the scoped services and provides a UI to initialize the device code flow process.

using System.Threading.Tasks;
using Microsoft.AspNetCore.Authentication;
using Microsoft.AspNetCore.Authentication.Cookies;
using Microsoft.AspNetCore.Http;
using Microsoft.AspNetCore.Mvc;
using Microsoft.AspNetCore.Mvc.RazorPages;

namespace DeviceFlowWeb.Pages
{
    public class LoginModel : PageModel
    {
        private readonly DeviceFlowService _deviceFlowService;
        private readonly AuthenticationSignInService _authenticationSignInService;

        public string AuthenticatorUri { get; set; }

        public string UserCode { get; set; }

        public LoginModel(DeviceFlowService deviceFlowService, AuthenticationSignInService authenticationSignInService)
        {
            _deviceFlowService = deviceFlowService;
            _authenticationSignInService = authenticationSignInService;
        }

        public async Task OnGetAsync()
        {
            HttpContext.Session.SetString("DeviceCode", string.Empty);

            await HttpContext.SignOutAsync(CookieAuthenticationDefaults.AuthenticationScheme);

            var deviceAuthorizationResponse = await _deviceFlowService.GetDeviceCode();
            AuthenticatorUri = deviceAuthorizationResponse.VerificationUri;
            UserCode = deviceAuthorizationResponse.UserCode;

            if (string.IsNullOrEmpty(HttpContext.Session.GetString("DeviceCode")))
            {
                HttpContext.Session.SetString("DeviceCode", deviceAuthorizationResponse.DeviceCode);
                HttpContext.Session.SetInt32("Interval", deviceAuthorizationResponse.Interval);
            }
        }

        public async Task<IActionResult> OnPostAsync()
        {
            var deviceCode = HttpContext.Session.GetString("DeviceCode");
            var interval = HttpContext.Session.GetInt32("Interval");

            if(interval.GetValueOrDefault() <= 0)
            {
                interval = 5;
            }

            var tokenresponse = await _deviceFlowService.PollTokenRequests(deviceCode, interval.Value);

            if (tokenresponse.IsError)
            {
                ModelState.AddModelError(string.Empty, "Invalid login attempt.");
                return Page();
            }

            await _authenticationSignInService.SignIn(HttpContext,
                tokenresponse.AccessToken, 
                tokenresponse.IdentityToken,
                tokenresponse.ExpiresIn);

            return Redirect("/Index");
        }

    }
}

The Razor page template displays the data and also a QR code of the link to enter the code. This would be useful as the user would for example use a mobile phone to complete the authentication process.

@page
@model DeviceFlowWeb.Pages.LoginModel
@{
    ViewData["Title"] = "Login";
    Layout = "~/Pages/Shared/_Layout.cshtml";
}


Login: <p>@Model.AuthenticatorUri</p>

<br /><br />

User Code: <p>@Model.UserCode</p>
<br />
<br />

<div id="qrCode"></div>
<div id="qrCodeData" data-url="@Html.Raw(Model.AuthenticatorUri)"></div>

<br />
<br />

<form data-ajax="true"  method="post" data-ajax-method="POST">
    <button class="btn btn-secondary" 
            name="begin_token_check" 
            id="begin_token_check" type="submit" style="visibility:hidden">Get device code</button>
</form>

@section scripts {
<script src="~/js/qrcode.min.js"></script>
<script type="text/javascript">
        new QRCode(document.getElementById("qrCode"),
            {
                text: "@Html.Raw(Model.AuthenticatorUri)",
                width: 150,
                height: 150
            });

    $(document).ready(() => {
        document.getElementById('begin_token_check').click();
    });

</script>
}

After a successful authentication, the tokens are added to a cookie. The claims from the id_token are added to the claims principal and the access token is also added. The identity is then signed-in and the token is sent with each request from the client browser to the server until it expires.

public async Task SignIn(HttpContext httpContext, 
   string accessToken, string idToken, int expiresIn)
{
	var claims = GetClaims(idToken);

	var claimsIdentity = new ClaimsIdentity(
		claims,
		CookieAuthenticationDefaults.AuthenticationScheme,
		"name",
		"user");

	var authProperties = new AuthenticationProperties();
	authProperties.ExpiresUtc = DateTime.UtcNow.AddSeconds(expiresIn);

	// save the tokens in the cookie
	authProperties.StoreTokens(new List<AuthenticationToken>
	{
		new AuthenticationToken
		{
			Name = "access_token",
			Value = accessToken
		},
		new AuthenticationToken
		{
			Name = "id_token",
			Value = idToken
		}
	});

	await httpContext.SignInAsync(
		CookieAuthenticationDefaults.AuthenticationScheme,
		new ClaimsPrincipal(claimsIdentity),
		authProperties);
}

private IEnumerable<Claim> GetClaims(string token)
{
	var validJwt = new JwtSecurityToken(token);
	return validJwt.Claims;
}

Now the application can be started and everything should work. You would need to add an App registration to your tenant and change the configuration to match to run this yourself.

Implementing the device code is really simple and made easy by using the IdentityModel nuget package. Azure Microsoft also provides its own client library with support for the device code flow. Maybe in a follow up post, I will implement a client using this and add an API to acces data.

Links

https://docs.microsoft.com/en-us/azure/active-directory/develop/v2-oauth2-device-code

https://tools.ietf.org/wg/oauth/draft-ietf-oauth-device-flow/

https://damienbod.com/2019/02/20/asp-net-core-oauth-device-flow-client-with-identityserver4/

https://github.com/Azure-Samples/active-directory-dotnetcore-devicecodeflow-v2

https://docs.microsoft.com/en-us/aspnet/core/security/authentication/cookie

https://github.com/AzureAD/microsoft-authentication-library-for-dotnet/wiki/Device-Code-Flow

Implement app roles authorization with Azure AD and ASP.NET Core

$
0
0

This post shows how to implement Azure AD App roles and applied to users or groups in Azure AD. The roles are used in an ASP.NET Core Razor page application as well as a ASP.NET Core API. The roles from the access token and the id token are used to authorize the identity which is authenticated.

Code: App roles

Create an Azure App registration for Web APP

In this example, a web application will implement authentication and will use a second ASP.NET Core application which implements the user API. Two Azure AD App registrations are created for this, one for each application.

The ASP.NET Core Razor page application is a client which can be authenticated, as well as the identity using the application. It has a trusted back end which can keep a secret. The Azure AD App registration uses a standard web application with a client secret. You could also use a certificate instead of a secret to authenticate the client.

App roles are added to the App registration for the UI client. These roles are used in the UI application which are returned in a user data profile request or in the id token, depending how your client implemented the OIDC standard.

Three roles were added to the Azure AD App registration using the App roles | preview blade.

The roles could also be added directly in the manifest json file.

"appRoles": [
{
	"allowedMemberTypes": [
		"User"
	],
	"description": "web app admin role",
	"displayName": "web-app-role-admin",
	"id": "3731c162-330a-412d-8b2f-7b0fe1bc7150",
	"isEnabled": true,
	"lang": null,
	"origin": "Application",
	"value": "web-app-role-admin"
},
{
	"allowedMemberTypes": [
		"User"
	],
	"description": "web app student role",
	"displayName": "web-app-role-student",
	"id": "53b2db3e-fb5e-484a-a294-4f68bbc543c8",
	"isEnabled": true,
	"lang": null,
	"origin": "Application",
	"value": "web-app-role-student"
},
{
	"allowedMemberTypes": [
		"User"
	],
	"description": "web app user role",
	"displayName": "web-app-role-user",
	"id": "9c2bae5f-8347-410a-a1bf-cd2ee0e4bb49",
	"isEnabled": true,
	"lang": null,
	"origin": "Application",
	"value": "web-app-role-user"
}
],

The API permissions are setup to include the scope created in the API Azure AD App registration. The standard OIDC scopes are added to the registration. All scopes are delegated scopes.

Create an Azure App registration for Web API

The App registration used for the API implements NO authentication flows. This App registration exposes an API and defines roles for the API project authorization. An access_as_user scope is added to the Azure App registration which is a delegated scope type.

Three roles were added to the Azure AD App registration for the API. These roles are for the API and will be added to the access token if the identity has been assigned the roles in the enterprise application of the Azure AD directory. The roles could also be added directly in the manifest.

Apply roles in Azure AD enterprise applications

The new roles which were defined in the Azure AD App registration can now be used. This is setup in the Enterprise application blade of the Azure AD directory. In the Enterprise application list, select the App registration for the API. New users or groups can be added here, and the roles can then be assigned.

In the Add user/group a user or a group can be selected (! Groups can only be selected if you have the correct license) and the roles which were created in the Azure AD App registration can be applied.

If creating applications for tenants with lots of users, groups would be used.

Implement ASP.NET Core API

The API is implemented in ASP.NET Core. The startup class is used to setup the authorization of the access tokens. The Microsoft.Identity.Web Nuget package is used for this. This application configuration will match the configuration of the Azure AD App registration setup for the API. The AddMicrosoftIdentityWebApiAuthentication method is used for this.

ASP.NET Core adds namespaces per default to the claims which are extracted from the access token. We do not want this and so disable the default claim mapping. The roles and the name can should also be mapped, as the default setting does not match what Azure AD returns in the token.

public void ConfigureServices(IServiceCollection services)
{
	JwtSecurityTokenHandler.DefaultInboundClaimTypeMap.Clear();
	// IdentityModelEventSource.ShowPII = true;

	// Adds Microsoft Identity platform (AAD v2.0) support to protect this Api
	services.AddMicrosoftIdentityWebApiAuthentication(Configuration);

	services.Configure<OpenIdConnectOptions>(
	   OpenIdConnectDefaults.AuthenticationScheme, options =>
	{
		// The claim in the Jwt token where App roles are available.
		options.TokenValidationParameters.RoleClaimType = "roles";
		options.TokenValidationParameters.NameClaimType = "name";
	});

Authorization is added for the API using the AddAuthorization method or it can be added global as a filter. The roles claims are mapped to policies which can then be enforced throughout the application. You could also do this directly using the roles property in the authorize attribute, but I prefer to use policies and separate the authorization. Only policies are used in the application.

A ValidateAccessTokenPolicy policy is implemented to do validation on the access token. The scp claim is validated for an access_as_user value as this is a user API for delegated access and not an application token. The azp claim is used to validate the client calling the API. The API is made specifically for the UI application and so we can validate that only access tokens created for the UI application can use this API. The azp claim is only sent in version 2 Azure App registrations. You must set this in the manifest.

The azpacr claim is also validated. Only authenticated clients can use this API. Any application which gets an access token for this API must use a secret as the value of “1” is controlled. This ensures that public clients cannot create access tokens for this API. If this was a value of “2”, only clients which used certificates to authenticate can acquire access tokens for this API.

It is good to validate the intended user, if possible.

services.AddAuthorization(policies =>
{
	policies.AddPolicy("p-web-api-with-roles-user", p => 
	{
		p.RequireClaim("roles","web-api-with-roles-user");
	});
	policies.AddPolicy("p-web-api-with-roles-student", p =>
	{
		p.RequireClaim("roles", "web-api-with-roles-student");
	});
	policies.AddPolicy("p-web-api-with-roles-admin", p =>
	{
		p.RequireClaim("roles", "web-api-with-roles-admin");
	});

	policies.AddPolicy("ValidateAccessTokenPolicy", validateAccessTokenPolicy =>
	{
		validateAccessTokenPolicy.RequireClaim("scp", "access_as_user");

		// Validate id of application for which the token was created
		// In this case the UI application 
		validateAccessTokenPolicy.RequireClaim("azp", "5c201b60-89f6-47d8-b2ef-9d9fe2a42751");

		// only allow tokens which used "Private key JWT Client authentication"
		// // https://docs.microsoft.com/en-us/azure/active-directory/develop/access-tokens
		// Indicates how the client was authenticated. For a public client, the value is "0". 
		// If client ID and client secret are used, the value is "1". 
		// If a client certificate was used for authentication, the value is "2".
		validateAccessTokenPolicy.RequireClaim("azpacr", "1");
	});
});

Authorization can also be added globally as a filter in the AddControllers. This would be applied to this middleware.

services.AddControllers(options =>
{
	// global
	var policy = new AuthorizationPolicyBuilder()
		.RequireAuthenticatedUser()
	   // disabled this to test with users that have no email (no license added)
	   // .RequireClaim("email") 
		.Build();
	options.Filters.Add(new AuthorizeFilter(policy));
});

The policies can then be applied in the API application as required. The access token used to access the API must fulfil all policies used on the API endpoint. If any single policy fails, the a 403 forbidden is returned.

using System.Collections.Generic;
using Microsoft.AspNetCore.Authorization;
using Microsoft.AspNetCore.Mvc;

namespace WebApiWithRoles.Controllers
{
    [Authorize(Policy = "p-web-api-with-roles-user")]
    [Authorize(Policy = "ValidateAccessTokenPolicy")]
    [ApiController]
    [Route("api/[controller]")]
    public class UserDataController : ControllerBase
    {
        [HttpGet]
        public IActionResult Get()
        {
            return Ok(new List<string> { "user data 1", "user data 2" });
        }
    }
}

Implement ASP.NET Core Razor Page APP

The ASP.NET Core Razor Page application uses an OIDC interactive flow to authenticate using Azure AD as the identity provider. Both the client application and the identity are authenticated. Microsoft.Identity.Web is used to implement the client code which uses Open ID connect. The AddMicrosoftIdentityWebAppAuthentication method is used in the Startup class in the ConfigureServices method. The downstream APIs are enabled as well as in memory cache. In memory cache is a bit of a problem with testing, as you need to delete the cookies in the browser manually after every test run. You can fix this by using a persistent cache. A filter is added so that an authenticated user is required.

public void ConfigureServices(IServiceCollection services)
{
	services.AddTransient<ClientApiWithRolesService>();
	services.AddHttpClient();

	services.AddOptions();

	string[] initialScopes = Configuration.GetValue<string>
		("ApiWithRoles:ScopeForAccessToken")?.Split(' ');

	services.AddMicrosoftIdentityWebAppAuthentication(Configuration)
		.EnableTokenAcquisitionToCallDownstreamApi(initialScopes)
		.AddInMemoryTokenCaches();

	services.AddRazorPages().AddMvcOptions(options =>
	{
		var policy = new AuthorizationPolicyBuilder()
			.RequireAuthenticatedUser()
			.Build();
		options.Filters.Add(new AuthorizeFilter(policy));
	}).AddMicrosoftIdentityUI();
}

The app.settings.json file contains the configurations for the Azure AD authentication of the application which uses the Microsoft.Identity.Web client. The ClientId from the Web APP App registration and the TenantId for the directory are added here. The ClientSecret also needs to be defined. This should be added to the user secrets in development or added to an Azure Key Vault if deploying to Azure. The ApiWithRoles configuration added the API scope and the URL for the API.

  "AzureAd": {
    "Instance": "https://login.microsoftonline.com/",
    "Domain": "damienbodhotmail.onmicrosoft.com",
    "TenantId": "7ff95b15-dc21-4ba6-bc92-824856578fc1",
    "ClientId": "5c201b60-89f6-47d8-b2ef-9d9fe2a42751",
    "CallbackPath": "/signin-oidc",
    "SignedOutCallbackPath ": "/signout-callback-oidc"
    // "ClientSecret": "in the user secrets, or a key vault"
  },
  "ApiWithRoles": {
    "ScopeForAccessToken": "api://5511b8d6-4652-4f2f-9643-59c61234e3c7/access_as_user",
    "ApiBaseAddress": "https://localhost:44323"
  },

The GetDataFromApi method calls the APIs. The UI application can call any one of the APIs, user, student or admin, each which required a different role. The policies were applied to these APIs. If an error is returned, the exception is handled and returned as a list to demonstrate. The ITokenAcquisition interface is used to get the access token from cache or from the Azure AD identity provider and the access token is added to the Authorization header of the HTTP request as a Bearer token.

private async Task<JArray> GetDataFromApi(string path)
{
	try
	{
		var client = _clientFactory.CreateClient();

		var scope = _configuration["ApiWithRoles:ScopeForAccessToken"];
		var accessToken = await _tokenAcquisition
			.GetAccessTokenForUserAsync(new[] { scope });

		client.BaseAddress = new Uri(
			_configuration["ApiWithRoles:ApiBaseAddress"]);
		client.DefaultRequestHeaders.Authorization = 
			new AuthenticationHeaderValue("Bearer", accessToken);
		client.DefaultRequestHeaders.Accept.Add(
			new MediaTypeWithQualityHeaderValue("application/json"));

		var response = await client.GetAsync($"api/{path}");
		if (response.IsSuccessStatusCode)
		{
			var responseContent = await response.Content.ReadAsStringAsync();
			var data = JArray.Parse(responseContent);

			return data;
		}
		var errorList = new List<string> { $"Status code: {response.StatusCode}", 
			$"Error: {response.ReasonPhrase}" };
		return JArray.FromObject(errorList);
	}
	catch (Exception e)
	{
		throw new ApplicationException($"Exception {e}");
	}
}

To demonstrate the application, the user has been assigned the user “web-api-with-roles-user” and the “web-api-with-roles-admin” roles but not the “web-api-with-roles-student” for the API access. The “web-app-with-roles-user” was assigned for the UI application.

After a successful authentication, the claims from Azure AD are added to the HttpContext.User. A single roles claim (“web-app-with-roles-user”) is added for the UI application. This is as we expected.

If the API is called, the access token can be extracted from the debugger and pasted to jwt.ms or jwt.io. The access token contains two roles, “web-api-with-roles-user”, “web-api-with-roles-admin” as was configured in the enterprise application for this user. The access token also has the scp claim with the access_as_user. The azp claim and the azpacr claims have the expected values. A secret was using to signin to the client UI application which we allow.

{
  "typ": "JWT",
  "alg": "RS256",
  "kid": "nOo3ZDrODXEK1jKWhXslHR_KXEg"
}.{
  "aud": "5511b8d6-4652-4f2f-9643-59c61234e3c7",
  "iss": "https://login.microsoftonline.com/7ff95b15-dc21-4ba6-bc92-824856578fc1/v2.0",
  "azp": "5c201b60-89f6-47d8-b2ef-9d9fe2a42751",
  "azpacr": "1",
  "roles": [
    "web-api-with-roles-user",
    "web-api-with-roles-admin"
  ],
  "scp": "access_as_user",
  "ver": "2.0"
  // + more claims
}.[Signature]

A breakpoint was added to Visual Studio in the API project and the claims from the access token can be inspected. We expect the same values like in the access token and without the ASP.NET Core extras.

The ASP.NET Core UI application displays the results of the three API calls. The user and the admin APIs return data and the student API returns a forbidden result. This is what was configured. Now if the user is assigned new roles, after a logout, login, the new claims will be included in the tokens.

This approach works well if you do not have many roles, groups or claims, or if you do not need to change the authorization without re-authentication. The size of the access_token is important, this should not become large. If you require lots of claims for the authorization rules, the claims should not be included in the access token and Microsoft Graph API could be used to access these, or you could implement your own policy management.

Links

https://docs.microsoft.com/en-us/azure/architecture/multitenant-identity/app-roles

https://docs.microsoft.com/en-us/azure/active-directory/develop/active-directory-enterprise-app-role-management

https://github.com/Azure-Samples/active-directory-aspnetcore-webapp-openidconnect-v2/tree/master/5-WebApp-AuthZ/5-1-Roles

https://docs.microsoft.com/en-us/azure/active-directory/develop/microsoft-identity-web

https://github.com/AzureAD/microsoft-identity-web

https://docs.microsoft.com/en-us/azure/active-directory/develop/id-tokens

https://docs.microsoft.com/en-us/azure/active-directory/develop/access-tokens

https://damienbod.com/2020/06/13/restricting-access-to-an-azure-ad-protected-api-using-azure-ad-groups/

https://docs.microsoft.com/en-us/aspnet/core/security/authorization/policies

Secure Azure AD User File Upload with Azure AD Storage and ASP.NET Core

$
0
0

This post shows how files can be uploaded to Azure blob storage using ASP.NET Core in a secure way using OAuth and Open ID Connect. Azure AD is used to authenticate the users. The uploaded file descriptions are saved to an SQL database using EF Core so that listing or searching files can be implemented easily.

Azure AD user accounts are used to authorize the user uploads and downloads to the Azure storage container. A user access token is used to access the Azure storage container and so each user, or group which the user is assigned to, muss have the correct role to access the files. This makes it possible to implement authorization for the users with Azure roles and role assignments.

Code: https://github.com/damienbod/AspNetCoreAzureAdAzureStorage

Blogs in this series

Creating the Azure AD Blob Storage and Container

An Azure storage was created in Azure. The Azure storage requires role assignments for the application users or the groups which user this.

Add new role assignments for the admin user, yourself and all the users or groups that will upload or download blobs (files) to the storage container. The role “Storage Blob Data Contributor” is used for what we require.

You must create a new container in the Azure storage and set the Authentication method to Azure AD User Account. In this mode, the Azure AD user access tokens are used to access the container. If you do not have the rights for this, assign yourself the correct role in the parent Azure storage.

The uploaded and downloaded files are for private access only. We do not want a public URL which can be used to download the blobs, or upload these. Only requests with the correct access token can use the Azure storage container. In the configuration of the Azure storage, set the “Allow Blob public access” to disabled.

It is important that public access is disabled. This is per default enabled. Upload a file to the container and get the URL for this blob. Try to access the blob using a different browser with unauthorized access. A forbidden response must be returned.

Now the Azure storage is ready to be used along with the container and the correct RBAC for the required users. Azure AD user access tokens are used to access the container.

Creating the Azure AD App registration

An Azure App registration is required for the ASP.NET Core authentication. A trusted web application is created and a secret is required to use the Azure App registration. This is not a public client. A version 2 client is used, so set this in the manifest.

In the API permissions, the delegated access to the Azure storage is added. Add a permission and select the delegated user_impersonation access from the Azure storage.

The Azure storage delegated permission should be set up.

The rest of the Azure App registration is standard like in the Microsoft.Identity.Web documentation.

ASP.NET Core File Upload

An ASP.NET Core Razor page is used to upload and download the files. The files are saved to the Azure storage blob and the file descriptions are added to an SQL database. A multipart/form-data form is used with an input of type file and some additional data to select the files is added with the uploaded files.

@page
@model AspNetCoreAzureStorage.Pages.AzStorageFilesModel
@{
    ViewData["Title"] = "Azure Storage Files";
    Layout = "~/Pages/Shared/_Layout.cshtml";
}

<div class="card">
    <div class="card-header">Uploaded Files</div>
    <div class="card-body">
        <form enctype="multipart/form-data" asp-page="/AzStorageFiles" id="ajaxUploadForm" novalidate="novalidate">

            <fieldset>

                <div class="col-xs-12" style="padding: 10px;">
                    <div class="col-xs-4">
                        <label>Description</label>
                    </div>
                    <div class="col-xs-7">
                        <textarea rows="2" placeholder="Description" class="form-control" asp-for="FileDescriptionShort.Description"></textarea>
                    </div>
                </div>

                <div class="col-xs-12" style="padding: 10px;">
                    <div class="col-xs-4">
                        <label>Upload</label>
                    </div>
                    <div class="col-xs-7">
                        <input type="file" asp-for="FileDescriptionShort.File" multiple>
                    </div>
                </div>

                <div class="col-xs-12" style="padding: 10px;">
                    <div class="col-xs-4">
                        <input type="submit" value="Upload" id="ajaxUploadButton" class="btn btn-primary col-sm-12">
                    </div>
                    <div class="col-xs-7">

                    </div>
                </div>

            </fieldset>

        </form>
    </div>
</div>

The attribute AuthorizeForScopes from the Microsoft.Identity.Web is used to validate that the correct scopes are required to used the page. The Azure storage https://storage.azure.com/user_impersonation scope is required to used this service.

[AuthorizeForScopes(Scopes = new string[] 
	{ "https://storage.azure.com/user_impersonation" })]
public class AzStorageFilesModel : PageModel
{

The OnPostAsync method of the Razor page is used to validate the form HTTP post request and call the services to upload the files to the Azure storage blob container. The IFormFile data is passed onto the Azure storage service. Each file from the multiple file upload is passed in a separate request. The file descriptions are also used in the database provider to save the data to the SQL database.

private readonly AzureStorageProvider _azureStorageService;
private readonly FileDescriptionProvider _fileDescriptionProvider;

[BindProperty]
public FileDescriptionUpload FileDescriptionShort { get; set; }

public AzStorageFilesModel(AzureStorageProvider azureStorageService,
	FileDescriptionProvider fileDescriptionProvider)
{
	_azureStorageService = azureStorageService;
	_fileDescriptionProvider = fileDescriptionProvider;
}

public void OnGet()
{
	FileDescriptionShort = new FileDescriptionUpload
	{
		Description = "enter description"
	};
}

public async Task<IActionResult> OnPostAsync()
{
	var fileInfos = new List<(string FileName, string ContentType)>();
	if (ModelState.IsValid)
	{
		if (!IsMultipartContentType(HttpContext.Request.ContentType))
		{
			ModelState.AddModelError("FileDescriptionShort.File", "not a MultipartContentType");
			return Page();
		}

		foreach (var file in FileDescriptionShort.File)
		{
			if (file.Length > 0)
			{
				var fileName = ContentDispositionHeaderValue.Parse(file.ContentDisposition).FileName.ToString().Trim('"');

				fileInfos.Add((fileName, file.ContentType));

				await _azureStorageService.AddNewFile(new BlobFileUpload
				{
					Name = fileName,
					Description = FileDescriptionShort.Description,
					UploadedBy = HttpContext.User.Identity.Name
				},
				file);
			}
		}
	}

	var files = new UploadedFileResult
	{
		FileInfos = fileInfos,
		Description = FileDescriptionShort.Description,
		UploadedBy = HttpContext.User.Identity.Name,
		CreatedTimestamp = DateTime.UtcNow,
		UpdatedTimestamp = DateTime.UtcNow,
	};

	await _fileDescriptionProvider.AddFileDescriptionsAsync(files);

	return Page();
}


private static bool IsMultipartContentType(string contentType)
{
	return !string.IsNullOrEmpty(contentType) && contentType.IndexOf("multipart/", StringComparison.OrdinalIgnoreCase) >= 0;
}

The AzureStorageProvider class uses the Azure.Storage.Blobs nuget package to upload and download the blobs to the Azure storage blob container. The files are persisted to Azure storage using the BlobClient. Metadata is added to the upload using the BlobUploadOptions and the stream is uploaded with the UploadAsync method.

public class AzureStorageProvider
{
	private readonly TokenAcquisitionTokenCredential _tokenAcquisitionTokenCredential;
	private readonly IConfiguration _configuration;

	public AzureStorageProvider(TokenAcquisitionTokenCredential tokenAcquisitionTokenCredential,
		IConfiguration configuration)
	{
		_tokenAcquisitionTokenCredential = tokenAcquisitionTokenCredential;
		_configuration = configuration;
	}

	[AuthorizeForScopes(Scopes = new string[] { "https://storage.azure.com/user_impersonation" })]
	public async Task<string> AddNewFile(BlobFileUpload blobFileUpload, IFormFile file)
	{
		try
		{
			return await PersistFileToAzureStorage(blobFileUpload, file);
		}
		catch (Exception e)
		{
			throw new ApplicationException($"Exception {e}");
		}
	}

	private async Task<string> PersistFileToAzureStorage(
		BlobFileUpload blobFileUpload,
		IFormFile formFile,
		CancellationToken cancellationToken = default)
	{
		var storage = _configuration.GetValue<string>("AzureStorage:StorageAndContainerName");
		var fileFullName = $"{storage}{blobFileUpload.Name}";
		var blobUri = new Uri(fileFullName);

		var blobUploadOptions = new BlobUploadOptions
		{
			Metadata = new Dictionary<string, string>
			{
				{ "uploadedBy", blobFileUpload.UploadedBy },
				{ "description", blobFileUpload.Description }
			}
		};

		var blobClient = new BlobClient(blobUri, _tokenAcquisitionTokenCredential);

		var inputStream = formFile.OpenReadStream();
		await blobClient.UploadAsync(inputStream, blobUploadOptions, cancellationToken);

		return $"{blobFileUpload.Name} successfully saved to Azure Storage Container";
	}
}

The TokenAcquisitionTokenCredential class which implements the TokenCredential class is required by the BlobClient to upload or download the blobs. The class uses the ITokenAcquisition interface to get the access token from the Micosoft.Identity.Web nuget package. The required scope is read from the configuration.

public class TokenAcquisitionTokenCredential : TokenCredential
{
	private ITokenAcquisition _tokenAcquisition;
	private readonly IConfiguration _configuration;

	public TokenAcquisitionTokenCredential(ITokenAcquisition tokenAcquisition,
		IConfiguration configuration)
	{
		_tokenAcquisition = tokenAcquisition;
		_configuration = configuration;
	}

	public override AccessToken GetToken(TokenRequestContext requestContext, CancellationToken cancellationToken)
	{
		throw new System.NotImplementedException();
	}

	public override async ValueTask<AccessToken> GetTokenAsync(TokenRequestContext requestContext, CancellationToken cancellationToken)
	{
		// requestContext.Scopes "https://storage.azure.com/.default"
		string[] scopes = _configuration["AzureStorage:ScopeForAccessToken"]?.Split(' ');

		AuthenticationResult result = await _tokenAcquisition
			.GetAuthenticationResultForUserAsync(scopes)
			.ConfigureAwait(false);

		return new AccessToken(result.AccessToken, result.ExpiresOn);
	}
}

SQL Database

Entity Framework Core is used to persist the file descriptions to a Microsoft SQL database. The file context has just one DbSet, ie a single table which can be selected of searched as required. If you were making this for an application which has a lot of data, maybe a search engine, search persistence would be the better choice.

public class FileContext : DbContext
{
	public FileContext(DbContextOptions<FileContext> options) : base(options)
	{ }

	public DbSet<FileDescription> FileDescriptions { get; set; }

	protected override void OnModelCreating(ModelBuilder builder)
	{
		builder.Entity<FileDescription>().HasKey(m => m.Id);
		base.OnModelCreating(builder);
	}
}

The AddFileDescriptionsAsync method takes the data from the ASP.NET Core Razor page and saves the data to the table. This can be used to select the uploaded files from the Azure blob container.

public async Task AddFileDescriptionsAsync(UploadedFileResult uploadedFileResult)
{
	foreach (var (FileName, ContentType) in uploadedFileResult.FileInfos)
	{
		_context.FileDescriptions.Add(new FileDescription
		{
			FileName = FileName,
			ContentType = ContentType,
			Description = uploadedFileResult.Description,
			UploadedBy = uploadedFileResult.UploadedBy,
			CreatedTimestamp = uploadedFileResult.CreatedTimestamp,
			UpdatedTimestamp = uploadedFileResult.UpdatedTimestamp
		});
	}

	await _context.SaveChangesAsync();

}

ASP.NET Core Startup

The ASP.NET Core Startup class adds the authentication using the Microsoft.Identity.Web nuget package. This is a server rendered application which can be trusted and so uses a secret to authenticate the client application. The Azure App registration was setup to require a secret to use the registration. The secret is saved to the user secrets in Visual Studio and would be read from Azure Key vault in a deployment, or something like this. The required services are added to the IoC and the Razor pages are setup to require an authenticated user. All access requirs an authenticated user, all the way down to the Azure storage blob container.

If the user is authenticated, the identity can use the application. This does not mean the user has access. The Azure AD user must be assigned a role to access the Azure storage blob container. In this demo the role “Storage Blob Data Contributor” is used.

public void ConfigureServices(IServiceCollection services)
{
	services.AddTransient<AzureStorageProvider>();
	services.AddTransient<TokenAcquisitionTokenCredential>();
	services.AddDbContext<FileContext>(options =>
		options.UseSqlServer(Configuration
			.GetConnectionString("DefaultConnection")));
	services.AddTransient<FileDescriptionProvider>();

	services.AddHttpClient();
	services.AddOptions();

	string[] initialScopes = Configuration.GetValue<string>
		("AzureStorage:ScopeForAccessToken")?.Split(' ');

	services.AddMicrosoftIdentityWebAppAuthentication(Configuration)
		.EnableTokenAcquisitionToCallDownstreamApi(initialScopes)
		.AddInMemoryTokenCaches();

	services.AddRazorPages().AddMvcOptions(options =>
	{
		var policy = new AuthorizationPolicyBuilder()
			.RequireAuthenticatedUser()
			.Build();
		options.Filters.Add(new AuthorizeFilter(policy));
	}).AddMicrosoftIdentityUI();
}

ASP.NET Core File Download

The files can be downloaded using a link from the list of files selected from the SQL database. When the authenticated user clicks a link, the OnGetDownloadFile method is called. This method uses the DownloadFile method to get the blob from the Azure storage.

public async Task<ActionResult> OnGetDownloadFile(string fileName)
{
	var file = await _azureStorageService.DownloadFile(fileName);

	return File(file.Value.Content, file.Value.ContentType, fileName);
}

The BlobClient is used to access the Azure storage. The DownloadAsync method gets the blob and returns the stream.

The stream is then returned as a file to the user. This will only work is the user has the correct role in Azure AD.

[AuthorizeForScopes(Scopes = new string[] { "https://storage.azure.com/user_impersonation" })]
public async Task<Azure.Response<BlobDownloadInfo>> DownloadFile(string fileName)
{
	try
	{
		var storage = _configuration.GetValue<string>("AzureStorage:StorageAndContainerName");
		var fileFullName = $"{storage}{fileName}";
		var blobUri = new Uri(fileFullName);
		var blobClient = new BlobClient(blobUri, _tokenAcquisitionTokenCredential);
		return await blobClient.DownloadAsync();
	}
	catch (Exception e)
	{
		throw new ApplicationException($"Exception {e}");
	}
}

When the application is started, the authenticated user can upload files and add a description. This will be added to the blob meta data.

Once uploaded, this can be checked in the Azure portal using the Azure storage container.

If the files menu is open, the user can download a file by clicking a link. The file is returned and can be saved to your browser downloads.

If the user is authenticated but does not have the correct role to access the files, an exception will be thrown.

Conclusion

Using Azure AD to access to blob storage works well and provides many possibilities to implement the authorization as wished. The next step would be to implement this authorization in the ASP.NET Core application.

Links:

https://github.com/Azure-Samples/storage-dotnet-azure-ad-msal

https://winsmarts.com/access-azure-blob-storage-with-standards-based-oauth-authentication-b10d201cbd15

https://stackoverflow.com/questions/45956935/azure-ad-roles-claims-missing-in-access-token

https://github.com/AzureAD/microsoft-identity-web/wiki

https://docs.microsoft.com/en-us/azure/storage/blobs/storage-blobs-introduction

Adding ASP.NET Core authorization for an Azure Blob Storage and Azure AD users using role assignments

$
0
0

This post shows how authorization can be implemented for Azure Storage Blob containers in an ASP.NET Core web application. The two roles Storage Blob Data Contributor and Storage Blob Data Reader are used to authorize the Azure AD users which use the Blob storage container. Users are assigned the roles using role assignment. This authorization information is required in the ASP.NET Core application so that the users can be authorized to upload files, or just get authorized to download the files. The Azure Management Fluent rest API is used to select this data.

Code: https://github.com/damienbod/AspNetCoreAzureAdAzureStorage

Blogs in this series

Setup the Azure App registration

To list the role assignments for Azure and Azure Storage in ASP.NET Core, a new Azure App registration was created. The service principle ID of the enterprise application (from this Azure App registration) is used to assign the contributor role on the subscription so that the application can list the role assignments from the scopes within the subscription. A client secret is setup for the application.

Setup the Role assignment for the Azure App registration

In the subscription, the Access control (IAM) blade is selected and a role assignment was added for the Azure Enterprise application which was created when we created the Azure App registration for this subscription. If the application registration is only required for the specific storage blob container, less rights would be required.

Implement the Azure Management Fluent Service

The Microsoft.Azure.Management.Fluent nuget package is used to implement the Azure rest API to access the role assignments for the Azure Storage Blob container.

The AuthenticateClient method is used to authenticate the Microsoft.Azure.Management.Fluent client using the Azure App registration clientId and the client secret from the App registration. The Authenticate method uses the Azure credentials to access the API.

private void AuthenticateClient()
{
	// clint credentials flow with secret
	var clientId = _configuration
		.GetValue<string>("AzureManagementFluent:ClientId");
	var clientSecret = _configuration
		.GetValue<string>("AzureManagementFluent:ClientSecret");
	var tenantId = _configuration
		.GetValue<string>("AzureManagementFluent:TenantId");

	AzureCredentialsFactory azureCredentialsFactory 
		= new AzureCredentialsFactory();
		
	var credentials = azureCredentialsFactory
		.FromServicePrincipal(clientId,
			clientSecret,
			tenantId,
			AzureEnvironment.AzureGlobalCloud);

	// authenticate to Azure AD
	_authenticatedClient = Microsoft.Azure.Management
		.Fluent.Azure.Configure()
		.Authenticate(credentials);
}

The GetStorageBlobDataContributors method lists all the role assignments for the scope parameter. The scope parameter is the path to the Azure storage or whatever resource you want to check. This would need to be changed for your application. The Id for the role Storage Blob Data Contributor is used to filter only this role assignment in the defined scope.

/// <summary>
/// returns IRoleAssignment for Storage Blob Data Contributor 
/// </summary>
/// <param name="scope">Scope of the Azure storage</param>
/// <returns>IEnumerable of the IRoleAssignment</returns>
private IEnumerable<IRoleAssignment> GetStorageBlobDataContributors(string scope)
{
	var roleAssignments = _authenticatedClient
		.RoleAssignments
		.ListByScope(scope);

	// https://docs.microsoft.com/en-us/azure/role-based-access-control/built-in-roles
	// Storage Blob Data Contributor == "ba92f5b4-2d11-453d-a403-e96b0029c9fe"
	// Storage Blob Data Reader == "2a2b9908-6ea1-4ae2-8e65-a410df84e7d1"

	var storageBlobDataContributors = roleAssignments
		.Where(d => d.RoleDefinitionId
			.Contains("ba92f5b4-2d11-453d-a403-e96b0029c9fe"));

	return storageBlobDataContributors;
}

The HasRoleStorageBlobDataContributorForScope method is used to check if the user principal id of the authenticated user in the ASP.NET core application has an assigned role for the Azure Storage, which was defined using the scope.

public bool HasRoleStorageBlobDataContributorForScope(
	string userPrincipalId, string scope)
{
	var roleAssignments = GetStorageBlobDataContributors(scope);
	return roleAssignments
		.Count(t => t.PrincipalId == userPrincipalId) > 0;
}

public bool HasRoleStorageBlobDataReaderForScope(
	string userPrincipalId, string scope)
{
	var roleAssignments = GetStorageBlobDataReaders(scope);
	return roleAssignments
		.Count(t => t.PrincipalId == userPrincipalId) > 0;
}

Add authorization to the ASP.NET Core Web application

Now that the authorization data can be requested from Azure, this can be used in the ASP.NET Core application. Requirements, policies and handlers implementations can be used for this. The StorageBlobDataContributorRoleRequirement class was created using the IAuthorizationRequirement.

namespace AspNetCoreAzureStorage
{
    public class StorageBlobDataContributorRoleRequirement 
      : IAuthorizationRequirement { }
}

The StorageBlobDataContributorRoleHandler implements the AuthorizationHandler which uses the StorageBlobDataContributorRoleRequirement requirement. The handler uses the AzureManagementFluentService to query the Azure data and the handler will succeed if the user has the built in Azure role Storage Blob Data Contributor.

using Microsoft.AspNetCore.Authorization;
using System;
using System.Linq;
using System.Threading.Tasks;

namespace AspNetCoreAzureStorage
{
    public class StorageBlobDataContributorRoleHandler 
		: AuthorizationHandler<StorageBlobDataContributorRoleRequirement>
    {
        private readonly AzureManagementFluentService _azureManagementFluentService;

        public StorageBlobDataContributorRoleHandler(
			AzureManagementFluentService azureManagementFluentService)
        {
            _azureManagementFluentService = azureManagementFluentService;
        }

        protected override Task HandleRequirementAsync(
            AuthorizationHandlerContext context,
            StorageBlobDataContributorRoleRequirement requirement
        )
        {
            if (context == null)
                throw new ArgumentNullException(nameof(context));
            if (requirement == null)
                throw new ArgumentNullException(nameof(requirement));

            var scope = "subscriptions/..../storageAccounts/azureadfiles";

            var spIdUserClaim = context.User.Claims.FirstOrDefault(t => t.Type 
				== "http://schemas.microsoft.com/identity/claims/objectidentifier");

            if (spIdUserClaim != null)
            {
                var success = _azureManagementFluentService
					.HasRoleStorageBlobDataContributorForScope(spIdUserClaim.Value, scope);
                if (success)
                {
                    context.Succeed(requirement);
                }
            }

            return Task.CompletedTask;
        }
    }
}

The Startup class adds the handlers and the services to the IoC of ASPNET Core. Two policies are added, one to check the Storage Blob Data Contributor requirement and a policy for the the Storage Blob Data Reader role check.

services.AddSingleton<IAuthorizationHandler, 
	StorageBlobDataContributorRoleHandler>();
services.AddSingleton<IAuthorizationHandler, 
	StorageBlobDataReaderRoleHandler>();

services.AddAuthorization(options =>
{
	options.AddPolicy("StorageBlobDataContributorPolicy", 
		policyIsAdminRequirement =>
	{
		policyIsAdminRequirement.Requirements
			.Add(new StorageBlobDataContributorRoleRequirement());
	});
	options.AddPolicy("StorageBlobDataReaderPolicy", 
		policyIsAdminRequirement =>
	{
		policyIsAdminRequirement.Requirements
			.Add(new StorageBlobDataReaderRoleRequirement());
	});
});

The Razor page uses the policy to show or hide the data. If the user has authenticated in the ASP.NET Core application and has the required roles in Azure, the data will be returned. The checks are also validated on Azure and not just in the ASP.NET Core application.

@page
@using Microsoft.AspNetCore.Authorization
@inject IAuthorizationService AuthorizationService
@model AspNetCoreAzureStorage.Pages.AzStorageFilesModel
@{
    ViewData["Title"] = "Azure Storage Files";
    Layout = "~/Pages/Shared/_Layout.cshtml";
}

@if ((await AuthorizationService.AuthorizeAsync(User, "StorageBlobDataContributorPolicy")).Succeeded)
{
    <div class="card">
        ///... rest of code omitted see src
    </div>
}
else
{
    <p>User has not contributor access role for blob storage</p>
}

When the application is started, the roles are checked and the views are displayed as required.

Notes:

This is just one way to use the role assignments authorization in an ASP.NET Core application using Azure Storage Blob containers. This would become complicated if using with lots of users or different types of service principals. In a follow up post we will explore other ways of implementing authorization in ASP.NET Core for Azure roles and azure role assignments.

Links Role assignments

https://docs.microsoft.com/en-us/azure/role-based-access-control/built-in-roles

Using Azure Management Libraries for .NET to manage Azure AD users, groups, and RBAC Role Assignments

https://management.azure.com/subscriptions/subscriptionId/providers/Microsoft.Authorization/roleAssignments?api-version=2015-07-01

https://docs.microsoft.com/en-us/rest/api/apimanagement/apimanagementrest/azure-api-management-rest-api-authentication

https://docs.microsoft.com/en-us/rest/api/authorization/role-assignment-rest-sample

Further Links:

https://github.com/Azure-Samples/storage-dotnet-azure-ad-msal

https://winsmarts.com/access-azure-blob-storage-with-standards-based-oauth-authentication-b10d201cbd15

https://stackoverflow.com/questions/45956935/azure-ad-roles-claims-missing-in-access-token

https://github.com/AzureAD/microsoft-identity-web/wiki

https://docs.microsoft.com/en-us/azure/storage/blobs/storage-blobs-introduction


Require user password verification with ASP.NET Core Identity to access Razor Page

$
0
0

This post shows how an ASP.NET Core application which uses ASP.NET Core Identity to authenticate and authorize users of the application can be used to require user password verification to view specific Razor pages in the application. If the user opens one of the Razor pages which require a password verification to open the page, the user will be redirected to a separate Razor page to re-enter a password. All good, the original page can be opened.

Code https://github.com/damienbod/AspNetCoreHybridFlowWithApi

Setup the required password verification page

The RequirePasswordVerificationModel class implements the Razor page which requires that a user has verified a password for the identity user within the last ten minutes. The razor page inherits from the PasswordVerificationBase Razor page which implements the verification check. The constructor of the class needs to pass the parent dependencies. If the user has a valid verification, the page will be displayed, otherwise the application redirects to the password verification route.

public class RequirePasswordVerificationModel : PasswordVerificationBase
{
	public RequirePasswordVerificationModel(
		UserManager<ApplicationUser> userManager) : base(userManager){}

	public async Task<IActionResult> OnGetAsync()
	{
		var passwordVerificationOk = await ValidatePasswordVerification();
		
		if (!passwordVerificationOk)
		{
			return RedirectToPage("/PasswordVerification", 
				new { ReturnUrl = "/DoUserChecks/RequirePasswordVerification" });
		}

		return Page();
	}
}

The PasswordVerificationBase Razor page implements the PageModel. The ValidatePasswordVerification method checks if the user is already authenticated. It then checks if the user has not signed in after the last successful verification. The UserManager is used to fetch the data from the database. The last verification is implemented so that it can be no longer that ten minutes old.

public class PasswordVerificationBase : PageModel
{
	public static string PasswordCheckedClaimType = "passwordChecked";
	public static string LastLoginClaimType = "lastlogin";

	private readonly UserManager<ApplicationUser> _userManager;

	public PasswordVerificationBase(UserManager<ApplicationUser> userManager)
	{
		_userManager = userManager;
	}

	public async Task<bool> ValidatePasswordVerification()
	{
		if (User.Identity.IsAuthenticated)
		{
			if (User.HasClaim(c => c.Type == PasswordCheckedClaimType))
			{
				var user = await _userManager.FindByEmailAsync(User.Identity.Name);

				var lastLogin = DateTime.FromFileTimeUtc(
					Convert.ToInt64(user.LastLogin));

				var lastPasswordVerificationClaim 
					= User.FindFirst(PasswordCheckedClaimType);
					
				var lastPasswordVerification = DateTime.FromFileTimeUtc(
					Convert.ToInt64(lastPasswordVerificationClaim.Value));

				if (lastLogin > lastPasswordVerification)
				{
					return false;
				}
				else if (DateTime.UtcNow.AddMinutes(-10.0) > lastPasswordVerification)
				{
					return false;
				}

				return true;
			}
		}

		return false;
	}
}

If the user needs to re-enter credentials, the PasswordVerificationModel Razor page is used for this. This class was built using the identity scaffolded login Razor page from ASP.NET Core Identity. The old password verifications claims are removed using the UserManager service. A new password verification claim is created, if the user successfully re-entered the password and the sign in is refreshed with the new ClaimIdentity instance.

public class PasswordVerificationModel : PageModel
{
	private readonly UserManager<ApplicationUser> _userManager;
	private readonly SignInManager<ApplicationUser> _signInManager;
	private readonly ILogger<PasswordVerificationModel> _logger;

	public PasswordVerificationModel(SignInManager<ApplicationUser> signInManager,
		ILogger<PasswordVerificationModel> logger,
		UserManager<ApplicationUser> userManager)
	{
		_userManager = userManager;
		_signInManager = signInManager;
		_logger = logger;
	}

	[BindProperty]
	public CheckModel Input { get; set; }

	public IList<AuthenticationScheme> ExternalLogins { get; set; }

	public string ReturnUrl { get; set; }

	[TempData]
	public string ErrorMessage { get; set; }

	public class CheckModel
	{
		[Required]
		[DataType(DataType.Password)]
		public string Password { get; set; }
	}

	public async Task<IActionResult> OnGetAsync(string returnUrl = null)
	{
		if (!string.IsNullOrEmpty(ErrorMessage))
		{
			ModelState.AddModelError(string.Empty, ErrorMessage);
		}

		var user = await _userManager.GetUserAsync(User);
		if (user == null)
		{
			return NotFound($"Unable to load user with ID '{_userManager.GetUserId(User)}'.");
		}

		var hasPassword = await _userManager.HasPasswordAsync(user);
		if (!hasPassword)
		{
			return NotFound($"User has no password'{_userManager.GetUserId(User)}'.");
		}

		returnUrl ??= Url.Content("~/");
		ReturnUrl = returnUrl;

		return Page();
	}

	public async Task<IActionResult> OnPostAsync(string returnUrl = null)
	{
		returnUrl ??= Url.Content("~/");

		var user = await _userManager.GetUserAsync(User);
		if (user == null)
		{
			return NotFound($"Unable to load user with ID '{_userManager.GetUserId(User)}'.");
		}

		if (ModelState.IsValid)
		{
			// This doesn't count login failures towards account lockout
			// To enable password failures to trigger account lockout, set lockoutOnFailure: true
			var result = await _signInManager.PasswordSignInAsync(user.Email, Input.Password, false, lockoutOnFailure: false);
			if (result.Succeeded)
			{
				_logger.LogInformation("User password re-entered");

				await RemovePasswordCheck(user);
				var claim = new Claim(PasswordVerificationBase.PasswordCheckedClaimType,
					DateTime.UtcNow.ToFileTimeUtc().ToString());
				await _userManager.AddClaimAsync(user, claim);
				await _signInManager.RefreshSignInAsync(user);

				return LocalRedirect(returnUrl);
			}
			if (result.IsLockedOut)
			{
				_logger.LogWarning("User account locked out.");
				return RedirectToPage("./Lockout");
			}
			else
			{
				ModelState.AddModelError(string.Empty, "Invalid login attempt.");
				return Page();
			}
		}

		// If we got this far, something failed, redisplay form
		return Page();
	}

	private async Task RemovePasswordCheck(ApplicationUser user)
	{
		if (User.HasClaim(c => c.Type == PasswordVerificationBase.PasswordCheckedClaimType))
		{
			var claims = User.FindAll(PasswordVerificationBase.PasswordCheckedClaimType);
			foreach (Claim c in claims)
			{
				await _userManager.RemoveClaimAsync(user, c);
			}
		}
	}
}

The PasswordVerificationModel Razor page html template displays the user input form with the password field.

@page
@model PasswordVerificationModel

@{
    ViewData["Title"] = "Password Verification";
}

<h1>@ViewData["Title"]</h1>
<div class="row">
    <div class="col-md-4">
        <section>
            <form id="account" method="post">
                <h4>Verify account using your password</h4>
                <hr />
                <div asp-validation-summary="All" class="text-danger"></div>
                <div class="form-group">
                    <label asp-for="Input.Password"></label>
                    <input asp-for="Input.Password" class="form-control" />
                    <span asp-validation-for="Input.Password" 
                       class="text-danger"></span>
                </div>
                <div class="form-group">
                    <button type="submit" class="btn btn-primary">
                       Re-enter password
                    </button>
                </div>
            </form>
        </section>
    </div>
</div>

@section Scripts {
    <partial name="_ValidationScriptsPartial" />
}

The Login Razor page needs to be updated to add a login file time value for DateTime.UtcNow when the login successfully occurred. This value is used in the base Razor page to verify the password check. The LastLogin property was added for this.

var result = await _signInManager.PasswordSignInAsync(
	Input.Email, Input.Password, 
	Input.RememberMe, 
	lockoutOnFailure: false);
	
if (result.Succeeded)
{
	_logger.LogInformation("User logged in.");

	var user = await _userManager.FindByEmailAsync(Input.Email);
	if (user == null)
	{
		return NotFound("help....");
	}
	user.LastLogin = DateTime.UtcNow.ToFileTimeUtc().ToString();

	var lastLoginResult = await _userManager.UpdateAsync(user);

	return LocalRedirect(returnUrl);
}

The LastLogin property was added to the ApplicationUser which implements the IdentityUser. This value is persisted to the Entity Framework Core database.

public class ApplicationUser : IdentityUser
{
	public string LastLogin { get; set; }
}

When the application is started, the user can login and will need to verify a password to access the Razor page implemented to require this feature.

Notes:

This was relatively simple to implement thanks to the helpers in ASP.NET Core Identity. It requires a user password login to work which is not always available or used. A FIDO2 verification would probably be better or a simple authenticator push notification. Some applications have the requirement for password verification to use a page, a view or a service for some extra sensitive processing and this would help here.

Links:

https://www.learnrazorpages.com/razor-pages/

https://docs.microsoft.com/en-us/aspnet/core/razor-pages

https://docs.microsoft.com/en-us/aspnet/core/security

Using Azure AD groups authorization in ASP.NET Core for an Azure Blob Storage

$
0
0

This post show how Azure AD groups could be used to implement authorization for an Azure Blob storage and used in an ASP.NET Core Razor page application to authorize the identities. The groups are assigned the roles in the Azure Storage. Azure AD users are added to the Azure AD groups and inherit the group roles. The group ID is added to the claims of the tokens which can be used for authorization in the client application.

Code: https://github.com/damienbod/AspNetCoreAzureAdAzureStorage

Blogs in this series

Setup the groups in Azure AD

To implement this, two new user groups are created inside the Azure AD directory.

The required Azure AD users are added to the groups.

Add the role assignment for the groups to Azure Storage

The Azure Storage which was created in the previous post is opened and the new Azure AD groups can be assigned roles. The Storage Blob Contributor group and the Storage Blob reader group are add to the Azure Storage Role assignments.

You can see that the Storage Contributors Azure AD group is assigned the Storage Blob Data Contributor role and the Storage Reader Azure AD group is assigned the Storage Blob Data Reader role.

Add the group IDs to the tokens in Azure App registrations

Now the groups can be added to the id_token and the access token in the Azure App registrations. If you use a lot of groups in your organisation, you might not want to do this due to token size, but instead use Microsoft Graph in the applications to get the groups for the authenticated Identity. In the Token Configuration blade of the Azure App registration, the groups can be added as an optional claim.

To use the groups in the ASP.NET Core web application, only the security groups are required.

Implement the ASP.NET Core authorization handlers

The StorageBlobDataContributorRoleHandler implements the ASP.NET Core handler to authorize the identities. The handler implements the AuthorizationHandler with the required requirement. The handler retrieves the group claim from the claims with the group value of the group we set in the role assignments in the Azure Storage. The claims are extracted from the id_token or the user info endpoint. Only the group is validated in the ASP.NET Core application, not the actual role which is required for the Azure Storage access. There is no direct authorization with the Azure Storage Blob container. The authorization is done through the Azure AD groups.

By using the group claims, no extra API call is required to authorize the identity using the application. This is great, as long as the tokens don’t get to large in size.

public class StorageBlobDataContributorRoleHandler 
	: AuthorizationHandler<StorageBlobDataContributorRoleRequirement>
{
	protected override Task HandleRequirementAsync(
		AuthorizationHandlerContext context,
		StorageBlobDataContributorRoleRequirement requirement
	)
	{
		if (context == null)
			throw new ArgumentNullException(nameof(context));
		if (requirement == null)
			throw new ArgumentNullException(nameof(requirement));

		// StorageContributorsAzureADfiles
		var groupId = "6705345e-c37e-4f7a-b2d9-e2f43e029524";

		var spIdUserGroup = context.User.Claims
			.FirstOrDefault(t => t.Type == "groups" && 
				t.Value == groupId);

		if(spIdUserGroup != null)
		{
			context.Succeed(requirement);
		}

		return Task.CompletedTask;
	}
}

The handlers with the requirements are registered in the application in the Startup class. Policies are created for the requirement which can be then used in the application. Microsoft.Identity.Web is used to authenticate the user and the application.

services.AddMicrosoftIdentityWebAppAuthentication(Configuration)
	.EnableTokenAcquisitionToCallDownstreamApi(initialScopes)
	.AddInMemoryTokenCaches();

services.AddAuthorization(options =>
{
	options.AddPolicy("StorageBlobDataContributorPolicy", 
		policyIsAdminRequirement =>
	{
		policyIsAdminRequirement
			.Requirements
			.Add(new StorageBlobDataContributorRoleRequirement());
	});
	options.AddPolicy("StorageBlobDataReaderPolicy", 
		policyIsAdminRequirement =>
	{
		policyIsAdminRequirement
			.Requirements
			.Add(new StorageBlobDataReaderRoleRequirement());
	});
});

services.AddRazorPages().AddMvcOptions(options =>
{
	var policy = new AuthorizationPolicyBuilder()
		.RequireAuthenticatedUser()
		.Build();
	options.Filters.Add(new AuthorizeFilter(policy));
}).AddMicrosoftIdentityUI();

The authorization policies can be applied as attributes on the class of ASP.NET Core Razor pages.

[Authorize(Policy = "StorageBlobDataContributorPolicy")]
[AuthorizeForScopes(Scopes = new string[] { 
   "https://storage.azure.com/user_impersonation" })]
public class AzStorageFilesModel : PageModel
{
    // code ...

When the application is started from Visual Studio, the group claims can be viewed and the handler will succeed if the Azure groups, users and role assignments are configured correctly.

Azure AD Groups can be used in this way to manage access to Azure AD storage in an ASP.NET Core. This works great but is a very dependent on Azure adminstration. For this to work good, you need access and control over the Azure AD tenant which is not always the case in companys. If the Azure Storage was extended with Tables or Queues, the roles can be applied to new groups or the existing ones. A lot depends on how the users, groups and applications are managed.

Links

https://docs.microsoft.com/en-us/azure/role-based-access-control/built-in-roles

Using Azure Management Libraries for .NET to manage Azure AD users, groups, and RBAC Role Assignments

https://management.azure.com/subscriptions/subscriptionId/providers/Microsoft.Authorization/roleAssignments?api-version=2015-07-01

https://docs.microsoft.com/en-us/rest/api/apimanagement/apimanagementrest/azure-api-management-rest-api-authentication

https://docs.microsoft.com/en-us/rest/api/authorization/role-assignment-rest-sample

https://github.com/mderriey/azure-identity-livestream

Securing Blazor Web assembly using cookies

$
0
0

The article shows how a Blazor web assembly UI hosted in an ASP.NET Core application can be secured using cookies. Azure AD is used as the identity provider and the Microsoft.Identity.Web Nuget package is used to secure the trusted server rendered application. The API calls are protected using the secure cookie and anti-forgery tokens to protected against CSRF. This architecture is also known as the Backends for Frontends (BFF) Pattern.

Code: Blazor Cookie security

Why Cookies

By using cookies, it gives us the possiblity to increase the security of the whole application, UI + API. Blazor web assembly is treated as a UI in the server rendered application. By using cookies, no access tokens, refresh tokens or id tokens are saved or managed in the browser. All security is implemented in the trusted backend. By implementing the security in the trusted backend, the application can be authenticated by the identity provider and all access tokens are removed from the browser, web storage. With the correct security definitions on the cookies, the security risks can be reduced, and the client application can be authenticated. It would be possible to use sender constrained tokens, or Mutual TLS for increased security, if this was required. Anti-forgery tokens are required to secure the API requests because we use cookies.

The UI and the backend are one application which are coupled together. This is different to the standard Blazor template which uses access tokens. The WASM and the API are secured as two separate applications. Here only a single server rendered application is secured. The WASM client can only use APIs hosted on the same domain.

Credits

Some of the code in this repo was built using original source code from Bernd Hirschmann.

Thank you for the git repository.

Creating the Blazor application

The Blazor application was created using a web assembly template hosted in an ASP.NET Core application. You need to check the checkbox in Visual Studio for this. No authentication was added. This creates three projects. We will add the security first, then the services to use the Identity of the authenticated user in the WASM client, and then add the bits required for CSRF protection.

Securing the application using Azure AD

The application is secured using the Azure AD identity provider. This is implemented using the Microsoft.Identity.Web web application client, not API client. This is just a wrapper for the Open ID connect code flow authentication and if successful authenticated, the auth data is stored in a cookie. Two Azure App Registrations are used to implement this, one for the API and one for the Web authentication. A client secret is required to access the API. A certificate could also be used instead. See the Microsoft.Identity.Web docs for more info.

The app.settings contains the configuration for both the API and the web client. The ScopeForAccessToken contains all the scopes required by the application so that after the user authenticates, the user can give consent up front for all required APIs. The rest is standard.

"AzureAd": {
	"Instance": "https://login.microsoftonline.com/",
	"Domain": "damienbodhotmail.onmicrosoft.com",
	"TenantId": "7ff95b15-dc21-4ba6-bc92-824856578fc1",
	"ClientId": "46d2f651-813a-4b5c-8a43-63abcb4f692c",
	"CallbackPath": "/signin-oidc",
	"SignedOutCallbackPath ": "/signout-callback-oidc"
	// "ClientSecret": "add secret to the user secrets"
},
	"UserApiOne": {
	"ScopeForAccessToken": "api://b2a09168-54e2-4bc4-af92-a710a64ef1fa/access_as_user User.ReadBasic.All user.read",
	"ApiBaseAddress": "https://localhost:44395"
},

The following nuget packages were added to the server blazor host application.

  • Microsoft.AspNetCore.Components.WebAssembly.Server
  • Microsoft.AspNetCore.Authentication.JwtBearer
  • Microsoft.AspNetCore.Authentication.OpenIdConnect
  • Microsoft.Identity.Web
  • Microsoft.Identity.Web.UI
  • Microsoft.Identity.Web.MicrosoftGraphBeta
  • IdentityModel
  • IdentityModel.AspNetCore

The startup ConfigureServices method is used to add the Azure AD authentication clients. The AddMicrosoftIdentityWebAppAuthentication method is used to add the web client which uses the services added in the AddMicrosoftIdentityUI method. Graph API is added as a downstream API demo.

public void ConfigureServices(IServiceCollection services)
{
    // + ...
	
	services.AddHttpClient();
	services.AddOptions();

	string[] initialScopes = Configuration.GetValue<string>(
		"UserApiOne:ScopeForAccessToken")?.Split(' ');

	services.AddMicrosoftIdentityWebAppAuthentication(Configuration)
		.EnableTokenAcquisitionToCallDownstreamApi(initialScopes)
		 .AddMicrosoftGraph("https://graph.microsoft.com/beta",
			"User.ReadBasic.All user.read")
		.AddInMemoryTokenCaches();

	services.AddRazorPages().AddMvcOptions(options =>
	{
		var policy = new AuthorizationPolicyBuilder()
			.RequireAuthenticatedUser()
			.Build();
		options.Filters.Add(new AuthorizeFilter(policy));
	}).AddMicrosoftIdentityUI();
}

The Configure method is used to add the middleware in the correct order. The Blazor application is setup like the template except for the fallback which maps to the razor page _Host instead of the index. This was added to support anti forgery tokens which I’ll explain later in this blog.

public void Configure(IApplicationBuilder app, IWebHostEnvironment env)
{
	if (env.IsDevelopment())
	{
		app.UseDeveloperExceptionPage();
		app.UseWebAssemblyDebugging();
	}
	else
	{
		app.UseExceptionHandler("/Error");
		app.UseHsts();
	}

	app.UseHttpsRedirection();
	app.UseBlazorFrameworkFiles();
	app.UseStaticFiles();

	app.UseRouting();
	app.UseAuthentication();
	app.UseAuthorization();

	app.UseEndpoints(endpoints =>
	{
		endpoints.MapRazorPages();
		endpoints.MapControllers();
		endpoints.MapFallbackToPage("/_Host");
	});
}

Now the APIs can be protected using the Authorize attribute with the cookie scheme. The AuthorizeForScopes which come from the Microsoft.Identity.Web Nuget package can be used to validate the scope and handle MSAL consent exceptions.

[ValidateAntiForgeryToken]
[Authorize(AuthenticationSchemes = CookieAuthenticationDefaults.AuthenticationScheme)]
[AuthorizeForScopes(Scopes = new string[] { "api://b2a09168-54e2-4bc4-af92-a710a64ef1fa/access_as_user" })]
[ApiController]
[Route("api/[controller]")]
public class DirectApiController : ControllerBase
{
	[HttpGet]
	public IEnumerable<string> Get()
	{
		return new List<string> { "some data", "more data", "loads of data" };
	}
}

Using the claims, identity in the web assembly client application

The next part of the code was implemented using the source code created by Bernd Hirschmann. Now that the server authentication is implemented and the identity exists for the user and the application, the claims from this identity and the state of the actual user needs to be accessed and used in the client web assembly part of the application. APIs need to be created for this purpose. The account controller is used to initialize the sign in flow and a HTTP Post can be used to sign out.

using Microsoft.AspNetCore.Authentication;
using Microsoft.AspNetCore.Authentication.Cookies;
using Microsoft.AspNetCore.Authentication.OpenIdConnect;
using Microsoft.AspNetCore.Authorization;
using Microsoft.AspNetCore.Mvc;

namespace BlazorAzureADWithApis.Server.Controllers
{
    // orig src https://github.com/berhir/BlazorWebAssemblyCookieAuth
    [Route("api/[controller]")]
    public class AccountController : ControllerBase
    {
        [HttpGet("Login")]
        public ActionResult Login(string returnUrl)
        {
            return Challenge(new AuthenticationProperties
            {
                RedirectUri = !string.IsNullOrEmpty(returnUrl) ? returnUrl : "/"
            });
        }

        // [ValidateAntiForgeryToken] // not needed explicitly due the the auto global definition.
        [Authorize]
        [HttpPost("Logout")]
        public IActionResult Logout()
        {
            return SignOut(
                new AuthenticationProperties { RedirectUri = "/" },
                CookieAuthenticationDefaults.AuthenticationScheme,
                OpenIdConnectDefaults.AuthenticationScheme);
        }
    }
}

The UserController is used to for the WASM to get access about the current identity and the claims of this identity.

using System.Collections.Generic;
using System.Linq;
using System.Security.Claims;
using BlazorAzureADWithApis.Shared.Authorization;
using IdentityModel;
using Microsoft.AspNetCore.Authorization;
using Microsoft.AspNetCore.Mvc;

namespace BlazorAzureADWithApis.Server.Controllers
{
    // orig src https://github.com/berhir/BlazorWebAssemblyCookieAuth
    [Route("api/[controller]")]
    [ApiController]
    public class UserController : ControllerBase
    {
        [HttpGet]
        [AllowAnonymous]
        public IActionResult GetCurrentUser()
        {
            return Ok(User.Identity.IsAuthenticated ? CreateUserInfo(User) : UserInfo.Anonymous);
        }

        private UserInfo CreateUserInfo(ClaimsPrincipal claimsPrincipal)
        {
            if (!claimsPrincipal.Identity.IsAuthenticated)
            {
                return UserInfo.Anonymous;
            }

            var userInfo = new UserInfo
            {
                IsAuthenticated = true
            };

            if (claimsPrincipal.Identity is ClaimsIdentity claimsIdentity)
            {
                userInfo.NameClaimType = claimsIdentity.NameClaimType;
                userInfo.RoleClaimType = claimsIdentity.RoleClaimType;
            }
            else
            {
                userInfo.NameClaimType = JwtClaimTypes.Name;
                userInfo.RoleClaimType = JwtClaimTypes.Role;
            }

            if (claimsPrincipal.Claims.Any())
            {
                var claims = new List<ClaimValue>();
                var nameClaims = claimsPrincipal.FindAll(userInfo.NameClaimType);
                foreach (var claim in nameClaims)
                {
                    claims.Add(new ClaimValue(userInfo.NameClaimType, claim.Value));
                }

                // Uncomment this code if you want to send additional claims to the client.
                //foreach (var claim in claimsPrincipal.Claims.Except(nameClaims))
                //{
                //    claims.Add(new ClaimValue(claim.Type, claim.Value));
                //}

                userInfo.Claims = claims;
            }

            return userInfo;
        }
    }
}

In the client project, the services are added in the program file. The HttpClients are added as well as the AuthenticationStateProvider which can be used in the client UI.

using BlazorAzureADWithApis.Client.Services;
using Microsoft.AspNetCore.Components.Authorization;
using Microsoft.AspNetCore.Components.WebAssembly.Hosting;
using Microsoft.Extensions.DependencyInjection;
using Microsoft.Extensions.DependencyInjection.Extensions;
using System;
using System.Net.Http;
using System.Net.Http.Headers;
using System.Threading.Tasks;

namespace BlazorAzureADWithApis.Client
{
    public class Program
    {
        public static async Task Main(string[] args)
        {
            var builder = WebAssemblyHostBuilder.CreateDefault(args);
            builder.Services.AddOptions();
            builder.Services.AddAuthorizationCore();
            builder.Services.TryAddSingleton<AuthenticationStateProvider, HostAuthenticationStateProvider>();
            builder.Services.TryAddSingleton(sp => (HostAuthenticationStateProvider)sp.GetRequiredService<AuthenticationStateProvider>());
            builder.Services.AddTransient<AuthorizedHandler>();

            builder.Services.AddHttpClient("default", client =>
            {
                client.BaseAddress = new Uri(builder.HostEnvironment.BaseAddress);
                client.DefaultRequestHeaders.Accept.Add(new MediaTypeWithQualityHeaderValue("application/json"));

            });

            builder.Services.AddHttpClient("authorizedClient", client =>
            {
                client.DefaultRequestHeaders.Accept.Add(new MediaTypeWithQualityHeaderValue("application/json"));
            }).AddHttpMessageHandler<AuthorizedHandler>();

            builder.Services.AddTransient(sp => sp.GetRequiredService<IHttpClientFactory>().CreateClient("default"));

            await builder.Build().RunAsync();
        }
    }
}

The HostAuthenticationStateProvider implements the AuthenticationStateProvider and is used to call the user controller APIs and return the state to the UI.

using BlazorAzureADWithApis.Shared.Authorization;
using Microsoft.AspNetCore.Components;
using Microsoft.AspNetCore.Components.Authorization;
using Microsoft.Extensions.Logging;
using System;
using System.Net.Http;
using System.Net.Http.Json;
using System.Security.Claims;
using System.Threading.Tasks;

namespace BlazorAzureADWithApis.Client.Services
{
    // orig src https://github.com/berhir/BlazorWebAssemblyCookieAuth
    public class HostAuthenticationStateProvider : AuthenticationStateProvider
    {
        private static readonly TimeSpan _userCacheRefreshInterval = TimeSpan.FromSeconds(60);

        private const string LogInPath = "api/Account/Login";
        private const string LogOutPath = "api/Account/Logout";

        private readonly NavigationManager _navigation;
        private readonly HttpClient _client;
        private readonly ILogger<HostAuthenticationStateProvider> _logger;

        private DateTimeOffset _userLastCheck = DateTimeOffset.FromUnixTimeSeconds(0);
        private ClaimsPrincipal _cachedUser = new ClaimsPrincipal(new ClaimsIdentity());

        public HostAuthenticationStateProvider(NavigationManager navigation, HttpClient client, ILogger<HostAuthenticationStateProvider> logger)
        {
            _navigation = navigation;
            _client = client;
            _logger = logger;
        }

        public override async Task<AuthenticationState> GetAuthenticationStateAsync()
        {
            return new AuthenticationState(await GetUser(useCache: true));
        }

        public void SignIn(string customReturnUrl = null)
        {
            var returnUrl = customReturnUrl != null ? _navigation.ToAbsoluteUri(customReturnUrl).ToString() : null;
            var encodedReturnUrl = Uri.EscapeDataString(returnUrl ?? _navigation.Uri);
            var logInUrl = _navigation.ToAbsoluteUri($"{LogInPath}?returnUrl={encodedReturnUrl}");
            _navigation.NavigateTo(logInUrl.ToString(), true);
        }

        private async ValueTask<ClaimsPrincipal> GetUser(bool useCache = false)
        {
            var now = DateTimeOffset.Now;
            if (useCache && now < _userLastCheck + _userCacheRefreshInterval)
            {
                _logger.LogDebug("Taking user from cache");
                return _cachedUser;
            }

            _logger.LogDebug("Fetching user");
            _cachedUser = await FetchUser();
            _userLastCheck = now;

            return _cachedUser;
        }

        private async Task<ClaimsPrincipal> FetchUser()
        {
            UserInfo user = null;

            try
            {
                _logger.LogInformation(_client.BaseAddress.ToString());
                user = await _client.GetFromJsonAsync<UserInfo>("api/User");
            }
            catch (Exception exc)
            {
                _logger.LogWarning(exc, "Fetching user failed.");
            }

            if (user == null || !user.IsAuthenticated)
            {
                return new ClaimsPrincipal(new ClaimsIdentity());
            }

            var identity = new ClaimsIdentity(
                nameof(HostAuthenticationStateProvider),
                user.NameClaimType,
                user.RoleClaimType);

            if (user.Claims != null)
            {
                foreach (var claim in user.Claims)
                {
                    identity.AddClaim(new Claim(claim.Type, claim.Value));
                }
            }

            return new ClaimsPrincipal(identity);
        }
    }
}

The AuthorizedHandler implements the DelegatingHandler which can be used to add headers or handle HTTP request logic when the user is authenticated.

using System.Net;
using System.Net.Http;
using System.Threading;
using System.Threading.Tasks;

namespace BlazorAzureADWithApis.Client.Services
{
    // orig src https://github.com/berhir/BlazorWebAssemblyCookieAuth
    public class AuthorizedHandler : DelegatingHandler
    {
        private readonly HostAuthenticationStateProvider _authenticationStateProvider;

        public AuthorizedHandler(HostAuthenticationStateProvider authenticationStateProvider)
        {
            _authenticationStateProvider = authenticationStateProvider;
        }

        protected override async Task<HttpResponseMessage> SendAsync(
            HttpRequestMessage request,
            CancellationToken cancellationToken)
        {
            var authState = await _authenticationStateProvider.GetAuthenticationStateAsync();
            HttpResponseMessage responseMessage;
            if (!authState.User.Identity.IsAuthenticated)
            {
                // if user is not authenticated, immediately set response status to 401 Unauthorized
                responseMessage = new HttpResponseMessage(HttpStatusCode.Unauthorized);
            }
            else
            {
                responseMessage = await base.SendAsync(request, cancellationToken);
            }

            if (responseMessage.StatusCode == HttpStatusCode.Unauthorized)
            {
                // if server returned 401 Unauthorized, redirect to login page
                _authenticationStateProvider.SignIn();
            }

            return responseMessage;
        }
    }
}

Now the AuthorizeView and the Authorized components can be used to hide or display the UI elements depending on the authentication state of the identity.

@inherits LayoutComponentBase

<div class="page">
    <div class="sidebar">
        <NavMenu />
    </div>

    <div class="main">
        <div class="top-row px-4 auth">
            <AuthorizeView>
                <Authorized>
                    <strong>Hello, @context.User.Identity.Name!</strong>
                    <form method="post" action="api//Account/Logout">
                        <AntiForgeryTokenInput/>
                        <button class="btn btn-link" type="submit">Sign out</button>
                    </form>
                </Authorized>
                <NotAuthorized>
                    <a href="Account/Login">Log in</a>
                </NotAuthorized>
            </AuthorizeView>

        </div>

        <div class="content px-4">
            @Body
        </div>
    </div>
</div>

For more information on thes see the Microsoft docs or this blog.

Cross-site request forgery CSRF protection

Cross-site request forgery (also known as XSRF or CSRF) is a possible security problem when using cookies. We can protect against this using anti-forgery tokens and will add this to the Blazor application. To support this, we can use a Razor page _Host.cshtml file instead of a static html file. This host page is added to the server project and uses the default div with the id app just like the index.html file from the dotnet template. The index.html can be deleted form the client project. The render-mode is per default WebAssembly. If you copied a _Host file from a server Blazor template, you would have to change this or remove it.

The Anti-forgery token is added at the bottom of the file in the body. A antiForgeryToken.js is also added to the razor Page _Host file. Also make sure the headers match the headers from the index.html which you deleted.

@page "/"
@namespace BlazorAzureADWithApis.Pages
@using BlazorAzureADWithApis.Client
@addTagHelper *, Microsoft.AspNetCore.Mvc.TagHelpers
@{
    Layout = null;
}

<!DOCTYPE html>
<html lang="en">
<head>
    <meta charset="utf-8" />
    <meta name="viewport" content="width=device-width, initial-scale=1.0, maximum-scale=1.0, user-scalable=no" />
    <title>Blazor AAD Cookie</title>
    <base href="~/" />
    <link rel="stylesheet" href="css/bootstrap/bootstrap.min.css" />
    <link href="css/app.css" rel="stylesheet" />
    <link href="BlazorAzureADWithApis.Client.styles.css" rel="stylesheet" />
    <link href="manifest.json" rel="manifest" />
    <link rel="apple-touch-icon" sizes="512x512" href="icon-512.png" />
</head>
<body>

    <div id="app">
        <!-- Spinner -->
        <div class="spinner d-flex align-items-center justify-content-center" style="position:absolute; width: 100%; height: 100%; background: #d3d3d39c; left: 0; top: 0; border-radius: 10px;">
            <div class="spinner-border text-success" role="status">
                <span class="sr-only">Loading...</span>
            </div>
        </div>
    </div>

    @*<component type="typeof(App)" render-mode="WebAssembly" />*@

    <div id="blazor-error-ui">
        <environment include="Staging,Production">
            An error has occurred. This application may no longer respond until reloaded.
        </environment>
        <environment include="Development">
            An unhandled exception has occurred. See browser dev tools for details.
        </environment>
        <a href="" class="reload">Reload</a>
        <a class="dismiss">🗙</a>
    </div>

    <script src="_framework/blazor.webassembly.js"></script>
    <script src="antiForgeryToken.js"></script>
    @Html.AntiForgeryToken()
</body>
</html>

The MapFallbackToPage needs to be updated to use the _Host file instead of the static html.

app.UseEndpoints(endpoints =>
{
	endpoints.MapRazorPages();
	endpoints.MapControllers();
	endpoints.MapFallbackToPage("/_Host");
});

The AddAntiforgery is used to add the service for the CSRF protection by using a header named X-XSRF-TOKEN. The AutoValidateAntiforgeryTokenAttribute is added so that all POST, PUT, DELETE Http requests require an anti-forgery token.

public void ConfigureServices(IServiceCollection services)
{
    // + ...
	
	services.AddAntiforgery(options =>
	{
		options.HeaderName = "X-XSRF-TOKEN";
	});

	services.AddControllersWithViews(options =>
		options.Filters.Add(
			new AutoValidateAntiforgeryTokenAttribute()));

}

The antiForgeryToken.js Javascript file uses the hidden input created by the _Host Razor Page file and returns this in a function.


function getAntiForgeryToken() {
    var elements = document.getElementsByName('__RequestVerificationToken');
    if (elements.length > 0) {
        return elements[0].value
    }

    console.warn('no anti forgery token found!');
    return null;
}

The Javascript function can be used in any Blazor component now by using the JSRuntime. The anti-forgery token can be added to the X-XSRF-TOKEN HTTP request header which is configured in the server Startup class.

@page "/directapi"
@inject HttpClient Http
@inject IJSRuntime JSRuntime

<h1>Data from Direct API</h1>

@if (apiData == null)
{
    <p><em>Loading...</em></p>
}
else
{
    <table class="table">
        <thead>
            <tr>
                <th>Data</th>
            </tr>
        </thead>
        <tbody>
            @foreach (var data in apiData)
            {
                <tr>
                    <td>@data</td>
                </tr>
            }
        </tbody>
    </table>
}

@code {
    private string[] apiData;

    protected override async Task OnInitializedAsync()
    {
        var token = await JSRuntime.InvokeAsync<string>("getAntiForgeryToken");

        Http.DefaultRequestHeaders.Add("X-XSRF-TOKEN", token);

        apiData = await Http.GetFromJsonAsync<string[]>("api/DirectApi");
    }

}

If you are using forms directly in the Blazor template, then a custom component which creates a hidden input can be used to add the anti forgery token to the HTTP POST, PUT, DELETE requests. Underneath is a new component called AntiForgeryTokenInput.

@inject IJSRuntime JSRuntime

<input type="hidden" id="__RequestVerificationToken"
       name="__RequestVerificationToken" value="@GetToken()">

@code {

    private string token = "";

    protected override async Task OnInitializedAsync()
    {
        token = await JSRuntime.InvokeAsync<string>("getAntiForgeryToken");
    }

    public string GetToken()
    {
        return token;
    }

}

The AntiForgeryTokenInput can be used directly in the HTML code.

<form method="post" action="api/Account/Logout">
	<AntiForgeryTokenInput/>
	<button class="btn btn-link" type="submit">Sign out</button>
</form>

In the server application, the ValidateAntiForgeryToken attribute can be used the force using anti forgery token protection explicitly.

[ValidateAntiForgeryToken] 
[Authorize]
[HttpPost("Logout")]
public IActionResult Logout()
{
	return SignOut(
		new AuthenticationProperties { RedirectUri = "/" },
		CookieAuthenticationDefaults.AuthenticationScheme,
		OpenIdConnectDefaults.AuthenticationScheme);
}

Using cookies with Blazor WASM and ASP.NET Core hosted applications can be used to support the high security flow requirements which are required for certain application deployments. This makes it possible to add extra layers of security just by having a trusted application implement the security parts. The Blazor client application can only use the API deployed on the host in the same domain. Any Open ID Connect provider can be supported in this way, just like a Razor Page application. This makes it easier to support logout requirements by using a OIDC backchannel logout and so on. MTLS and sender constrained tokens can also be supported with this setup. SignalR no longer needs to add the access tokens to the URL of the web sockets as cookies can be used on the same domain.

Would love feedback on further ways of improving this.

Links:

https://github.com/berhir/BlazorWebAssemblyCookieAuth

Secure a Blazor WebAssembly application with cookie authentication

https://docs.microsoft.com/en-us/aspnet/core/blazor/components/prerendering-and-integration?view=aspnetcore-5.0&pivots=webassembly#configuration

https://docs.microsoft.com/en-us/aspnet/core/security/anti-request-forgery

https://docs.microsoft.com/en-us/aspnet/core/blazor/security

Securing Blazor Server App using IdentityServer4

https://github.com/saber-wang/BlazorAppFormTset

https://jonhilton.net/blazor-wasm-prerendering-missing-http-client/

https://andrewlock.net/enabling-prerendering-for-blazor-webassembly-apps/

https://docs.microsoft.com/en-us/aspnet/core/blazor/security/webassembly/additional-scenarios

Setting dynamic Metadata for Blazor Web assembly

$
0
0

This post shows how HTML header meta data can be dynamically updated or changed for a Blazor Web assembly application routes hosted in ASP.NET Core. This can be usually for changing how URL link previews are displayed when sharing links.

Code: https://github.com/damienbod/BlazorMetaData

Updating the HTTP Header data to match the URL route used in the Blazor WASM can be supported using a Razor Page host file instead of using a static html file. The Razor Page _Host file can use code behind and a model from this class. The Model can the be used to display the different values as required. This is a Hosted WASM application using ASP.NET Core as the server.

@page "/"
@model BlazorMeta.Server.Pages._HostModel
@namespace BlazorMeta.Pages
@addTagHelper *, Microsoft.AspNetCore.Mvc.TagHelpers
@{
    Layout = null;
}

<!DOCTYPE html>
<html lang="en">
<head>
    <meta charset="utf-8" />
    <meta name="viewport" content="width=device-width, initial-scale=1.0, maximum-scale=1.0, user-scalable=no" />
    <meta property="og:type" content="website" />
    <meta property="og:title" content="Blazor BFF AAD Cookie 2021 @Model.SiteName" />
    <meta property="og:url" content="https://damienbod.com" />
    <meta property="og:image" content="https://avatars.githubusercontent.com/u/3442158?s=400&v=4">
    <meta property="og:image:height" content="384" />
    <meta property="og:image:width" content="384" />
    <meta property="og:site_name" content="@Model.SiteName" />
    <meta property="og:description" content="@Model.PageDescription" />
    <meta name="twitter:site" content="damien_bod" />
    <meta name="twitter:card" content="summary" />
    <meta name="twitter:description" content="@Model.PageDescription" />
    <meta name="twitter:title" content="Blazor BFF AAD Cookie 2021 @Model.SiteName" />

    <title>Blazor AAD Cookie</title>
    <base href="~/" />
    <link rel="stylesheet" href="css/bootstrap/bootstrap.min.css" />
    <link href="css/app.css" rel="stylesheet" />
    <link href="BlazorMeta.Client.styles.css" rel="stylesheet" />
    <link rel="apple-touch-icon" sizes="512x512" href="icon-512.png" />
</head>
<body>

    <div id="app">
        <!-- Spinner -->
        <div class="spinner d-flex align-items-center justify-content-center" style="position:absolute; width: 100%; height: 100%; background: #d3d3d39c; left: 0; top: 0; border-radius: 10px;">
            <div class="spinner-border text-success" role="status">
                <span class="sr-only">Loading...</span>
            </div>
        </div>
    </div>

    @*<component type="typeof(App)" render-mode="WebAssembly" />*@

    <div id="blazor-error-ui">
        <environment include="Staging,Production">
            An error has occurred. This application may no longer respond until reloaded.
        </environment>
        <environment include="Development">
            An unhandled exception has occurred. See browser dev tools for details.
        </environment>
        <a href="" class="reload">Reload</a>
        <a class="dismiss">🗙</a>
    </div>

    <script src="_framework/blazor.webassembly.js"></script>
</body>
</html>

The code behind _Host class adds the public properties of the model which are used in the template _cshtml file. The OnGet sets the values of the properties using the path property of the HTTP request.

using Microsoft.AspNetCore.Mvc.RazorPages;

namespace BlazorMeta.Server.Pages
{
    public class _HostModel : PageModel
    {
        public string SiteName { get; set; } = "damienbod";
        public string PageDescription { get; set; } = "damienbod init description";
        public void OnGet()
        {
            (SiteName, PageDescription) = GetMetaData();
        }

        private (string, string) GetMetaData()
        {
            var metadata = Request.Path.Value switch
            {
                "/counter" => ("damienbod/counter", "This is the meta data for the counter"),
                "/fetchdata" => ("damienbod/fetchdata", "This is the meta data for the fetchdata"),
                _ => ("damienbod", "general description")
            };
            return metadata;
        }
    }
}

The MapFallbackToPage must be set to use the _Host Razor Page layout or fallback file.

app.UseEndpoints(endpoints =>
{
	endpoints.MapRazorPages();
	endpoints.MapControllers();
	endpoints.MapFallbackToPage("/_Host");
});

When the application is deployed to a public server, an URL with the Blazor route can be copied and pasted into the software services or tools which then display the preview data.

Each service uses different meta data headers and you would need to add the headers with the dynamic content as required. Underneath are some examples of what can be displayed.

LinkedIn URL preview

Slack URL preview

Twitter URL preview

Microsoft teams URL preview

Links:

https://www.w3schools.com/tags/tag_meta.asp

https://cards-dev.twitter.com/validator

https://developer.twitter.com/en/docs/twitter-for-websites/cards/overview/markup

https://swimburger.net/blog/dotnet/pre-render-blazor-webassembly-at-build-time-to-optimize-for-search-engines

Securing Blazor Web assembly using Cookies and Auth0

$
0
0

The article shows how an ASP.NET Core Blazor web assembly UI hosted in an ASP.NET Core application can be secured using cookies. Auth0 is used as the identity provider. The trusted application is protected using the Open ID Connect code flow with a secret and using PKCE. The API calls are protected using the secure cookie and anti-forgery tokens to protect against CSRF. This architecture is also known as the Backends for Frontends (BFF) Pattern.

Code: https://github.com/damienbod/SeparatingApisPerSecurityLevel

Blogs in this series

The application was built as described in the previous blog in this series. Please refer to that blog for implementation details about the WASM application, user session and anti-forgery tokens. Setting up the Auth0 authentication and the differences are described in this blog.

An Auth0 account is required and a Regular Web Application was setup for this. This is not an SPA application and must always be deployed with a backend which can keep a secret. The WASM client can only use the APIs on the same domain and uses cookies. All application authentication is implemented in the trusted backend and the secure data is encrypted in the cookie.

The Microsoft.AspNetCore.Authentication.OpenIdConnect Nuget package is used to add the authentication to the ASP.NET Core application. User secrets are used for configuration which uses the Auth0 sensitive data

<Project Sdk="Microsoft.NET.Sdk.Web">

  <PropertyGroup>
    <TargetFramework>net5.0</TargetFramework>
    <WebProject_DirectoryAccessLevelKey>1</WebProject_DirectoryAccessLevelKey>
    <UserSecretsId>de0b7f31-65d4-46d6-8382-30c94073cf4a</UserSecretsId>
  </PropertyGroup>

  <ItemGroup>
    <ProjectReference Include="..\Client\BlazorAuth0Bff.Client.csproj" />
    <ProjectReference Include="..\Shared\BlazorAuth0Bff.Shared.csproj" />
  </ItemGroup>
  
  <ItemGroup>
    <PackageReference Include="Microsoft.AspNetCore.Components.WebAssembly.Server" Version="5.0.5" />
    <PackageReference Include="Microsoft.AspNetCore.Authentication.JwtBearer" Version="5.0.5" NoWarn="NU1605" />
    <PackageReference Include="Microsoft.AspNetCore.Authentication.OpenIdConnect" Version="5.0.5" NoWarn="NU1605" />
    <PackageReference Include="IdentityModel" Version="5.1.0" />
    <PackageReference Include="IdentityModel.AspNetCore" Version="3.0.0" />
  </ItemGroup>

</Project>

The ConfigureServices method in the Startup class of the ASP.NET Core Blazor server application is used to add the authentication. The Open ID Connect code flow with PKCE and a client secret is used for the default challenge and a cookie is used to persist the tokens if authenticated. The Blazor client WASM uses the cookie to access the API.

The Open ID Connect is configured to match the Auth0 settings for the client. A client secret is required and used to authenticate the application. The PKCE option is set explicitly to use PKCE with the client configuration. The required scopes are set so that the profile is returned and an email. These are OIDC standard scopes. The user profile API is used to return the profile data and so keep the id_token small. The tokens are persisted. If successful, the data is persisted to an identity cookie. The logout client is configured as documented by Auth0 in its example.

services.AddAuthentication(options => {
	options.DefaultScheme = CookieAuthenticationDefaults.AuthenticationScheme;
	options.DefaultChallengeScheme = OpenIdConnectDefaults.AuthenticationScheme;
})
.AddCookie(options =>
{
	options.Cookie.Name = "__Host-BlazorServer";
	options.Cookie.SameSite = SameSiteMode.Lax;
})
.AddOpenIdConnect(OpenIdConnectDefaults.AuthenticationScheme, options => {
	options.Authority = $"https://{Configuration["Auth0:Domain"]}";
	options.ClientId = Configuration["Auth0:ClientId"];
	options.ClientSecret = Configuration["Auth0:ClientSecret"];
	options.ResponseType = OpenIdConnectResponseType.Code;
	options.Scope.Clear();
	options.Scope.Add("openid");
	options.Scope.Add("profile");
	options.Scope.Add("email");
	options.CallbackPath = new PathString("/signin-oidc");
	options.ClaimsIssuer = "Auth0";
	options.SaveTokens = true;
	options.UsePkce = true;
	options.GetClaimsFromUserInfoEndpoint = true;
	options.TokenValidationParameters.NameClaimType = "name";

	options.Events = new OpenIdConnectEvents
	{
		// handle the logout redirection 
		OnRedirectToIdentityProviderForSignOut = (context) =>
		{
			var logoutUri = $"https://{Configuration["Auth0:Domain"]}/v2/logout?client_id={Configuration["Auth0:ClientId"]}";

			var postLogoutUri = context.Properties.RedirectUri;
			if (!string.IsNullOrEmpty(postLogoutUri))
			{
				if (postLogoutUri.StartsWith("/"))
				{
					// transform to absolute
					var request = context.Request;
					postLogoutUri = request.Scheme + "://" + request.Host + request.PathBase + postLogoutUri;
				}
				logoutUri += $"&returnTo={ Uri.EscapeDataString(postLogoutUri)}";
			}

			context.Response.Redirect(logoutUri);
			context.HandleResponse();

			return Task.CompletedTask;
		}
	};
});

The Configure method is implement to require authentication. The UseAuthentication extension method is required. Our endpoints are added like in the previous blog.

public void Configure(IApplicationBuilder app, IWebHostEnvironment env)
{
	// IdentityModelEventSource.ShowPII = true;
	JwtSecurityTokenHandler.DefaultInboundClaimTypeMap.Clear();

	app.UseHttpsRedirection();
	app.UseBlazorFrameworkFiles();
	app.UseStaticFiles();

	app.UseRouting();
	app.UseAuthentication();
	app.UseAuthorization();

	app.UseEndpoints(endpoints =>
	{
		endpoints.MapRazorPages();
		endpoints.MapControllers();
		endpoints.MapFallbackToPage("/_Host");
	});
}

The Auth0 configuration can be downloaded in the sample application, or you can configure this direct in the Auth0 UI and copy this. Three properties are required. I added these to the user secrets in my application development. If I deployed this to Azure, I would add these to an Azure Key Vault and can then use managed identities to access the secrets.

"Auth0": {
   "Domain": "your-domain-in-auth0",
   "ClientId": "--in-secrets--",
   "ClientSecret": "--in-secrets--"
}

Now everything will run and you can now use ASP.NET Core Blazor BFF with Auth0. We don’t need any access tokens in the browser. This was really simple to configure and only ASP.NET Core standard Nuget packages are used. Security best practices are supported by Auth0 and it is really easy to setup. In production I would force MFA and FIDO2 if possible.

Links

Securing Blazor Web assembly using Cookies and Azure AD

https://auth0.com/

https://docs.microsoft.com/en-us/aspnet/core/security/anti-request-forgery

https://docs.microsoft.com/en-us/aspnet/core/blazor/security

https://docs.microsoft.com/en-us/aspnet/core/blazor/security/webassembly/additional-scenarios

Securing multiple Auth0 APIs in ASP.NET Core using OAuth Bearer tokens

$
0
0

This article shows a strategy for security multiple APIs which have different authorization requirements but the tokens are issued by the same authority. Auth0 is used as the identity provider. A user API and a service API are implemented in the ASP.NET Core API project. The access token for the user API data is created using an Open ID Connect Code flow with PKCE authentication and the service API access token is created using the client credentials flow in the trusted backend of the Blazor application. It is important the both access tokens will only work for the intended API.

Code: https://github.com/damienbod/SeparatingApisPerSecurityLevel

Setup

The projects are setup to use a Blazor WASM application hosted in ASP.NET Core secured using the Open ID Connect code flow with PKCE and the BFF pattern. Cookies are used to persist the session. This application uses two separate APIs, a user data API and a service API. The access token from the OIDC authentication is used to access the user data API and a client credentials flow is used to get an access token for the service API. Auth0 is setup using a regular web application and an API configuration. A scope was added to the API which is requested in the client application and validated in the API project.

Implementing the APIs in ASP.NET Core

OAuth2 JwtBearer auth is used to secure the APIs. As we use the same Authority and the same Audience, a single scheme can be used for both applications. We use the default JwtBearerDefaults.AuthenticationScheme.

services.AddAuthentication(options =>
{
	options.DefaultAuthenticateScheme 
		= JwtBearerDefaults.AuthenticationScheme;
	options.DefaultChallengeScheme 
		= JwtBearerDefaults.AuthenticationScheme;
}).AddJwtBearer(options =>
{
	options.Authority 
		= "https://dev-damienbod.eu.auth0.com/";
	options.Audience 
		= "https://auth0-api1";
});

The AddAuthorization method is used to setup the policies so that each API can authorize that the correct token was used to request the data. Two policies are added, one for the user access token and one for the service access token. The access token created using the client credentials flow with Auth0 can be authorized using the azp claim and the Auth0 gty claim. The API client-id is validated using the token claims. The user access token is validated using an IAuthorizationHandler implementation. A default policy is added to the AddControllers method to require an authenticated user meaning a valid access token.

services.AddSingleton<IAuthorizationHandler, UserApiScopeHandler>();

services.AddAuthorization(policies =>
{
	policies.AddPolicy("p-user-api-auth0", p =>
	{
		p.Requirements.Add(new UserApiScopeHandlerRequirement());
		// Validate id of application for which the token was created
		p.RequireClaim("azp", "AScjLo16UadTQRIt2Zm1xLHVaEaE1feA");
	});

	policies.AddPolicy("p-service-api-auth0", p =>
	{
		// Validate id of application for which the token was created
		p.RequireClaim("azp", "naWWz6gdxtbQ68Hd2oAehABmmGM9m1zJ");
		p.RequireClaim("gty", "client-credentials");
	});
});

services.AddControllers(options =>
{
	var policy = new AuthorizationPolicyBuilder()
		.RequireAuthenticatedUser()
		.Build();
	options.Filters.Add(new AuthorizeFilter(policy));
});

Swagger is added with an OAuth UI so that we can add access tokens manually to test the APIs.

services.AddSwaggerGen(c =>
{
	// add JWT Authentication
	var securityScheme = new OpenApiSecurityScheme
	{
		Name = "JWT Authentication",
		Description = "Enter JWT Bearer token **_only_**",
		In = ParameterLocation.Header,
		Type = SecuritySchemeType.Http,
		Scheme = "bearer", // must be lower case
		BearerFormat = "JWT",
		Reference = new OpenApiReference
		{
			Id = JwtBearerDefaults.AuthenticationScheme,
			Type = ReferenceType.SecurityScheme
		}
	};
	c.AddSecurityDefinition(securityScheme.Reference.Id, securityScheme);
	c.AddSecurityRequirement(new OpenApiSecurityRequirement
	{
		{securityScheme, new string[] { }}
	});

	c.SwaggerDoc("v1", new OpenApiInfo
	{
		Title = "My API",
		Version = "v1",
		Description = "My API",
		Contact = new OpenApiContact
		{
			Name = "damienbod",
			Email = string.Empty,
			Url = new Uri("https://damienbod.com/"),
		},
	});
});

The Configure method is used to add the middleware to implement the API application. It is important to use the UseAuthentication middleware and you should have no reason to implement this yourself. If you find yourself implementing some special authentication middleware for whatever reason, maybe your security architecture might be incorrect.

public void Configure(IApplicationBuilder app)
{
	app.UseSwagger();
	app.UseSwaggerUI(c =>
	{
		c.SwaggerEndpoint("/swagger/v1/swagger.json", "User API");
		c.RoutePrefix = string.Empty;
	});

	// only needed for browser clients
	// app.UseCors("AllowAllOrigins");

	app.UseHttpsRedirection();

	app.UseRouting();

	app.UseAuthentication();
	app.UseAuthorization();

	app.UseEndpoints(endpoints =>
	{
		endpoints.MapControllers();
	});
}

The UserApiScopeHandler class implements the abstract AuthorizationHandler class. Logic can be implemented here to fulfil the UserApiScopeHandlerRequirement requirement. This requirement is what we use to authorize a request for the user data API. This handler just validates if the required scope exists in the scope claim.

public class UserApiScopeHandler : 
	AuthorizationHandler<UserApiScopeHandlerRequirement>
{

	protected override Task HandleRequirementAsync(
		AuthorizationHandlerContext context, 
		UserApiScopeHandlerRequirement requirement)
	{
		if (context == null)
			throw new ArgumentNullException(nameof(context));
		if (requirement == null)
			throw new ArgumentNullException(nameof(requirement));

		var scopeClaim = context
			.User
			.Claims
			.FirstOrDefault(t => t.Type == "scope");

		if (scopeClaim != null)
		{
			var scopes = scopeClaim
				.Value
				.Split(" ", StringSplitOptions.RemoveEmptyEntries);
				
			if (scopes.Any(t => t == "auth0-user-api-one"))
			{
				context.Succeed(requirement);
			}
		}

		return Task.CompletedTask;
	}
}

public class UserApiScopeHandlerRequirement : 
	IAuthorizationRequirement{ }

The policies can be applied anywhere within the application and the authorization logic is not tightly coupled anywhere to the business of the application. By separating the authorization implementation with the business implementation of the application, it is easier to maintain and understand the authorization and business of the application. This has worked well for me and I find it easy to test and maintain applications setup like this over long periods of time.

[Authorize(Policy = "p-user-api-auth0")]
[ApiController]
[Route("api/[controller]")]
public class UserOneController : ControllerBase

The p-service-api-auth policy is applied to the Service API.

[Authorize(Policy = "p-service-api-auth0")]
[ApiController]
[Route("api/[controller]")]
public class ServiceTwoController : ControllerBase

When the application is started, the swagger UI is displayed and any access token can be pasted into the swagger UI. Both APIs are displayed in the swagger and both APIs require a different access token.

Calling the clients from ASP.NET Core

A Blazor WASM application hosted in ASP.NET Core is used to access the APIs. The application is secured using a trusted server rendered application and the OIDC data is persisted to a secure cookie. The OnRedirectToIdentityProvider method is used to set the audience of the API to request the access token with the required scope. The scopes are added to the OIDC options.

services.AddAuthentication(options =>
{
	options.DefaultScheme = CookieAuthenticationDefaults.AuthenticationScheme;
	options.DefaultChallengeScheme = OpenIdConnectDefaults.AuthenticationScheme;
})
.AddCookie(options =>
{
	options.Cookie.Name = "__Host-BlazorServer";
	options.Cookie.SameSite = SameSiteMode.Lax;
})
.AddOpenIdConnect(OpenIdConnectDefaults.AuthenticationScheme, options =>
{
	options.Authority = $"https://{Configuration["Auth0:Domain"]}";
	options.ClientId = Configuration["Auth0:ClientId"];
	options.ClientSecret = Configuration["Auth0:ClientSecret"];
	options.ResponseType = OpenIdConnectResponseType.Code;
	options.Scope.Clear();
	options.Scope.Add("openid");
	options.Scope.Add("profile");
	options.Scope.Add("email");
	options.Scope.Add("auth0-user-api-one");
	options.CallbackPath = new PathString("/signin-oidc");
	options.ClaimsIssuer = "Auth0";
	options.SaveTokens = true;
	options.UsePkce = true;
	options.GetClaimsFromUserInfoEndpoint = true;
	options.TokenValidationParameters.NameClaimType = "name";

	options.Events = new OpenIdConnectEvents
	{
		// handle the logout redirection 
		OnRedirectToIdentityProviderForSignOut = (context) =>
		{
			var logoutUri = $"https://{Configuration["Auth0:Domain"]}/v2/logout?client_id={Configuration["Auth0:ClientId"]}";

			var postLogoutUri = context.Properties.RedirectUri;
			if (!string.IsNullOrEmpty(postLogoutUri))
			{
				if (postLogoutUri.StartsWith("/"))
				{
					// transform to absolute
					var request = context.Request;
					postLogoutUri = request.Scheme + "://" + request.Host + request.PathBase + postLogoutUri;
				}
				logoutUri += $"&returnTo={ Uri.EscapeDataString(postLogoutUri)}";
			}

			context.Response.Redirect(logoutUri);
			context.HandleResponse();

			return Task.CompletedTask;
		},
		OnRedirectToIdentityProvider = context =>
		{
			// The context's ProtocolMessage can be used to pass along additional query parameters
			// to Auth0's /authorize endpoint.
			// 
			// Set the audience query parameter to the API identifier to ensure the returned Access Tokens can be used
			// to call protected endpoints on the corresponding API.
			context.ProtocolMessage.SetParameter("audience", "https://auth0-api1");

			return Task.FromResult(0);
		}
	};
});

Calling the User API

A user API client service is used to request the data from the ASP.NET Core API. The access token is passed as a parameter and the IHttpClientFactory is used to create the HttpClient.

/// <summary>
/// setup to oidc client in the startup correctly
/// https://auth0.com/docs/quickstart/webapp/aspnet-core#enterprise-saml-and-others-
/// </summary>
public class MyApiUserOneClient
{
	private readonly IConfiguration _configurations;
	private readonly IHttpClientFactory _clientFactory;

	public MyApiUserOneClient(
		IConfiguration configurations,
		IHttpClientFactory clientFactory)
	{
		_configurations = configurations;
		_clientFactory = clientFactory;
	}

	public async Task<List<string>> GetUserOneApiData(string accessToken)
	{
		try
		{
			var client = _clientFactory.CreateClient();

			client.BaseAddress = new Uri(_configurations["MyApiUrl"]);

			client.SetBearerToken(accessToken);

			var response = await client.GetAsync("api/UserOne");
			if (response.IsSuccessStatusCode)
			{
				var data = await JsonSerializer.DeserializeAsync<List<string>>(
				await response.Content.ReadAsStreamAsync());

				return data;
			}

			throw new ApplicationException($"Status code: {response.StatusCode}, Error: {response.ReasonPhrase}");
		}
		catch (Exception e)
		{
			throw new ApplicationException($"Exception {e}");
		}
	}
}

The user access token is saved to the HttpContext after a successful sign-in and the GetTokenAsync method with the “access_token” parameter is used to retrieve the user access token.

private readonly MyApiUserOneClient _myApiUserOneClient;

public CallUserApiController(
	MyApiUserOneClient myApiUserOneClient)
{
	_myApiUserOneClient = myApiUserOneClient;
}

[HttpGet]
public async Task<IActionResult> GetAsync()
{
	// call user API
	string accessToken = 
		await HttpContext.GetTokenAsync("access_token");
	var userData = 
		await _myApiUserOneClient
			.GetUserOneApiData(accessToken);

	return Ok(userData);
}

Calling the Service API

Using a service API requires requesting an access token using the OAuth client credentials flow. This flow can only be used in a trusted backend and a secret is required to request an access token. No user is involved. This is a machine to machine request. The access token is persisted to a distributed cache.

public class Auth0CCTokenApiService
{
	private readonly ILogger<Auth0CCTokenApiService> _logger;
	private readonly Auth0ApiConfiguration _auth0ApiConfiguration;

	private static readonly Object _lock = new Object();
	private IDistributedCache _cache;

	private const int cacheExpirationInDays = 1;

	private class AccessTokenResult
	{
		public string AcessToken { get; set; } = string.Empty;
		public DateTime ExpiresIn { get; set; }
	}

	private class AccessTokenItem
	{
		public string access_token { get; set; } = string.Empty;
		public int expires_in { get; set; }
		public string token_type { get; set; }
		public string scope { get; set; }
	}

	public Auth0CCTokenApiService(
			IOptions<Auth0ApiConfiguration> auth0ApiConfiguration,
			IHttpClientFactory httpClientFactory,
			ILoggerFactory loggerFactory,
			IDistributedCache cache)
	{
		_auth0ApiConfiguration = auth0ApiConfiguration.Value;
		_logger = loggerFactory.CreateLogger<Auth0CCTokenApiService>();
		_cache = cache;
	}

	public async Task<string> GetApiToken(HttpClient client, string api_name)
	{
		var accessToken = GetFromCache(api_name);

		if (accessToken != null)
		{
			if (accessToken.ExpiresIn > DateTime.UtcNow)
			{
				return accessToken.AcessToken;
			}
			else
			{
				// remove  => NOT Needed for this cache type
			}
		}

		_logger.LogDebug($"GetApiToken new from oauth server for {api_name}");

		// add
		var newAccessToken = await GetApiTokenClient(client);
		AddToCache(api_name, newAccessToken);

		return newAccessToken.AcessToken;
	}

	private async Task<AccessTokenResult> GetApiTokenClient(HttpClient client)
	{
		try
		{
			var payload = new Auth0ClientCrendentials
			{
				client_id = _auth0ApiConfiguration.ClientId,
				client_secret = _auth0ApiConfiguration.ClientSecret,
				audience = _auth0ApiConfiguration.Audience
			};

			var authUrl = _auth0ApiConfiguration.Url;
			var tokenResponse = await client.PostAsJsonAsync(authUrl, payload);

			if (tokenResponse.StatusCode == System.Net.HttpStatusCode.OK)
			{
				var result = await tokenResponse.Content.ReadFromJsonAsync<AccessTokenItem>();
				DateTime expirationTime = DateTimeOffset.FromUnixTimeSeconds(result.expires_in).DateTime;
				return new AccessTokenResult
				{
					AcessToken = result.access_token,
					ExpiresIn = expirationTime
				};
			}

			_logger.LogError($"tokenResponse.IsError Status code: {tokenResponse.StatusCode}, Error: {tokenResponse.ReasonPhrase}");
			throw new ApplicationException($"Status code: {tokenResponse.StatusCode}, Error: {tokenResponse.ReasonPhrase}");
		}
		catch (Exception e)
		{
			_logger.LogError($"Exception {e}");
			throw new ApplicationException($"Exception {e}");
		}
	}

	private void AddToCache(string key, AccessTokenResult accessTokenItem)
	{
		var options = new DistributedCacheEntryOptions().SetSlidingExpiration(TimeSpan.FromDays(cacheExpirationInDays));

		lock (_lock)
		{
			_cache.SetString(key, System.Text.Json.JsonSerializer.Serialize(accessTokenItem), options);
		}
	}

	private AccessTokenResult GetFromCache(string key)
	{
		var item = _cache.GetString(key);
		if (item != null)
		{
			return System.Text.Json.JsonSerializer.Deserialize<AccessTokenResult>(item);
		}

		return null;
	}
}

The MyApiServiceTwoClient service uses the client credentials token client to get the access token and request data from the service API.

public class MyApiServiceTwoClient
{
	private readonly IConfiguration _configurations;
	private readonly IHttpClientFactory _clientFactory;
	private readonly Auth0CCTokenApiService _auth0TokenApiService;

	public MyApiServiceTwoClient(
		IConfiguration configurations,
		IHttpClientFactory clientFactory,
		Auth0CCTokenApiService auth0TokenApiService)
	{
		_configurations = configurations;
		_clientFactory = clientFactory;
		_auth0TokenApiService = auth0TokenApiService;
	}

	public async Task<List<string>> GetServiceTwoApiData()
	{
		try
		{
			var client = _clientFactory.CreateClient();

			client.BaseAddress = new Uri(_configurations["MyApiUrl"]);

			var access_token = await _auth0TokenApiService.GetApiToken(client, "ServiceTwoApi");

			client.SetBearerToken(access_token);

			var response = await client.GetAsync("api/ServiceTwo");
			if (response.IsSuccessStatusCode)
			{
				var data = await JsonSerializer.DeserializeAsync<List<string>>(
				await response.Content.ReadAsStreamAsync());

				return data;
			}

			throw new ApplicationException($"Status code: {response.StatusCode}, Error: {response.ReasonPhrase}");
		}
		catch (Exception e)
		{
			throw new ApplicationException($"Exception {e}");
		}
	}
}


The services are added to the default IoC in ASP.NET Core so that construction injection can be used.

services.AddHttpClient();
services.AddOptions();

services.Configure<Auth0ApiConfiguration(Configuration.GetSection("Auth0ApiConfiguration");
services.AddScoped<Auth0CCTokenApiService>();
services.AddScoped<MyApiServiceTwoClient>();
services.AddScoped<MyApiUserOneClient>();

The service can be used anywhere in the code as required.

private readonly MyApiServiceTwoClient _myApiClientService;

public CallServiceApiController(
	MyApiServiceTwoClient myApiClientService)
{
	_myApiClientService = myApiClientService;
}

[HttpGet]
public async Task<IActionResult> GetAsync()
{
	// call service API
	var serviceData = await 
		_myApiClientService.GetServiceTwoApiData();

	return Ok(serviceData);
}

You can test the APIs in the swagger UI. I added a breakpoint to my application and copied the access token. I added the token to the swagger UI.

If you send a HTTP request using the wrong token for the intended API, the request will be rejected and a 401or 403 is returned. Without the extra authorization logic implemented with the policies, this request would not have failed.

Notes

It is really important to validate that only access tokens created for the specific APIs will work. There are different ways of implementing this. If using service APIs which are probably solution internal, you could possibly use network security as well to separate these into different security zones. It is really important to validate the no access non-functional use case where using the same identity provider to create the access token for different APIs or if the identity provider produces access tokens for different applications which will probably have different security requirements. For high security requirements, you could use sender constrained tokens.

Links

https://auth0.com/docs/quickstart/webapp/aspnet-core

https://docs.microsoft.com/en-us/aspnet/core/security/authorization/introduction

Open ID Connect

Securing Blazor Web assembly using Cookies and Auth0

Securing an ASP.NET Core app and web API using windows authentication

$
0
0

This post shows how an ASP.NET Core Web API and an ASP.NET Core Razor page application can be implemented to use windows authentication. The Razor page application uses Javascript to display an autocomplete control which gets the data indirectly from the service API which is protected using windows authentication. The Razor Page application uses the API to get the auto-complete suggestions data. Both applications are protected using windows authentication.

Code: https://github.com/damienbod/PoCWindowsAuth

Setup the API

The ASP.NET Core demo API is setup to use windows authentication. The launch settings windowsAuthentication property is set to true and the anonymousAuthentication property to false. The application host file settings on your development PC would also need to be configured to allow windows authentication, which is disabled by default. See the stack overflow link at the bottom for more information.

{
  "iisSettings": {
    "windowsAuthentication": true,
    "anonymousAuthentication": false,
    "iisExpress": {
      "applicationUrl": "https://localhost:44364",
      "sslPort": 44364
    }
  },

The Startup ConfigureServices method is configured to require authentication using the IISDefaults.AuthenticationScheme scheme. This would need to be changed if you were using a different hosting model.

public void ConfigureServices(IServiceCollection services)
{
	services.AddAuthentication(IISDefaults.AuthenticationScheme);

	services.AddControllers().AddJsonOptions(option =>
		option.JsonSerializerOptions
              .PropertyNamingPolicy = JsonNamingPolicy.CamelCase);
}

public void Configure(IApplicationBuilder app, IWebHostEnvironment env)
{
	if (env.IsDevelopment())
	{
		app.UseDeveloperExceptionPage();
	}

	app.UseHttpsRedirection();

	app.UseRouting();

	app.UseAuthentication();
	app.UseAuthorization();

	app.UseEndpoints(endpoints =>
	{
		endpoints.MapControllers();
	});
}

The API is protected using the authorize attribute. This example returns the user name from the windows authentication.

[Authorize]
[ApiController]
[Route("api/[controller]")]
public class MyDataController : ControllerBase
{

	private readonly ILogger<MyDataController> _logger;

	public MyDataController(ILogger<MyDataController> logger)
	{
		_logger = logger;
	}

	[HttpGet]
	public IEnumerable<string> Get()
	{
		return new List<string> { User.Identity.Name };
	}
}

Implement the ASP.NET Core Razor pages

The application calling the API also requires windows authentication and requests the data from the API project. The HttpClient instance requesting the data from the API project must send the default credentials with each API call. A HttpClientHandler is used to implement this. The HttpClientHandler is added to a named AddHttpClient service which can be used anywhere in the application.

public void ConfigureServices(IServiceCollection services)
{
	services.AddAuthentication(IISDefaults.AuthenticationScheme);

	services.AddHttpClient();

	HttpClientHandler handler = new HttpClientHandler()
	{
		UseDefaultCredentials = true
	};

	services.AddHttpClient("windowsAuthClient", c =>{ })
		.ConfigurePrimaryHttpMessageHandler(() => handler);

	services.AddScoped<MyDataClientService>();
	services.AddRazorPages().AddJsonOptions(option =>
		option.JsonSerializerOptions
			.PropertyNamingPolicy = JsonNamingPolicy.CamelCase);
}

A client service is implemented to call the API from the second project. This client uses the IHttpClientFactory to create instances of the HttpClient. The CreateClient method is used to create an instance using the named client which was configured in the Startup class. This instance will send credentials to the API.

public MyDataClientService(
	IConfiguration configurations,
	IHttpClientFactory clientFactory)
{
	_configurations = configurations;
	_clientFactory = clientFactory;
	_jsonSerializerOptions = new JsonSerializerOptions
	{
		PropertyNameCaseInsensitive = true,
	};
}

public async Task<List<string>> GetMyData()
{
	try
	{
		var client = _clientFactory.CreateClient("windowsAuthClient");
		client.BaseAddress = new Uri(_configurations["MyApiUrl"]);

		var response = await client.GetAsync("api/MyData");
		if (response.IsSuccessStatusCode)
		{
			var data = await JsonSerializer.DeserializeAsync<List<string>>(
			await response.Content.ReadAsStreamAsync());

			return data;
		}

		var error = await response.Content.ReadAsStringAsync();
		throw new ApplicationException($"Status code: {response.StatusCode}, Error: {response.ReasonPhrase}, Message: {error}");

	}
	catch (Exception e)
	{
		throw new ApplicationException($"Exception {e}");
	}
}

Javascript UI

If using Javascript to call the API protected with window authentication, this can become a bit tricky due to CORS when using windows authentication. I prefer to avoid this and use a backend to proxy the calls from my trusted backend to the API. The OnGetAutoCompleteSuggest method is used to call the API. The would also make it easy to map DTOs from my API to my view DTOs as required.

 public class IndexModel : PageModel
    {
        private readonly ILogger<IndexModel> _logger;
        private readonly MyDataClientService _myDataClientService;
        public List<string> DataFromApi;
        public string SearchText { get; set; }
        public List<PersonCity> PersonCities;

        public IndexModel(MyDataClientService myDataClientService,
            ILogger<IndexModel> logger)
        {
            _myDataClientService = myDataClientService;
            _logger = logger;
        }

        public async Task OnGetAsync()
        {
            DataFromApi = await _myDataClientService.GetMyData();
        }

        public async Task<ActionResult> OnGetAutoCompleteSuggest(string term)
        {
            PersonCities = await _myDataClientService.Suggest(term);
            SearchText = term;

            return new JsonResult(PersonCities);
        }
    }

The Razor Page underneath uses an autocomplete implemented in Javascript to suggest data requested from the API. Any Javascript framework can be used in this way.

@page "{handler?}"
@model IndexModel
@{
    ViewData["Title"] = "Home page";
}

<div class="text-center">
    <p>Data from API:</p>

    @foreach (string item in Model.DataFromApi)
    {
        <p>@item</p><br />
    }
</div>

<hr />

<fieldset class="form">
    <legend>Search for a person in the search engine</legend>
    <table width="500">
        <tr>
            <th></th>
        </tr>
        <tr>
            <td>
                <input class="form-control" id="autocomplete" type="text" style="width:500px" />
            </td>
        </tr>
    </table>
</fieldset>

<br />


<div class="card" id="results">
    <h5 class="card-header">
        <span id="docName"></span>
        <span id="docFamilyName"></span>
    </h5>
    <div class="card-body">
        <p class="card-text"><span id="docInfo"></span></p>
        <p class="card-text"><span id="docCityCountry"></span></p>
        <p class="card-text"><span id="docWeb"></span></p>
    </div>
</div>

@section scripts
{
    <script type="text/javascript">
        var items;
        $(document).ready(function () {
            $("#results").hide();
            $("input#autocomplete").autocomplete({
                source: function (request, response) {
                    $.ajax({
                        url: "Index/AutoCompleteSuggest",
                        dataType: "json",
                        data: {
                            term: request.term,
                        },
                        success: function (data) {
                            var itemArray = new Array();
                            for (i = 0; i < data.length; i++) {
                                itemArray[i] = {
                                    label: data[i].name + " " + data[i].familyName,
                                    value: data[i].name + " " + data[i].familyName,
                                    data: data[i]
                                }
                            }

                            console.log(itemArray);
                            response(itemArray);
                        },
                        error: function (data, type) {
                            console.log(type);
                        }
                    });
                },
                select: function (event, ui) {
                    $("#results").show();
                    $("#docNameId").text(ui.item.data.id);
                    $("#docName").text(ui.item.data.name);
                    $("#docFamilyName").text(ui.item.data.familyName);
                    $("#docInfo").text(ui.item.data.info);
                    $("#docCityCountry").text(ui.item.data.cityCountry);
                    $("#docWeb").text(ui.item.data.web);
                    console.log(ui.item);
                }
            });
        });
    </script>
}

If all is setup correctly, the ASP.NET Core application displays the API data which is protected using the windows authentication.

CRSF

If using windows authentication, you need to protect against CSRF forgery like any application using cookies. It is also recommended NOT to use windows authentication in the public domain. Modern security architectures should be used like Open ID Connect whenever possible. This works well on intranets or for making changes to existing applications which use windows authentication in secure networks.

Links:

https://stackoverflow.com/questions/36946304/using-windows-authentication-in-asp-net

https://docs.microsoft.com/en-us/aspnet/web-api/overview/security/integrated-windows-authentication


Create an OIDC credential Issuer with Mattr and ASP.NET Core

$
0
0

This article shows how to create and issue verifiable credentials using Mattr and an ASP.NET Core. The ASP.NET Core application allows an admin user to create an OIDC credential issuer using the Mattr service. The credentials are displayed in an ASP.NET Core Razor Page web UI as a QR code for the users of the application. The user can use a digital wallet form Mattr to scan the QR code, authenticate against an Auth0 identity provider configured for this flow and use the claims from the id token to add the verified credential to the digital wallet. In a follow up post, a second application will then use the verified credentials to allow access to a second business process.

Code: https://github.com/swiss-ssi-group/MattrGlobalAspNetCore

Blogs in the series

Setup

The solutions involves an Mattr API which handles all the blockchain identity logic. An ASP.NET Core application is used to create the digital identity and the OIDC credential issuer using the Mattr APIs and also present this as a QR code which can be scanned. An identity provider is required to add the credential properties to the id token. The properties in a verified credential are issued using the claims values from the id token so a specific identity provider is required with every credential issuer using this technic. Part of the business of this solution is adding business claims to the identity provider. A Mattr digital wallet is required to scan the QR code, authenticate against the OIDC provider which in our case is Auth0 and then store the verified credentials to the wallet for later use.

Mattr Setup

You need to register with Mattr and create a new account. Mattr will issue you access to your sandbox domain and you will get access data from them plus a link to support.

Once setup, use the OIDC Bridge tutorial to implement the flow used in this demo. The docs are really good but you need to follow the docs exactly.

https://learn.mattr.global/tutorials/issue/oidc-bridge/issue-oidc

Auth0 Setup

A standard trusted web application which supports the code flow is required so that the Mattr digital wallet can authenticate using the identity provider and use the id token values from the claims which are required in the credential. It is important to create a new application which is only used for this because the client secret is required when creating the OIDC credential issuer and is shared with the Mattr platform. It would probably be better to use certificates instead of a shared secret which is persisted in different databases. We also use a second Auth0 application configuration to sign into the web application but this is not required to issue credentials.

In Auth0, rules are used to extend the id token claims. You need to add your claims as required by the Mattr API and your business logic for the credentials you wish to issue.

function (user, context, callback) {
    const namespace = 'https://--your-tenant--.vii.mattr.global/';
    context.idToken[namespace + 'license_issued_at'] = user.user_metadata.license_issued_at;
    context.idToken[namespace + 'license_type'] = user.user_metadata.license_type;
    context.idToken[namespace + 'name'] = user.user_metadata.name;
    context.idToken[namespace + 'first_name'] = user.user_metadata.first_name;
    context.idToken[namespace + 'date_of_birth'] = user.user_metadata.date_of_birth;
    callback(null, user, context);
}

For every user (holder) who should be able to create verifiable credentials, you must add the credential data to the user profile. This is part of the business process with this flow. If you were to implement this for a real application with lots of users, it would probably be better to integrate the identity provider into the solution issuing the credentials and add a UI for editing the user profile data which is used in the credentials. This would be really easy using ASP.NET Core Identity and for example OpenIddict or IdentityServer4. It is important that the user cannot edit this data. This logic is part of the credential issuer logic and not part of the user profile.

After creating a new Mattr OIDC credential issuer, the callback URL needs to be added to the Open ID connect code flow client used for the digital wallet sign in.

Add the URL to the Allowed Callback URLs in the settings of your Auth0 application configuration for the digital wallet.

Implementing the OpenID Connect credentials Issuer application

The ASP.NET Core application is used to create new OIDC credential issuers and also display the QR code for these so that the verifiable credential can be loaded to the digital wallet. The application requires secrets. The data is stored to a database, so that any credential can be added to a wallet at a later date and also so that you can find the credentials you created. The MattrConfiguration is the data and the secrets you received from Mattr for you account access to the API. The Auth0 configuration is the data required to sign in to the application. The Auth0Wallet configuration is the data required to create the OIDC credential issuer so that the digital wallet can authenticate the identity using the Auth0 application. This data is stored in the user secrets during development.

{
  // use user secrets
  "ConnectionStrings": {
    "DefaultConnection": "--your-connection-string--"
  },
  "MattrConfiguration": {
    "Audience": "https://vii.mattr.global",
    "ClientId": "--your-client-id--",
    "ClientSecret": "--your-client-secret--",
    "TenantId": "--your-tenant--",
    "TenantSubdomain": "--your-tenant-sub-domain--",
    "Url": "http://mattr-prod.au.auth0.com/oauth/token"
  },
  "Auth0": {
    "Domain": "--your-auth0-domain",
    "ClientId": "--your--auth0-client-id--",
    "ClientSecret": "--your-auth0-client-secret--",
  }
  "Auth0Wallet": {
    "Domain": "--your-auth0-wallet-domain",
    "ClientId": "--your--auth0-wallet-client-id--",
    "ClientSecret": "--your-auth0-wallet-client-secret--",
  }
}

Accessing the Mattr APIs

The MattrConfiguration DTO is used to fetch the Mattr account data for the API access and to use in the application.

public class MattrConfiguration
{
	public string Audience { get; set; }
	public string ClientId { get; set; }
	public string ClientSecret { get; set; }
	public string TenantId { get; set; }
	public string TenantSubdomain { get; set; }
	public string Url { get; set; }
}

The MattrTokenApiService is used to acquire an access token and used for the Mattr API access. The token is stored to a cache and only fetched if the old one has expired or is not available.

public class MattrTokenApiService
{
	private readonly ILogger<MattrTokenApiService> _logger;
	private readonly MattrConfiguration _mattrConfiguration;

	private static readonly Object _lock = new Object();
	private IDistributedCache _cache;

	private const int cacheExpirationInDays = 1;

	private class AccessTokenResult
	{
		public string AcessToken { get; set; } = string.Empty;
		public DateTime ExpiresIn { get; set; }
	}

	private class AccessTokenItem
	{
		public string access_token { get; set; } = string.Empty;
		public int expires_in { get; set; }
		public string token_type { get; set; }
		public string scope { get; set; }
	}

	private class MattrCrendentials
	{
		public string audience { get; set; }
		public string client_id { get; set; }
		public string client_secret { get; set; }
		public string grant_type { get; set; } = "client_credentials";
	}

	public MattrTokenApiService(
			IOptions<MattrConfiguration> mattrConfiguration,
			IHttpClientFactory httpClientFactory,
			ILoggerFactory loggerFactory,
			IDistributedCache cache)
	{
		_mattrConfiguration = mattrConfiguration.Value;
		_logger = loggerFactory.CreateLogger<MattrTokenApiService>();
		_cache = cache;
	}

	public async Task<string> GetApiToken(HttpClient client, string api_name)
	{
		var accessToken = GetFromCache(api_name);

		if (accessToken != null)
		{
			if (accessToken.ExpiresIn > DateTime.UtcNow)
			{
				return accessToken.AcessToken;
			}
			else
			{
				// remove  => NOT Needed for this cache type
			}
		}

		_logger.LogDebug($"GetApiToken new from oauth server for {api_name}");

		// add
		var newAccessToken = await GetApiTokenClient(client);
		AddToCache(api_name, newAccessToken);

		return newAccessToken.AcessToken;
	}

	private async Task<AccessTokenResult> GetApiTokenClient(HttpClient client)
	{
		try
		{
			var payload = new MattrCrendentials
			{
				client_id = _mattrConfiguration.ClientId,
				client_secret = _mattrConfiguration.ClientSecret,
				audience = _mattrConfiguration.Audience
			};

			var authUrl = "https://auth.mattr.global/oauth/token";
			var tokenResponse = await client.PostAsJsonAsync(authUrl, payload);

			if (tokenResponse.StatusCode == System.Net.HttpStatusCode.OK)
			{
				var result = await tokenResponse.Content.ReadFromJsonAsync<AccessTokenItem>();
				DateTime expirationTime = DateTimeOffset.FromUnixTimeSeconds(result.expires_in).DateTime;
				return new AccessTokenResult
				{
					AcessToken = result.access_token,
					ExpiresIn = expirationTime
				};
			}

			_logger.LogError($"tokenResponse.IsError Status code: {tokenResponse.StatusCode}, Error: {tokenResponse.ReasonPhrase}");
			throw new ApplicationException($"Status code: {tokenResponse.StatusCode}, Error: {tokenResponse.ReasonPhrase}");
		}
		catch (Exception e)
		{
			_logger.LogError($"Exception {e}");
			throw new ApplicationException($"Exception {e}");
		}
	}

	private void AddToCache(string key, AccessTokenResult accessTokenItem)
	{
		var options = new DistributedCacheEntryOptions().SetSlidingExpiration(TimeSpan.FromDays(cacheExpirationInDays));

		lock (_lock)
		{
			_cache.SetString(key, JsonConvert.SerializeObject(accessTokenItem), options);
		}
	}

	private AccessTokenResult GetFromCache(string key)
	{
		var item = _cache.GetString(key);
		if (item != null)
		{
			return JsonConvert.DeserializeObject<AccessTokenResult>(item);
		}

		return null;
	}
}

Generating the API DTOs using Nswag

The MattrOpenApiClientSevice file was generated using Nswag and the Open API file provided by Mattr here. We only generated the DTOs using this and access the client then using a HttpClient instance. The Open API file used in this solution is deployed in the git repo.

Creating the OIDC credential issuer

The MattrCredentialsService is used to create an OIDC credentials issuer using the Mattr APIs. This is implemented using the CreateCredentialsAndCallback method. The created callback is returned so that it can be displayed in the UI and copied to the specific Auth0 application configuration.

private readonly IConfiguration _configuration;
private readonly DriverLicenseCredentialsService _driverLicenseService;
private readonly IHttpClientFactory _clientFactory;
private readonly MattrTokenApiService _mattrTokenApiService;
private readonly MattrConfiguration _mattrConfiguration;

public MattrCredentialsService(IConfiguration configuration,
	DriverLicenseCredentialsService driverLicenseService,
	IHttpClientFactory clientFactory,
	IOptions<MattrConfiguration> mattrConfiguration,
	MattrTokenApiService mattrTokenApiService)
{
	_configuration = configuration;
	_driverLicenseService = driverLicenseService;
	_clientFactory = clientFactory;
	_mattrTokenApiService = mattrTokenApiService;
	_mattrConfiguration = mattrConfiguration.Value;
}

public async Task<string> CreateCredentialsAndCallback(string name)
{
	// create a new one
	var driverLicenseCredentials = await CreateMattrDidAndCredentialIssuer();
	driverLicenseCredentials.Name = name;
	await _driverLicenseService.CreateDriverLicense(driverLicenseCredentials);

	var callback = $"https://{_mattrConfiguration.TenantSubdomain}/ext/oidc/v1/issuers/{driverLicenseCredentials.OidcIssuerId}/federated/callback";
	return callback;
}

The CreateMattrDidAndCredentialIssuer method implements the different steps described in the Mattr API documentation for this. An access token for the Mattr API is created or retrieved from the cache and DID is created and the id from the DID post response is used to create the OIDC credential issuer. The DriverLicenseCredentials is returned which is persisted to a database and the callback is created using this object.

private async Task<DriverLicenseCredentials> CreateMattrDidAndCredentialIssuer()
{
	HttpClient client = _clientFactory.CreateClient();
	var accessToken = await _mattrTokenApiService
		.GetApiToken(client, "mattrAccessToken");
	client.DefaultRequestHeaders.Authorization =
		new AuthenticationHeaderValue("Bearer", accessToken);
	client.DefaultRequestHeaders
		.TryAddWithoutValidation("Content-Type", "application/json");

	var did = await CreateMattrDid(client);
	var oidcIssuer = await CreateMattrCredentialIssuer(client, did);

	return new DriverLicenseCredentials
	{
		Name = "not_named",
		Did = JsonConvert.SerializeObject(did),
		OidcIssuer = JsonConvert.SerializeObject(oidcIssuer),
		OidcIssuerId = oidcIssuer.Id
	};
}

The CreateMattrDid method creates a new DID as specified by the API. The MattrOptions class is used to create the request object. This is serialized using the StringContentWithoutCharset class due to a bug in the Mattr API validation. I created this class using the blog from Gunnar Peipman.

private async Task<V1_CreateDidResponse> CreateMattrDid(HttpClient client)
{
	// create did , post to dids 
	// https://learn.mattr.global/api-ref/#operation/createDid
	// https://learn.mattr.global/tutorials/dids/use-did/

	var createDidUrl = $"https://{_mattrConfiguration.TenantSubdomain}/core/v1/dids";

	var payload = new MattrOpenApiClient.V1_CreateDidDocument
	{
		Method = MattrOpenApiClient.V1_CreateDidDocumentMethod.Key,
		Options = new MattrOptions()
	};
	var payloadJson = JsonConvert.SerializeObject(payload);
	var uri = new Uri(createDidUrl);

	using (var content = new StringContentWithoutCharset(payloadJson, "application/json"))
	{
		var createDidResponse = await client.PostAsync(uri, content);

		if (createDidResponse.StatusCode == System.Net.HttpStatusCode.Created)
		{
			var v1CreateDidResponse = JsonConvert.DeserializeObject<V1_CreateDidResponse>(
					await createDidResponse.Content.ReadAsStringAsync());

			return v1CreateDidResponse;
		}

		var error = await createDidResponse.Content.ReadAsStringAsync();
	}

	return null;
}

The MattrOptions DTO is used to create a default DID using the key type “ed25519”. See the Mattr API docs for further details.

public class MattrOptions
{
  /// <summary>
  /// The supported key types for the DIDs are ed25519 and bls12381g2. 
  /// If the keyType is omitted, the default key type that will be used is ed25519.
  /// 
  /// If the keyType in options is set to bls12381g2 a DID will be created with 
  /// a BLS key type which supports BBS+ signatures for issuing ZKP-enabled credentials.
  /// </summary>
  public string keyType { get; set; } = "ed25519";
}

The CreateMattrCredentialIssuer implements the OIDC credential issuer to create the post request. The request properties need to be setup for your credential properties and must match claims from the id token of the Auth0 user profile. This is where the OIDC client for the digital wallet is setup and also where the credential claims are specified. If this is setup up incorrectly, loading the data into your wallet will fail. The HTTP request and the response DTOs are implemented using the Nswag generated classes.

private async Task<V1_CreateOidcIssuerResponse> CreateMattrCredentialIssuer(HttpClient client, V1_CreateDidResponse did)
        {
            // create vc, post to credentials api
            // https://learn.mattr.global/tutorials/issue/oidc-bridge/setup-issuer

            var createCredentialsUrl = $"https://{_mattrConfiguration.TenantSubdomain}/ext/oidc/v1/issuers";

            var payload = new MattrOpenApiClient.V1_CreateOidcIssuerRequest
            {
                Credential = new Credential
                {
                    IssuerDid = did.Did,
                    Name = "NationalDrivingLicense",
                    Context = new List<Uri> {
                         new Uri( "https://schema.org") // Only this is supported
                    },
                    Type = new List<string> { "nationaldrivinglicense" }
                },
                ClaimMappings = new List<ClaimMappings>
                {
                    new ClaimMappings{ JsonLdTerm="name", OidcClaim=$"https://{_mattrConfiguration.TenantSubdomain}/name"},
                    new ClaimMappings{ JsonLdTerm="firstName", OidcClaim=$"https://{_mattrConfiguration.TenantSubdomain}/first_name"},
                    new ClaimMappings{ JsonLdTerm="licenseType", OidcClaim=$"https://{_mattrConfiguration.TenantSubdomain}/license_type"},
                    new ClaimMappings{ JsonLdTerm="dateOfBirth", OidcClaim=$"https://{_mattrConfiguration.TenantSubdomain}/date_of_birth"},
                    new ClaimMappings{ JsonLdTerm="licenseIssuedAt", OidcClaim=$"https://{_mattrConfiguration.TenantSubdomain}/license_issued_at"}
                },
                FederatedProvider = new FederatedProvider
                {
                    ClientId = _configuration["Auth0Wallet:ClientId"],
                    ClientSecret = _configuration["Auth0Wallet:ClientSecret"],
                    Url = new Uri($"https://{_configuration["Auth0Wallet:Domain"]}"),
                    Scope = new List<string> { "openid", "profile", "email" }
                }
            };

            var payloadJson = JsonConvert.SerializeObject(payload);

            var uri = new Uri(createCredentialsUrl);

            using (var content = new StringContentWithoutCharset(payloadJson, "application/json"))
            {
                var createOidcIssuerResponse = await client.PostAsync(uri, content);

                if (createOidcIssuerResponse.StatusCode == System.Net.HttpStatusCode.Created)
                {
                    var v1CreateOidcIssuerResponse = JsonConvert.DeserializeObject<V1_CreateOidcIssuerResponse>(
                            await createOidcIssuerResponse.Content.ReadAsStringAsync());

                    return v1CreateOidcIssuerResponse;
                }

                var error = await createOidcIssuerResponse.Content.ReadAsStringAsync();
            }

            throw new Exception("whoops something went wrong");
        }

Now the service is completely ready to generate credentials. This can be used in any Blazor UI, Razor page or MVC view in ASP.NET Core. The services are added to the DI in the startup class. The callback method is displayed in the UI if the application successfully creates a new OIDC credential issuer.

private readonly MattrCredentialsService _mattrCredentialsService;
public bool CreatingDriverLicense { get; set; } = true;
public string Callback { get; set; }

[BindProperty]
public IssuerCredential IssuerCredential { get; set; }
public AdminModel(MattrCredentialsService mattrCredentialsService)
{
	_mattrCredentialsService = mattrCredentialsService;
}
public void OnGet()
{
	IssuerCredential = new IssuerCredential();
}

public async Task<IActionResult> OnPostAsync()
{
	if (!ModelState.IsValid)
	{
		return Page();
	}

	Callback = await _mattrCredentialsService
		.CreateCredentialsAndCallback(IssuerCredential.CredentialName);
	CreatingDriverLicense = false;
	return Page();
}
}

public class IssuerCredential
{
	[Required]
	public string CredentialName { get; set; }
}

Adding credentials you wallet

After the callback method has been added to the Auth0 callback URLs, the credentials can be used to add verifiable credentials to your wallet. This is fairly simple. The Razor Page uses the data from the database and generates an URL using the Mattr specification and the id from the created OIDC credential issuer. The claims from the id token or the profile data is just used to display the data for the user signed into the web application. This is not the same data which is used be the digital wallet. If the same person logs into the digital wallet, then the data is the same. The wallet authenticates the identity separately.

public class DriverLicenseCredentialsModel : PageModel
{
	private readonly DriverLicenseCredentialsService _driverLicenseCredentialsService;
	private readonly MattrConfiguration _mattrConfiguration;

	public string DriverLicenseMessage { get; set; } = "Loading credentials";
	public bool HasDriverLicense { get; set; } = false;
	public DriverLicense DriverLicense { get; set; }
	public string CredentialOfferUrl { get; set; }
	public DriverLicenseCredentialsModel(DriverLicenseCredentialsService driverLicenseCredentialsService,
		IOptions<MattrConfiguration> mattrConfiguration)
	{
		_driverLicenseCredentialsService = driverLicenseCredentialsService;
		_mattrConfiguration = mattrConfiguration.Value;
	}
	public async Task OnGetAsync()
	{
		//"license_issued_at": "2021-03-02",
		//"license_type": "B1",
		//"name": "Bob",
		//"first_name": "Lammy",
		//"date_of_birth": "1953-07-21"

		var identityHasDriverLicenseClaims = true;
		var nameClaim = User.Claims.FirstOrDefault(t => t.Type == $"https://{_mattrConfiguration.TenantSubdomain}/name");
		var firstNameClaim = User.Claims.FirstOrDefault(t => t.Type == $"https://{_mattrConfiguration.TenantSubdomain}/first_name");
		var licenseTypeClaim = User.Claims.FirstOrDefault(t => t.Type == $"https://{_mattrConfiguration.TenantSubdomain}/license_type");
		var dateOfBirthClaim = User.Claims.FirstOrDefault(t => t.Type == $"https://{_mattrConfiguration.TenantSubdomain}/date_of_birth");
		var licenseIssuedAtClaim = User.Claims.FirstOrDefault(t => t.Type == $"https://{_mattrConfiguration.TenantSubdomain}/license_issued_at");

		if (nameClaim == null
			|| firstNameClaim == null
			|| licenseTypeClaim == null
			|| dateOfBirthClaim == null
			|| licenseIssuedAtClaim == null)
		{
			identityHasDriverLicenseClaims = false;
		}

		if (identityHasDriverLicenseClaims)
		{
			DriverLicense = new DriverLicense
			{
				Name = nameClaim.Value,
				FirstName = firstNameClaim.Value,
				LicenseType = licenseTypeClaim.Value,
				DateOfBirth = dateOfBirthClaim.Value,
				IssuedAt = licenseIssuedAtClaim.Value,
				UserName = User.Identity.Name

			};
			// get per name
			//var offerUrl = await _driverLicenseCredentialsService.GetDriverLicenseCredentialIssuerUrl("ndlseven");

			// get the last one
			var offerUrl = await _driverLicenseCredentialsService.GetLastDriverLicenseCredentialIssuerUrl();

			DriverLicenseMessage = "Add your driver license credentials to your wallet";
			CredentialOfferUrl = offerUrl;
			HasDriverLicense = true;
		}
		else
		{
			DriverLicenseMessage = "You have no valid driver license";
		}
	}
}

The data is displayed using Bootstrap. If you use a Mattr wallet to scan the QR Code shown underneath, you will be redirected to authenticate against the specified Auth0 application. If you have the claims, you can add verifiable claims to you digital wallet.

Notes

Mattr API has a some problems with its API and a stricter validation would help a lot. But Mattr support is awesome and the team are really helpful and you will end up with a working solution. It would be also awesome if the Open API file could be used without changes to generate a client and the DTOs. It would makes sense, if you could issue credentials data from the data in the credential issuer application and not from the id token of the user profile. I understand that in some use cases, you would like to protect against any wallet taking credentials for other identities, but I as a credential issuer cannot always add my business data to user profiles from the IDP. The security of this solution all depends on the user profile data. If a non authorized person can change this data (in this case, this could be the same user), then incorrect verifiable credentials can be created.

Next step is to create an application to verify and use the verifiable credentials created here.

Links

https://mattr.global/

https://mattr.global/get-started/

https://learn.mattr.global/

https://keybase.io/

https://learn.mattr.global/tutorials/dids/did-key

https://gunnarpeipman.com/httpclient-remove-charset/

https://auth0.com/

Present and Verify Verifiable Credentials in ASP.NET Core using Decentralized Identities and MATTR

$
0
0

This article shows how use verifiable credentials stored on a digital wallet to verify a digital identity and use in an application. For this to work, a trust needs to exist between the verifiable credential issuer and the application which requires the verifiable credentials to verify. A blockchain decentralized database is used and MATTR is used as a access layer to this ledger and blockchain. The applications are implemented in ASP.NET Core.

The verifier application Bo Insurance is used to implement the verification process and to create a presentation template. The application sends a HTTP post request to create a presentation request using the DID Id from the OIDC credential Issuer, created in the previous article. This DID is created from the National Driving license application which issues verifiable credentials and so a trust needs to exist between the two applications. Once the credentials have been issued to a holder of the verifiable credentials and stored for example in a digital wallet, the issuer is no longer involved in the process. Verifying the credentials only requires the holder and the verifier and the decentralized database which holds the digital identities and documents. The verifier application gets the DID from the ledger and signs the verify request. The request can then be presented as a QR Code. The holder can scan this using a MATTR digital wallet and grant consent to share the credentials with the application. The digital wallet calls the callback API defined in the request presentation body and sends the data to the API. The verifier application hosting the API would need to verify the data and can update the application UI using SignalR to continue the business process with the verified credentials.

Code https://github.com/swiss-ssi-group/MattrGlobalAspNetCore

Blogs in the series

Create the presentation template for the Verifiable Credential

A presentation template is required to verify the issued verifiable credentials stored on a digital wallet.

The digital identity (DID) Id of the OIDC credential issuer is all that is required to create a presentation request template. In the application which issues credentials, ie the NationalDrivingLicense, a Razor page was created to view the DID of the OIDC credential issuer.

The DID can be used to create the presentation template. The MATTR documentation is really good here:

https://learn.mattr.global/tutorials/verify/presentation-request-template

A Razor page was created to start this task from the UI. This would normally require authentication as this is an administrator task from the application requesting the verified credentials. The code behind the Razor page takes the DID request parameter and calls the MattrPresentationTemplateService to create the presentation template and present this id a database.

public class CreatePresentationTemplateModel : PageModel
{
	private readonly MattrPresentationTemplateService _mattrVerifyService;
	public bool CreatingPresentationTemplate { get; set; } = true;
	public string TemplateId { get; set; }

	[BindProperty]
	public PresentationTemplate PresentationTemplate { get; set; }
	public CreatePresentationTemplateModel(MattrPresentationTemplateService mattrVerifyService)
	{
		_mattrVerifyService = mattrVerifyService;
	}
	public void OnGet()
	{
		PresentationTemplate = new PresentationTemplate();
	}

	public async Task<IActionResult> OnPostAsync()
	{
		if (!ModelState.IsValid)
		{
			return Page();
		}

		TemplateId = await _mattrVerifyService.CreatePresentationTemplateId(PresentationTemplate.DidId);
		CreatingPresentationTemplate = false;
		return Page();
	}
}

public class PresentationTemplate
{
	[Required]
	public string DidId { get; set; }
}

The Razor page html template creates a form to post the request to the server rendered page and displays the templateId after, if the creation was successful.

@page
@model BoInsurance.Pages.CreatePresentationTemplateModel

<div class="container-fluid">
    <div class="row">
        <div class="col-sm">
            <form method="post">
                <div>
                    <div class="form-group">
                        <label class="control-label">DID ID</label>
                        <input asp-for="PresentationTemplate.DidId" class="form-control" />
                        <span asp-validation-for="PresentationTemplate.DidId" class="text-danger"></span>
                    </div>
                    <div class="form-group">
                        @if (Model.CreatingPresentationTemplate)
                        {
                            <input class="form-control"
                                   type="submit" readonly="@Model.CreatingPresentationTemplate"
                                   value="Create Presentation Template" />
                        }

                    </div>
                    <div class="form-group">
                        @if (!Model.CreatingPresentationTemplate)
                        {
                            <div class="alert alert-success">
                                <strong>Mattr Presentation Template created</strong>
                            </div>
                        }

                        
                    </div>
                </div>
            </form>
            <hr />
            <p>When the templateId is created, you can use the template ID to verify</p>
        </div>
        <div class="col-sm">
            <div>
                <img src="~/ndl_car_01.png" width="200" alt="Driver License">
                <div>
                    <b>Driver Licence templateId from presentation template</b>
                    <hr />
                    <dl class="row">
                        <dt class="col-sm-4">templateId</dt>
                        <dd class="col-sm-8">
                            @Model.TemplateId
                        </dd>
                    </dl>
                </div>
            </div>
        </div>
    </div>
</div>


The MattrPresentationTemplateService is used to create the MATTR presentation template. This class uses the MATTR API and sends a HTTP post request with the DID Id of the OIDC credential issuer and creates a presentation template. The service saves the returned payload to a database and returns the template ID as the result. The template ID is required to verify the verifiable credentials.

The MattrTokenApiService is used to request an API token for the MATTR API using the credential of your MATTR account. This service has a simple token cache and only requests new access tokens when no token exists or the token has expired.

The BoInsuranceDbService service is used to access the SQL database using Entity Framework Core. This provides simple methods to persist or select the data as required.

private readonly IHttpClientFactory _clientFactory;
private readonly MattrTokenApiService _mattrTokenApiService;
private readonly BoInsuranceDbService _boInsuranceDbService;
private readonly MattrConfiguration _mattrConfiguration;

public MattrPresentationTemplateService(IHttpClientFactory clientFactory,
	IOptions<MattrConfiguration> mattrConfiguration,
	MattrTokenApiService mattrTokenApiService,
	BoInsuranceDbService boInsuranceDbService)
{
	_clientFactory = clientFactory;
	_mattrTokenApiService = mattrTokenApiService;
	_boInsuranceDbService = boInsuranceDbService;
	_mattrConfiguration = mattrConfiguration.Value;
}

public async Task<string> CreatePresentationTemplateId(string didId)
{
	// create a new one
	var v1PresentationTemplateResponse = await CreateMattrPresentationTemplate(didId);

	// save to db
	var drivingLicensePresentationTemplate = new DrivingLicensePresentationTemplate
	{
		DidId = didId,
		TemplateId = v1PresentationTemplateResponse.Id,
		MattrPresentationTemplateReponse = JsonConvert
			.SerializeObject(v1PresentationTemplateResponse)
	};
	await _boInsuranceDbService
		.CreateDriverLicensePresentationTemplate(drivingLicensePresentationTemplate);

	return v1PresentationTemplateResponse.Id;
}

private async Task<V1_PresentationTemplateResponse> CreateMattrPresentationTemplate(string didId)
{
	HttpClient client = _clientFactory.CreateClient();
	var accessToken = await _mattrTokenApiService.GetApiToken(client, "mattrAccessToken");

	client.DefaultRequestHeaders.Authorization =
		new AuthenticationHeaderValue("Bearer", accessToken);
	client.DefaultRequestHeaders.TryAddWithoutValidation("Content-Type", "application/json");

	var v1PresentationTemplateResponse = await CreateMattrPresentationTemplate(client, didId);
	return v1PresentationTemplateResponse;
}

The CreateMattrPresentationTemplate method sends the HTTP Post request like in the MATTR API documentation. Creating the payload for the HTTP post request using the MATTR Open API definitions is a small bit complicated. This could be improved with a better Open API definition. In our use case, we just want to create the default template for the OIDC credential issuer and so just require the DID Id. Most of the other properties are fixed values, see the MATTR API docs for more information.

private async Task<V1_PresentationTemplateResponse> CreateMattrPresentationTemplate(
	HttpClient client, string didId)
{
	// create presentation, post to presentations templates api
	// https://learn.mattr.global/tutorials/verify/presentation-request-template

	var createPresentationsTemplatesUrl = $"https://{_mattrConfiguration.TenantSubdomain}/v1/presentations/templates";

	var additionalProperties = new Dictionary<string, object>();
	additionalProperties.Add("type", "QueryByExample");
	additionalProperties.Add("credentialQuery", new List<CredentialQuery> {
		new CredentialQuery
		{
			Reason = "Please provide your driving license",
			Required = true,
			Example = new Example
			{
				Context = new List<object>{ "https://schema.org" },
				Type = "VerifiableCredential",
				TrustedIssuer = new List<TrustedIssuer2>
				{
					new TrustedIssuer2
					{
						Required = true,
						Issuer = didId // DID use to create the oidc
					}
				}
			}
		}
	});

	var payload = new MattrOpenApiClient.V1_CreatePresentationTemplate
	{
		Domain = _mattrConfiguration.TenantSubdomain,
		Name = "certificate-presentation",
		Query = new List<Query>
		{
			new Query
			{
				AdditionalProperties = additionalProperties
			}
		}
	};

	var payloadJson = JsonConvert.SerializeObject(payload);

	var uri = new Uri(createPresentationsTemplatesUrl);

	using (var content = new StringContentWithoutCharset(payloadJson, "application/json"))
	{
		var presentationTemplateResponse = await client.PostAsync(uri, content);

		if (presentationTemplateResponse.StatusCode == System.Net.HttpStatusCode.Created)
		{

			var v1PresentationTemplateResponse = JsonConvert
					.DeserializeObject<MattrOpenApiClient.V1_PresentationTemplateResponse>(
					await presentationTemplateResponse.Content.ReadAsStringAsync());

			return v1PresentationTemplateResponse;
		}

		var error = await presentationTemplateResponse.Content.ReadAsStringAsync();

	}

	throw new Exception("whoops something went wrong");
}

The application can be started and the presentation template can be created. The ID is returned back to the UI for the next step.

Verify the verifiable credentials

Now that a template exists to request the verifiable data from the holder of the data which is normally stored in a digital wallet, the verifier application can create and start a verification process. A post request is sent to the MATTR APIs which creates a presentation request using a DID ID and the required template. The application can request the DID from the OIDC credential issuer. The request is signed using the correct key from the DID and the request is published in the UI as a QR Code. A digital wallet is used to scan the code and the user of the wallet can grant consent to share the personal data. The wallet sends a HTTP post request to the callback API. This API handles the request, would validate the data and updates the UI using SignalR to move to the next step of the business process using the verified data.

Step 1 Invoke a presentation request

The InvokePresentationRequest method implements the presentation request. This method requires the DID Id of the OIDC credential issuer which will by used to get the data from the holder of the data. The template ID is also required from the template created above. A challenge is also used to track the verification. The challenge is a random value and is used when the digital wallet calls the API with the verified data. The callback URL is where the data is returned to. This could be unique for every request or anything you want. The payload is created like the docs from the MATTR API defines. The post request is sent to the MATTR API and a V1_CreatePresentationRequestResponse is returned if all is configured correctly.

private async Task<V1_CreatePresentationRequestResponse> InvokePresentationRequest(
	HttpClient client,
	string didId,
	string templateId,
	string challenge,
	string callbackUrl)
{
	var createDidUrl = $"https://{_mattrConfiguration.TenantSubdomain}/v1/presentations/requests";

	var payload = new MattrOpenApiClient.V1_CreatePresentationRequestRequest
	{
		Did = didId,
		TemplateId = templateId,
		Challenge = challenge,
		CallbackUrl = new Uri(callbackUrl),
		ExpiresTime = MATTR_EPOCH_EXPIRES_TIME_VERIFIY // Epoch time
	};
	var payloadJson = JsonConvert.SerializeObject(payload);
	var uri = new Uri(createDidUrl);

	using (var content = new StringContentWithoutCharset(payloadJson, "application/json"))
	{
		var response = await client.PostAsync(uri, content);

		if (response.StatusCode == System.Net.HttpStatusCode.Created)
		{
			var v1CreatePresentationRequestResponse = JsonConvert
				.DeserializeObject<V1_CreatePresentationRequestResponse>(
					await response.Content.ReadAsStringAsync());

			return v1CreatePresentationRequestResponse;
		}

		var error = await response.Content.ReadAsStringAsync();
	}

	return null;
}

Step 2 Get the OIDC Issuer DID

The RequestDID method uses the MATTR API to get the DID data from the blochchain for the OIDC credential issuer. Only the DID Id is required.

private async Task<V1_GetDidResponse> RequestDID(string didId, HttpClient client)
{
	var requestUrl = $"https://{_mattrConfiguration.TenantSubdomain}/core/v1/dids/{didId}";
	var uri = new Uri(requestUrl);

	var didResponse = await client.GetAsync(uri);

	if (didResponse.StatusCode == System.Net.HttpStatusCode.OK)
	{
		var v1CreateDidResponse = JsonConvert.DeserializeObject<V1_GetDidResponse>(
				await didResponse.Content.ReadAsStringAsync());

		return v1CreateDidResponse;
	}

	var error = await didResponse.Content.ReadAsStringAsync();
	return null;
}

Step 3 Sign the request using correct key and display QR Code

To verify data using a digital wallet, the payload must be signed using the correct key. The SignAndEncodePresentationRequestBody uses the DID payload and the request from the presentation request to create the payload to sign. Creating the payload is a big messy due to the OpenAPI definitions created for the MATTR API. A HTTP post request with the payload returns the signed JWT in a payload in a strange data format so we parse this as a string and manually get the JWT payload.

private async Task<string> SignAndEncodePresentationRequestBody(
	HttpClient client,
	V1_GetDidResponse did,
	V1_CreatePresentationRequestResponse v1CreatePresentationRequestResponse)
{
	var createDidUrl = $"https://{_mattrConfiguration.TenantSubdomain}/v1/messaging/sign";

	object didUrlArray;
	did.DidDocument.AdditionalProperties.TryGetValue("authentication", out didUrlArray);
	var didUrl = didUrlArray.ToString().Split("\"")[1];
	var payload = new MattrOpenApiClient.SignMessageRequest
	{
		DidUrl = didUrl,
		Payload = v1CreatePresentationRequestResponse.Request
	};
	var payloadJson = JsonConvert.SerializeObject(payload);
	var uri = new Uri(createDidUrl);

	using (var content = new StringContentWithoutCharset(payloadJson, "application/json"))
	{
		var response = await client.PostAsync(uri, content);

		if (response.StatusCode == System.Net.HttpStatusCode.OK)
		{
			var result = await response.Content.ReadAsStringAsync();
			return result;
		}

		var error = await response.Content.ReadAsStringAsync();
	}

	return null;
}

The CreateVerifyCallback method uses the presentation request, the get DID and the sign HTTP post requests to create a URL which can be displayed in a UI. The challenge is created using the RNGCryptoServiceProvider class which creates a random string. The access token to access the API is returned from the client credentials OAuth requests or from the in memory cache. The DrivingLicensePresentationVerify class is persisted to a database and the verify URL is returned so that this could be displayed as a QR Code in the UI.

/// <summary>
/// https://learn.mattr.global/tutorials/verify/using-callback/callback-e-to-e
/// </summary>
/// <param name="callbackBaseUrl"></param>
/// <returns></returns>
public async Task<(string QrCodeUrl, string ChallengeId)> CreateVerifyCallback(string callbackBaseUrl)
{
	callbackBaseUrl = callbackBaseUrl.Trim();
	if (!callbackBaseUrl.EndsWith('/'))
	{
		callbackBaseUrl = $"{callbackBaseUrl}/";
	}

	var callbackUrlFull = $"{callbackBaseUrl}{MATTR_CALLBACK_VERIFY_PATH}";
	var challenge = GetEncodedRandomString();

	HttpClient client = _clientFactory.CreateClient();
	var accessToken = await _mattrTokenApiService.GetApiToken(client, "mattrAccessToken");

	client.DefaultRequestHeaders.Authorization =
		new AuthenticationHeaderValue("Bearer", accessToken);
	client.DefaultRequestHeaders.TryAddWithoutValidation("Content-Type", "application/json");

	var template = await _boInsuranceDbService.GetLastDriverLicensePrsentationTemplate();

	// Invoke the Presentation Request
	var invokePresentationResponse = await InvokePresentationRequest(
		client,
		template.DidId,
		template.TemplateId,
		challenge,
		callbackUrlFull);

	// Request DID 
	V1_GetDidResponse did = await RequestDID(template.DidId, client);

	// Sign and Encode the Presentation Request body
	var signAndEncodePresentationRequestBodyResponse = await SignAndEncodePresentationRequestBody(
		client, did, invokePresentationResponse);

	// fix strange DTO
	var jws = signAndEncodePresentationRequestBodyResponse.Replace("\"", "");

	// save to db // TODO add this back once working
	var drivingLicensePresentationVerify = new DrivingLicensePresentationVerify
	{
		DidId = template.DidId,
		TemplateId = template.TemplateId,
		CallbackUrl = callbackUrlFull,
		Challenge = challenge,
		InvokePresentationResponse = JsonConvert.SerializeObject(invokePresentationResponse),
		Did = JsonConvert.SerializeObject(did),
		SignAndEncodePresentationRequestBody = jws
	};
	await _boInsuranceDbService.CreateDrivingLicensePresentationVerify(drivingLicensePresentationVerify);

	var qrCodeUrl = $"didcomm://https://{_mattrConfiguration.TenantSubdomain}/?request={jws}";

	return (qrCodeUrl, challenge);
}

private string GetEncodedRandomString()
{
	var base64 = Convert.ToBase64String(GenerateRandomBytes(30));
	return HtmlEncoder.Default.Encode(base64);
}

private byte[] GenerateRandomBytes(int length)
{
	using var randonNumberGen = new RNGCryptoServiceProvider();
	var byteArray = new byte[length];
	randonNumberGen.GetBytes(byteArray);
	return byteArray;
}

The CreateVerifierDisplayQrCodeModel is the code behind for the Razor page to request a verification and also display the verify QR Code for the digital wallet to scan. The CallbackUrl can be set from the UI so that this is easier for testing. This callback can be any webhook you want or API. To test the application in local development, I used ngrok. The return URL has to match the proxy which tunnels to you PC, once you start. If the API has no public address when debugging, you will not be able to test locally.

public class CreateVerifierDisplayQrCodeModel : PageModel
{
	private readonly MattrCredentialVerifyCallbackService _mattrCredentialVerifyCallbackService;
	public bool CreatingVerifier { get; set; } = true;
	public string QrCodeUrl { get; set; }

	[BindProperty]
	public string ChallengeId { get; set; }

	[BindProperty]
	public CreateVerifierDisplayQrCodeCallbackUrl CallbackUrlDto { get; set; }
	public CreateVerifierDisplayQrCodeModel(MattrCredentialVerifyCallbackService 
		mattrCredentialVerifyCallbackService)
	{
		_mattrCredentialVerifyCallbackService = mattrCredentialVerifyCallbackService;
	}
	public void OnGet()
	{
		CallbackUrlDto = new CreateVerifierDisplayQrCodeCallbackUrl();
		CallbackUrlDto.CallbackUrl = $"https://{HttpContext.Request.Host.Value}";
	}

	public async Task<IActionResult> OnPostAsync()
	{
		if (!ModelState.IsValid)
		{
			return Page();
		}

		var result = await _mattrCredentialVerifyCallbackService
			.CreateVerifyCallback(CallbackUrlDto.CallbackUrl);

		CreatingVerifier = false;

		QrCodeUrl = result.QrCodeUrl;
		ChallengeId = result.ChallengeId;
		return Page();
	}
}

public class CreateVerifierDisplayQrCodeCallbackUrl
{
	[Required]
	public string CallbackUrl { get; set; }
}

The html or template part of the Razor page displays the QR Code from a successful post request. You can set any URL for the callback in the form request. This is really just for testing.

@page
@model BoInsurance.Pages.CreateVerifierDisplayQrCodeModel

<div class="container-fluid">
    <div class="row">
        <div class="col-sm">
            <form method="post">
                <div>
                    <div class="form-group">
                        <label class="control-label">Callback base URL (ngrok in debug...)</label>
                        <input asp-for="CallbackUrlDto.CallbackUrl" class="form-control" />
                        <span asp-validation-for="CallbackUrlDto.CallbackUrl" class="text-danger"></span>
                    </div>
                    <div class="form-group">
                        @if (Model.CreatingVerifier)
                        {
                            <input class="form-control"
                                   type="submit" readonly="@Model.CreatingVerifier"
                                   value="Create Verification" />
                        }

                    </div>
                    <div class="form-group">
                        @if (!Model.CreatingVerifier)
                        {
                            <div class="alert alert-success">
                                <strong>Ready to verify</strong>
                            </div>
                        }
                    </div>
                </div>
            </form>
            <hr />
            <p>When the verification is created, you can scan the QR Code to verify</p>
        </div>
        <div class="col-sm">
            <div>
                <img src="~/ndl_car_01.png" width="200" alt="Driver License">
            </div>
        </div>
    </div>
    <div class="row">
        <div class="col-sm">
            <div class="qr" id="qrCode"></div>
            <input asp-for="ChallengeId" hidden/>
        </div>
    </div>
</div>

@section scripts {
<script src="~/js/qrcode.min.js"></script>
<script type="text/javascript">
    new QRCode(document.getElementById("qrCode"),
    {
        text: "@Html.Raw(Model.QrCodeUrl)",
        width: 400,
        height: 400,
        correctLevel: QRCode.CorrectLevel.M
    });

    $(document).ready(() => {
 
    });

    var connection = new signalR.HubConnectionBuilder().withUrl("/mattrVerifiedSuccessHub").build();

    connection.on("MattrCallbackSuccess", function (challengeId) {
        console.log("received verification:" + challengeId);
        window.location.href = "/VerifiedUser?challengeid=" + challengeId;
    });

    connection.start().then(function () {
        //console.log(connection.connectionId);
        const challengeId = $("#ChallengeId").val();
        
        if (challengeId) {
            console.log(challengeId);
            // join message
            connection.invoke("AddChallenge", challengeId, connection.connectionId).catch(function (err) {
                return console.error(err.toString());
            });
        }
    }).catch(function (err) {
        return console.error(err.toString());
    });
</script>
}

Step 4 Implement the Callback and update the UI using SignalR

After a successful verification in the digital wallet, the wallet sends the verified credentials to the API defined in the presentation request. The API handling this needs to update the correct client UI and continue the business process using the verified data. We use SignalR for this with a single client to client connection. The Signal connections for each connection is associated with a challenge ID, the same Id we used to create the presentation request. Using this, only the correct client will be notified and not all clients broadcasted. The DrivingLicenseCallback takes the body with is specific for the credentials you issued. This is always depending on what you request. The data is saved to a database and the client is informed to continue. We send a message directly to the correct client using the connectionId of the SignalR session created for this challenge.

[ApiController]
[Route("api/[controller]")]
public class VerificationController : Controller
{
	private readonly BoInsuranceDbService _boInsuranceDbService;

	private readonly IHubContext<MattrVerifiedSuccessHub> _hubContext;

	public VerificationController(BoInsuranceDbService boInsuranceDbService,
		IHubContext<MattrVerifiedSuccessHub> hubContext)
	{
		_hubContext = hubContext;
		_boInsuranceDbService = boInsuranceDbService;
	}

	/// <summary>
	/// {
	///  "presentationType": "QueryByExample",
	///  "challengeId": "GW8FGpP6jhFrl37yQZIM6w",
	///  "claims": {
	///      "id": "did:key:z6MkfxQU7dy8eKxyHpG267FV23agZQu9zmokd8BprepfHALi",
	///      "name": "Chris",
	///      "firstName": "Shin",
	///      "licenseType": "Certificate Name",
	///      "dateOfBirth": "some data",
	///      "licenseIssuedAt": "dda"
	///  },
	///  "verified": true,
	///  "holder": "did:key:z6MkgmEkNM32vyFeMXcQA7AfQDznu47qHCZpy2AYH2Dtdu1d"
	/// }
	/// </summary>
	/// <param name="body"></param>
	/// <returns></returns>
	[HttpPost]
	[Route("[action]")]
	public async Task<IActionResult> DrivingLicenseCallback([FromBody] VerifiedDriverLicense body)
	{
		string connectionId;
		var found = MattrVerifiedSuccessHub.Challenges
			.TryGetValue(body.ChallengeId, out connectionId);

		// test Signalr
		//await _hubContext.Clients.Client(connectionId).SendAsync("MattrCallbackSuccess", $"{body.ChallengeId}");
		//return Ok();

		var exists = await _boInsuranceDbService.ChallengeExists(body.ChallengeId);

		if (exists)
		{
			await _boInsuranceDbService.PersistVerification(body);

			if (found)
			{
				//$"/VerifiedUser?challengeid={body.ChallengeId}"
				await _hubContext.Clients
					.Client(connectionId)
					.SendAsync("MattrCallbackSuccess", $"{body.ChallengeId}");
			}

			return Ok();
		}

		return BadRequest("unknown verify request");
	}
}

The SignalR server is configured in the Startup class of the ASP.NET Core application. The path for the hub is defined in the MapHub method.

public void ConfigureServices(IServiceCollection services)
{
	// ...
	
	services.AddRazorPages();
	services.AddSignalR();
	services.AddControllers();
}

public void Configure(IApplicationBuilder app, IWebHostEnvironment env)
{
	// ...

	app.UseEndpoints(endpoints =>
	{
		endpoints.MapRazorPages();
		endpoints.MapHub<MattrVerifiedSuccessHub>("/mattrVerifiedSuccessHub");
		endpoints.MapControllers();
	});
}

The Hub implementation requires only one fixed method. The AddChallenge method takes the challenge Id and adds this the an in-memory cache. The controller implemented for the callbacks uses this ConcurrentDictionary to find the correct connectionId which is mapped to the challenges form the verification.

public class MattrVerifiedSuccessHub : Hub
{
	/// <summary>
	/// This should be replaced with a cache which expires or something
	/// </summary>
	public static readonly ConcurrentDictionary<string, string> Challenges 
		= new ConcurrentDictionary<string, string>();

	public void AddChallenge(string challengeId, string connnectionId)
	{
		Challenges.TryAdd(challengeId, connnectionId);
	}

}

The Javascript SignalR client in the browser connects to the SignalR server and registers the connectionId with the challenge ID used for the verification of the verifiable credentials from the holder of the digital wallet. If a client gets a message from that a verify has completed successfully and the callback has been called, it will redirect to the verified page. The client listens to the MattrCallbackSuccess for messages. These messages are sent from the callback controller directly.

<script type="text/javascript">
    
    var connection = new signalR.HubConnectionBuilder()
		.withUrl("/mattrVerifiedSuccessHub").build();

    connection.on("MattrCallbackSuccess", function (challengeId) {
        console.log("received verification:" + challengeId);
        window.location.href = "/VerifiedUser?challengeid=" + challengeId;
    });

    connection.start().then(function () {
        //console.log(connection.connectionId);
        const challengeId = $("#ChallengeId").val();
        
        if (challengeId) {
            console.log(challengeId);
            // join message
            connection.invoke("AddChallenge", challengeId, 
				connection.connectionId).catch(function (err) {
                return console.error(err.toString());
            });
        }
    }).catch(function (err) {
        return console.error(err.toString());
    });
</script>

The VerifiedUserModel Razor page displays the data and the business process can continue using the verified data.

public class VerifiedUserModel : PageModel
{
	private readonly BoInsuranceDbService _boInsuranceDbService;

	public VerifiedUserModel(BoInsuranceDbService boInsuranceDbService)
	{
		_boInsuranceDbService = boInsuranceDbService;
	}

	public string ChallengeId { get; set; }
	public DriverLicenseClaimsDto VerifiedDriverLicenseClaims { get; private set; }

	public async Task OnGetAsync(string challengeId)
	{
		// user query param to get challenge id and display data
		if (challengeId != null)
		{
			var verifiedDriverLicenseUser = await _boInsuranceDbService.GetVerifiedUser(challengeId);
			VerifiedDriverLicenseClaims = new DriverLicenseClaimsDto
			{
				DateOfBirth = verifiedDriverLicenseUser.DateOfBirth,
				Name = verifiedDriverLicenseUser.Name,
				LicenseType = verifiedDriverLicenseUser.LicenseType,
				FirstName = verifiedDriverLicenseUser.FirstName,
				LicenseIssuedAt = verifiedDriverLicenseUser.LicenseIssuedAt
			};
		}
	}
}

public class DriverLicenseClaimsDto
{
	public string Name { get; set; }
	public string FirstName { get; set; }
	public string LicenseType { get; set; }
	public string DateOfBirth { get; set; }
	public string LicenseIssuedAt { get; set; }
}

Running the verifier

To test the BoInsurance application locally, which is the verifier application, ngrok is used so that we have a public address for the callback. I install ngrok using npm. Without a license, you can only run your application in http.

npm install -g ngrok

Run the ngrok from the command line using the the URL of the application. I start the ASP.NET Core application at localhost port 5000.

ngrok http localhost:5000

You should be able to copied the ngrok URL and use this in the browser to test the verification.

Once running, a verification can be created and you can scan the QR Code with your digital wallet. Once you grant access to your data, the data is sent to the callback API and the UI will be redirected to the success page.

Notes

MATTR APIs work really well and support some of the flows for digital identities. I plan to try out the zero proof flow next. It is only possible to create verifiable credentials from data from your identity provider using the id_token. To issue credentials, you have to implement your own identity provider and cannot use business data from your application. If you have full control like with Openiddict, IdenityServer4 or Auth0, this is no problem, just more complicated to implement. If you do not control the data in your identity provider, you would need to create a second identity provider to issue credentials. This is part of your business logic then and not just an identity provider. This will always be a problem is using Azure AD or IDPs from large, medium size companies. The quality of the verifiable credentials also depend on how good the OIDC credential issuers are implemented as these are still central databases for these credentials and are still open to all the problems we have today. Decentralized identities have to potential to solve many problems but still have many unsolved problems.

Links

https://mattr.global/

https://learn.mattr.global/tutorials/verify/using-callback/callback-e-to-e

https://mattr.global/get-started/

https://learn.mattr.global/

https://keybase.io/

https://learn.mattr.global/tutorials/dids/did-key

https://gunnarpeipman.com/httpclient-remove-charset/

https://auth0.com/

Securing OAuth Bearer tokens from multiple Identity Providers in an ASP.NET Core API

$
0
0

This article shows how to secure and use different APIs in an ASP.NET Core API which support OAuth access tokens from multiple identity providers. Access tokens from Azure AD and from Auth0 can be be used to access data from the service. Each API only supports a specific token from the specific identity provider. Microsoft.Identity.Web is used to implement the access token authorization for the Azure AD tokens and the default authorization is used to support the Auth0 access tokens.

Codehttps://github.com/damienbod/SeparatingApisPerSecurityLevel

Blogs in this series

Setup

An API ASP.NET Core application is created to implement the multiple APIs and accept access tokens created by Auth0 and Azure AD. The access tokens need to be validated and should only work for the intended purpose for which the access token was created. The Azure AD API is used by an ASP.NET Core Razor page application which requests an user access token with the correct scope to access the API. Two Azure AD App registrations are used to define the Azure AD setup. The Auth0 application is implemented using a Blazor server hosted application and accesses the two Auth0 APIs, See the pervious post for details.

To support the multiple identity providers, multiple schemes are used. The Auth0 APIs use the default scheme definition for JWT Bearer tokens and the Azure AD uses a custom named scheme. It does not matter which scheme is used for which as long as the correct scheme is defined on the controller securing the API. The AddMicrosoftIdentityWebApiAuthentication method takes the scheme and the configuration name as a optional parameter. The Azure AD configuration is defined like any standard Azure AD API in ASP.NET Core.

public void ConfigureServices(IServiceCollection services)
{
	// Adds Microsoft Identity platform (AAD v2.0) 
	// support to protect this Api
	services.AddMicrosoftIdentityWebApiAuthentication(
		Configuration, "AzureAd", "myADscheme");

	// Auth0 API configuration=> default scheme
	services.AddAuthentication(options =>
	{
		options.DefaultAuthenticateScheme = JwtBearerDefaults.AuthenticationScheme;
		options.DefaultChallengeScheme = JwtBearerDefaults.AuthenticationScheme;
	}).AddJwtBearer(options =>
	{
		options.Authority = "https://dev-damienbod.eu.auth0.com/";
		options.Audience = "https://auth0-api1";
	});

	services.AddSingleton<IAuthorizationHandler, UserApiScopeHandler>();

	// authorization definitions for the multiple Auth0 tokens
	services.AddAuthorization(policies =>
	{
		policies.AddPolicy("p-user-api-auth0", p =>
		{
			p.Requirements.Add(new UserApiScopeHandlerRequirement());
			// Validate id of application for which the token was created
			p.RequireClaim("azp", "AScjLo16UadTQRIt2Zm1xLHVaEaE1feA");
		});

		policies.AddPolicy("p-service-api-auth0", p =>
		{
			// Validate id of application for which the token was created
			p.RequireClaim("azp", "naWWz6gdxtbQ68Hd2oAehABmmGM9m1zJ");
			p.RequireClaim("gty", "client-credentials");
		});
	});

	services.AddControllers(options =>
	{
		var policy = new AuthorizationPolicyBuilder()
			.RequireAuthenticatedUser()
			.Build();
		options.Filters.Add(new AuthorizeFilter(policy));
	});
}

The Configure method uses the UseAuthentication method to add the middleware for the APIs.

public void Configure(IApplicationBuilder app, 
	IWebHostEnvironment env)
{
	// ...

	app.UseRouting();

	app.UseAuthentication();
	app.UseAuthorization();

	app.UseEndpoints(endpoints =>
	{
		endpoints.MapControllers();
	});
}

The AzureADUserOneController class is used to implement the API for the Azure AD access tokens. The AuthorizeForScopes attribute from Microsoft.Identity.Web is used to validate the Azure AD App registration access token and define the scheme required for the validation. The scope name must match the Azure App registration definition.

using System.Collections.Generic;
using Microsoft.AspNetCore.Authorization;
using Microsoft.AspNetCore.Mvc;
using Microsoft.Extensions.Logging;
using Microsoft.Identity.Web;

namespace MyApi.Controllers
{
    [AuthorizeForScopes(Scopes = new string[] { "api://72286b8d-5010-4632-9cea-e69e565a5517/user_impersonation" }, 
        AuthenticationScheme = "myADscheme")]
    [ApiController]
    [Route("api/[controller]")]
    public class AzureADUserOneController : ControllerBase
    {
        private readonly ILogger<UserOneController> _logger;

        public AzureADUserOneController(ILogger<UserOneController> logger)
        {
            _logger = logger;
        }

        [HttpGet]
        public IEnumerable<string> Get()
        {
            return new List<string> { "AzureADUser one data" };
        }
    }
}

The UserOneController implements the Auth0 user access token API. Since the default scheme is used, no scheme definition is required. The authorization policy is used to secure the API which validates the scope and the claims for this API.

using System.Collections.Generic;
using Microsoft.AspNetCore.Authorization;
using Microsoft.AspNetCore.Mvc;
using Microsoft.Extensions.Logging;

namespace MyApi.Controllers
{
    [Authorize(Policy = "p-user-api-auth0")]
    [ApiController]
    [Route("api/[controller]")]
    public class UserOneController : ControllerBase
    {
        private readonly ILogger<UserOneController> _logger;

        public UserOneController(ILogger<UserOneController> logger)
        {
            _logger = logger;
        }

        [HttpGet]
        public IEnumerable<string> Get()
        {
            return new List<string> { "user one data" };
        }
    }
}

When the API application is started the APIs can be used and a swagger UI implemented using Swashbuckle was created to display the different APIs. Each API will only work with the correct access token. The different UIs can use the APIs and data is returned.

Links

https://auth0.com/docs/quickstart/webapp/aspnet-core

https://docs.microsoft.com/en-us/aspnet/core/security/authorization/introduction

Open ID Connect

Securing Blazor Web assembly using Cookies and Auth0

Secure an Angular SPA and an ASP.NET Core API using Auth0

$
0
0

This article shows how to implement an Angular single page application with an ASP.NET Core API and secured using the Open ID Connect code flow with PKCE and OAuth JWT Bearer tokens to protect the API. The identity provider is implemented using Auth0. The flow uses refresh tokens to renew the SPA session and the revocation endpoint is used to clean up the refresh tokens on logout.

Code: https://github.com/damienbod/Auth0AngularAspNetCoreApi

Setup

The solutions consists of three parts, an ASP.NET Core API which would provide the data in a secure way, an Angular application which would use the data and the Auth0 service which is used as the identity provider. Both applications are registered in Auth0 and the refresh tokens are configured for the SPA. The API can be used from the SPA application.

Angular SPA Code flow PKCE with refresh tokens

The Angular Open ID Connect client is implemented using the npm package angular-auth-oidc-client. The Auth0 client requires two special configurations to use an API. The audience is added as a custom parameter in the authorize request so that the required API can be used. The customParamsRefreshToken is used to add the scope parameter to the refresh request which is required by Auth0. The rest is standard Open ID Connect settings used for code flow using PKCE and refresh tokens.

import { APP_INITIALIZER, NgModule } from '@angular/core';
import { AuthModule, LogLevel, OidcConfigService } from 'angular-auth-oidc-client';

export function configureAuth(oidcConfigService: OidcConfigService) {
  return () =>
    oidcConfigService.withConfig({
      stsServer: 'https://dev-damienbod.eu.auth0.com',
      redirectUrl: window.location.origin,
      postLogoutRedirectUri: window.location.origin,
      clientId: 'Ujh5oSBAFr1BuilgkZPcMWEgnuREgrwU',
      scope: 'openid profile offline_access auth0-user-api-spa',
      responseType: 'code',
      silentRenew: true,
      useRefreshToken: true,
      logLevel: LogLevel.Debug,
      customParams: {
        audience: 'https://auth0-api-spa', // API app in Auth0
      },
      customParamsRefreshToken: {
        scope: 'openid profile offline_access auth0-user-api-spa',
      },
    });
}

@NgModule({
  imports: [AuthModule.forRoot()],
  providers: [
    OidcConfigService,
    {
      provide: APP_INITIALIZER,
      useFactory: configureAuth,
      deps: [OidcConfigService],
      multi: true,
    },
  ],
  exports: [AuthModule],
})
export class AuthConfigModule {}

An AuthInterceptor class is used to add the access token to the API requests to the secure APIs which use the access token. It is important that the access token is only sent to the intended API and not every outgoing HTTP request.

import { HttpInterceptor, HttpRequest, HttpHandler } from '@angular/common/http';
import { Injectable } from '@angular/core';
import { AuthService } from './auth.service';

@Injectable()
export class AuthInterceptor implements HttpInterceptor {
  private secureRoutes = ['https://localhost:44390'];

  constructor(private authService: AuthService) {}

  intercept(
    request: HttpRequest<any>,
    next: HttpHandler
  ) {
    if (!this.secureRoutes.find((x) => request.url.startsWith(x))) {
      return next.handle(request);
    }

    const token = this.authService.token;

    if (!token) {
      return next.handle(request);
    }

    request = request.clone({
      headers: request.headers.set('Authorization', 'Bearer ' + token),
    });

    return next.handle(request);
  }
}

ASP.NET Core API OAuth

The ASP.NET Core API allows requests from the calling SPA application. CORS is enabled for the application. The AddAuthentication method is used to add JWT bearer token security and the policies are added to verify the access token. The UseAuthentication method is used to add the security middleware.

public void ConfigureServices(IServiceCollection services)
{
	// ...
	
	JwtSecurityTokenHandler.DefaultInboundClaimTypeMap.Clear();
	// IdentityModelEventSource.ShowPII = true;

	// only needed for browser clients
	services.AddCors(options =>
	{
		options.AddPolicy("AllowAllOrigins",
			builder =>
			{
				builder
					.AllowCredentials()
					.WithOrigins(
						"https://localhost:4204")
					.SetIsOriginAllowedToAllowWildcardSubdomains()
					.AllowAnyHeader()
					.AllowAnyMethod();
			});
	});

	services.AddAuthentication(options =>
	{
		options.DefaultAuthenticateScheme = JwtBearerDefaults.AuthenticationScheme;
		options.DefaultChallengeScheme = JwtBearerDefaults.AuthenticationScheme;
	}).AddJwtBearer(options =>
	{
		options.Authority = "https://dev-damienbod.eu.auth0.com/";
		options.Audience = "https://auth0-api-spa";
	});

	services.AddSingleton<IAuthorizationHandler, UserApiScopeHandler>();

	services.AddAuthorization(policies =>
	{
		policies.AddPolicy("p-user-api-auth0", p =>
		{
			p.Requirements.Add(new UserApiScopeHandlerRequirement());
			// Validate id of application for which the token was created
			p.RequireClaim("azp", "Ujh5oSBAFr1BuilgkZPcMWEgnuREgrwU");
		});
	});

	services.AddControllers(options =>
	{
		var policy = new AuthorizationPolicyBuilder()
			.RequireAuthenticatedUser()
			.Build();
		options.Filters.Add(new AuthorizeFilter(policy));
	});
}

public void Configure(IApplicationBuilder app, IWebHostEnvironment env)
{
	// ...
	
	app.UseCors("AllowAllOrigins");

	app.UseHttpsRedirection();

	app.UseRouting();

	app.UseAuthentication();
	app.UseAuthorization();

	app.UseEndpoints(endpoints =>
	{
		endpoints.MapControllers();
	});
}

The UserApiScopeHandler class implements the AuthorizationHandler to require the UserApiScopeHandlerRequirement requirement which is used as the policy.

public class UserApiScopeHandler : AuthorizationHandler<UserApiScopeHandlerRequirement>
{

	protected override Task HandleRequirementAsync(AuthorizationHandlerContext context, 
		UserApiScopeHandlerRequirement requirement)
	{
		if (context == null)
			throw new ArgumentNullException(nameof(context));
		if (requirement == null)
			throw new ArgumentNullException(nameof(requirement));

		var scopeClaim = context.User.Claims.FirstOrDefault(t => t.Type == "scope");

		if (scopeClaim != null)
		{
			var scopes = scopeClaim.Value.Split(" ", StringSplitOptions.RemoveEmptyEntries);
			if (scopes.Any(t => t == "auth0-user-api-spa"))
			{
				context.Succeed(requirement);
			}
		}

		return Task.CompletedTask;
	}
}

The UserOneController class uses the policy which validates the access token and the claims from the token.

[SwaggerTag("User access token protected using Auth0")]
[Authorize(Policy = "p-user-api-auth0")]
[ApiController]
[Route("api/[controller]")]
public class UserOneController : ControllerBase
{
	/// <summary>
	/// returns data id the correct Auth0 access token is used.
	/// </summary>
	/// <returns>protected data</returns>
	[HttpGet]
	[ProducesResponseType(StatusCodes.Status200OK)]
	[ProducesResponseType(StatusCodes.Status401Unauthorized)]
	public IEnumerable<string> Get()
	{
		return new List<string> { "user one data" };
	}
}

Problems, notes, Improvements

Auth0 supports the revocation endpoint which is really good and so the refresh token can be revoked when the Angular application is logged out. This is really a MUST I think if using refresh tokens in the browser. It is not possible to revoke the access tokens so these remain valid after the SPA app logs out. You could reduce the lifespan of the access tokens which would improve this a bit. Auth0 does not support reference tokens and introspection which I would always use if using SPA authentication. Introspection could be supported by using a different identity provider. Using refresh token rotation is really important when using refresh tokens in the browser, this should also be configured.

Using Auth0 with an SPA means you cannot fully logout. The tokens are also stored somewhere in the browser, but at least the refresh token can be revoked which is really important. To improve security, you could switch to a BFF architecture and remove the tokens from the browser. Then it would also be possible to fully logout. The BFF also allows for client authentication and other security features which are not possible with an SPA.

Links

https://auth0.com/docs/quickstart/webapp/aspnet-core

https://docs.microsoft.com/en-us/aspnet/core/security/authorization/introduction

Open ID Connect

https://www.npmjs.com/package/angular-auth-oidc-client

Verify vaccination data using Zero Knowledge Proofs with ASP.NET Core and MATTR

$
0
0

This article shows how Zero Knowledge Proofs ZKP verifiable credentials can be used to verify a persons vaccination data implemented in ASP.NET Core and MATTR. The ZKP BBS+ verifiable credentials are issued and stored on a digital wallet using a Self-Issued Identity Provider (SIOP) and Open ID Connect. The data can then be used to verify if the holder has the required credentials, but only the required data is used and returned to the verification application. The holder of the data who owns the wallet can consent or not consent to allow the verification application to see and use the vaccination data. Auth0 is used to implement the identity provider.

Code https://github.com/swiss-ssi-group/MattrZeroKnowledgeProofsAspNetCore

Blogs in the series

What are Zero Knowledge Proof enabled credentials

Zero Knowledge Proof enabled credentials allows you to selectively disclose claims from a verifiable credential without disclosing all of the information of the verifiable credential. It also makes it possible to verify data without having to share the sensitive data required to verify something. In this post, we will just selectively request part of the data from a verifiable credential. This would make it possible to implement business flows without having to share or copy the sensitive data.

Setup ZKP Vaccination Data Issue and Verify

The demo application implements a covid vaccination data process. A number of components, applications are required to implement these flows. The idea is that when a person is vaccinated, the authority responsible for this could add the vaccination data to the persons identity. In this demo, that would be added to the Auth0 service which can be accessed in the id_token claims. The vaccination data organization can use the credentials issuer application to create a DID credential issuer using ZKP verifiable credentials. The end user can use a digital wallet to add his or his credentials using the SIOP flow which gets the claims from the IDP and adds the data to the digital wallet. The verification application would have to create a presentation template defining the claims which are required to use to verify. Once created, a new verification request can be created and used to verify the vaccination data from the user. The user would scan the presented QR Code from the verifier application and display a verify in the digital wallet. Once consented, the data is returned to the verifier application using an API. The data can be processed and the UI is updated with a verified result or not. The blockchain ledger is abstracted away and used indirectly through MATTR which has APIs for the Self sovereign identity specifications.

Issuing Zero Knowledge Proof enabled credentials

The VaccineCredentialsIssuer ASP.NET Core application is used to create the credential issuer and present this as a QR Code for the user to add vaccination Zero Knowledge Proofs verifiable credentials. The flow implemented is very similar to the flow used in the previous blog Create an OIDC credential Issuer with MATTR and ASP.NET Core . A DID is created to use a BLS key type which supports BBS+ signatures for issuing ZKP-enabled credentials.

public class MattrOptions
{
	/// <summary>
	/// The supported key types for the DIDs are ed25519 and bls12381g2. 
	/// If the keyType is omitted, the default key type that will be used is ed25519.
	/// 
	/// If the keyType in options is set to bls12381g2 a DID will be created with 
	/// a BLS key type which supports BBS+ signatures for issuing ZKP-enabled credentials.
	/// </summary>
	public string keyType { get; set; } = "bls12381g2";
}

The DID is used to create a credential issuer for the ZKP credentials. The CreateMattrCredentialIssuer method takes the DID created with the bls12381g2 key and creates the OIDC credential issuer.

private async Task<V1_CreateOidcIssuerResponse> CreateMattrCredentialIssuer(HttpClient client, V1_CreateDidResponse did)
{
	// create vc, post to credentials api
	// https://learn.mattr.global/tutorials/issue/oidc-bridge/setup-issuer

	var createCredentialsUrl = $"https://{_mattrConfiguration.TenantSubdomain}/ext/oidc/v1/issuers";

	var payload = new MattrOpenApiClient.V1_CreateOidcIssuerRequest
	{
		Credential = new Credential
		{
			IssuerDid = did.Did,
			Name = "VaccinationCertificate7",
			Context = new List<Uri> {
				new Uri( "https://schema.org"), 
				new Uri( "https://www.w3.org/2018/credentials/v1")
			},
			Type = new List<string> { "VerifiableCredential" }
		},
		ClaimMappings = new List<ClaimMappings>
		{
			new ClaimMappings{ JsonLdTerm="family_name", OidcClaim=$"https://{_mattrConfiguration.TenantSubdomain}/family_name"},
			new ClaimMappings{ JsonLdTerm="given_name", OidcClaim=$"https://{_mattrConfiguration.TenantSubdomain}/given_name"},
			new ClaimMappings{ JsonLdTerm="date_of_birth", OidcClaim=$"https://{_mattrConfiguration.TenantSubdomain}/date_of_birth"},
			new ClaimMappings{ JsonLdTerm="medicinal_product_code", OidcClaim=$"https://{_mattrConfiguration.TenantSubdomain}/medicinal_product_code"},
			new ClaimMappings{ JsonLdTerm="number_of_doses", OidcClaim=$"https://{_mattrConfiguration.TenantSubdomain}/number_of_doses"},
			new ClaimMappings{ JsonLdTerm="total_number_of_doses", OidcClaim=$"https://{_mattrConfiguration.TenantSubdomain}/total_number_of_doses"},
			new ClaimMappings{ JsonLdTerm="vaccination_date", OidcClaim=$"https://{_mattrConfiguration.TenantSubdomain}/vaccination_date"},
			new ClaimMappings{ JsonLdTerm="country_of_vaccination", OidcClaim=$"https://{_mattrConfiguration.TenantSubdomain}/country_of_vaccination"}
		},
		FederatedProvider = new FederatedProvider
		{
			ClientId = _configuration["Auth0Wallet:ClientId"],
			ClientSecret = _configuration["Auth0Wallet:ClientSecret"],
			Url = new Uri($"https://{_configuration["Auth0Wallet:Domain"]}"),
			Scope = new List<string> { "openid", "profile", "email" }
		}
	};

	var payloadJson = JsonConvert.SerializeObject(payload);

	var uri = new Uri(createCredentialsUrl);

	using (var content = new StringContentWithoutCharset(payloadJson, "application/json"))
	{
		var createOidcIssuerResponse = await client.PostAsync(uri, content);

		if (createOidcIssuerResponse.StatusCode == System.Net.HttpStatusCode.Created)
		{
			var v1CreateOidcIssuerResponse = JsonConvert.DeserializeObject<V1_CreateOidcIssuerResponse>(
					await createOidcIssuerResponse.Content.ReadAsStringAsync());

			return v1CreateOidcIssuerResponse;
		}

		var error = await createOidcIssuerResponse.Content.ReadAsStringAsync();
	}

	throw new Exception("whoops something went wrong");
}

The data from the MATTR response is used to create the callback for the credentials issuer. This is persisted to a database as this needs to be created only once and can be re-used.

 public async Task<string> CreateCredentialsAndCallback(string name)
        {
            // create a new one
            var vaccinationDataCredentials = await CreateMattrDidAndCredentialIssuer();
            vaccinationDataCredentials.Name = name;
            await _vaccineCredentialsIssuerCredentialsService.CreateVaccinationData(vaccinationDataCredentials);

            var callback = $"https://{_mattrConfiguration.TenantSubdomain}/ext/oidc/v1/issuers/{vaccinationDataCredentials.OidcIssuerId}/federated/callback";
            return callback;
        }

The data is displayed as a QR Code in a ASP.NET Core Razor page application. This can be scanned and the credentials will be added to your digital wallet, if the Open ID Connect server has the claims for the identity required by this issuer.

Auth0 is used to add the identity data for the claims. An Auth0 pipeline rule was created and used to add these claims to the id_tokens.

function (user, context, callback) {
    const namespace = 'https://damianbod-sandbox.vii.mattr.global/';

    context.idToken[namespace + 'date_of_birth'] = user.user_metadata.date_of_birth;
  
    context.idToken[namespace + 'family_name'] = user.user_metadata.family_name;
    context.idToken[namespace + 'given_name'] = user.user_metadata.given_name;
    context.idToken[namespace + 'medicinal_product_code'] = user.user_metadata.medicinal_product_code;
    context.idToken[namespace + 'number_of_doses'] = user.user_metadata.number_of_doses;
    context.idToken[namespace + 'total_number_of_doses'] = user.user_metadata.total_number_of_doses;
    context.idToken[namespace + 'vaccination_date'] = user.user_metadata.vaccination_date;
    context.idToken[namespace + 'country_of_vaccination'] = user.user_metadata.country_of_vaccination;
  
    callback(null, user, context);
}

The data needs to be added to each user in Auth0. If using this in a real application, a UI could be created and used to add the specific data for each user. The credential issuer is tightly coupled through the data with the IDP. So each credential issuer which creates verifiable credentials would require it’s own identity provider and full access to update the profiles. The IDP contains the business data required to issuer the credentials. Auth0 might not be a good choice for this, maybe something like IdentityServer or Openiddict would be a better choice because you could implement custom UIs with ASP.NET Core Identity and the complete UIs for the credential issuing flows.

When the credential issuer is scanned by the digital wallet, the user logs into the OIDC server and gets the data for the ZKP verifiable credentials. In a MATTR wallet, this is displayed with the Privacy enhancing credential information.

Verifying the credentials

Before the ZKP credentials can be verified, a presentation template is created to define the required credentials to verify. The DID ID from the credential issuer is used to find the DID in the ledger. The CreateMattrPresentationTemplate method creates the template using the QueryByFrame so that the exact claims can be defined. The context must use the https://w3c-ccg.github.io/ldp-bbs2020/context/v1 namespace to use the ZKP BBS+ credentials in MATTR. The type must be VerifiableCredential.

private async Task<V1_PresentationTemplateResponse> CreateMattrPresentationTemplate(
	HttpClient client, string didId)
{
	// create presentation, post to presentations templates api
	// https://learn.mattr.global/tutorials/verify/presentation-request-template
	// https://learn.mattr.global/tutorials/verify/presentation-request-template#create-a-privacy-preserving-presentation-request-template-for-zkp-enabled-credentials

	var createPresentationsTemplatesUrl = $"https://{_mattrConfiguration.TenantSubdomain}/v1/presentations/templates";

	var additionalPropertiesCredentialSubject = new Dictionary<string, object>();
	additionalPropertiesCredentialSubject.Add("credentialSubject", new VaccanationDataCredentialSubject
	{ 
		Explicit = true
	});

	var additionalPropertiesCredentialQuery = new Dictionary<string, object>();
	additionalPropertiesCredentialQuery.Add("required", true);

	var additionalPropertiesQuery = new Dictionary<string, object>();
	additionalPropertiesQuery.Add("type", "QueryByFrame");
	additionalPropertiesQuery.Add("credentialQuery", new List<CredentialQuery2> {
		new CredentialQuery2
		{
			Reason = "Please provide your vaccination data",
			TrustedIssuer = new List<TrustedIssuer>{
				new TrustedIssuer
				{
					Required = true,
					Issuer = didId // DID use to create the oidc
				}
			},
			Frame = new Frame
			{
				Context = new List<object>{
					"https://www.w3.org/2018/credentials/v1",
					"https://w3c-ccg.github.io/ldp-bbs2020/context/v1",
					"https://schema.org",
				},
				Type = "VerifiableCredential",
				AdditionalProperties = additionalPropertiesCredentialSubject

			},
			AdditionalProperties = additionalPropertiesCredentialQuery
		}
	});

	var payload = new MattrOpenApiClient.V1_CreatePresentationTemplate
	{
		Domain = _mattrConfiguration.TenantSubdomain,
		Name = "zkp-certificate-presentation-11",
		Query = new List<Query>
		{
			new Query
			{
				AdditionalProperties = additionalPropertiesQuery
			}
		}
	};

	var payloadJson = JsonConvert.SerializeObject(payload);

	var uri = new Uri(createPresentationsTemplatesUrl);

	using (var content = new StringContentWithoutCharset(payloadJson, "application/json"))
	{
		var presentationTemplateResponse = await client.PostAsync(uri, content);

		if (presentationTemplateResponse.StatusCode == System.Net.HttpStatusCode.Created)
		{

			var v1PresentationTemplateResponse = JsonConvert
					.DeserializeObject<MattrOpenApiClient.V1_PresentationTemplateResponse>(
					await presentationTemplateResponse.Content.ReadAsStringAsync());

			return v1PresentationTemplateResponse;
		}

		var error = await presentationTemplateResponse.Content.ReadAsStringAsync();

	}

	throw new Exception("whoops something went wrong");
}

The VaccanationDataCredentialSubject class defines the specific claims to use for the verification.

public class VaccanationDataCredentialSubject
{
	[Newtonsoft.Json.JsonProperty("@explicit", Required = Newtonsoft.Json.Required.Always)]
	public bool Explicit { get; set; }

	[Newtonsoft.Json.JsonProperty("family_name", Required = Newtonsoft.Json.Required.Always)]
	[System.ComponentModel.DataAnnotations.Required]
	public object FamilyName { get; set; } = new object();

	[Newtonsoft.Json.JsonProperty("given_name", Required = Newtonsoft.Json.Required.Always)]
	[System.ComponentModel.DataAnnotations.Required]
	public object GivenName { get; set; } = new object();

	[Newtonsoft.Json.JsonProperty("date_of_birth", Required = Newtonsoft.Json.Required.Always)]
	[System.ComponentModel.DataAnnotations.Required]
	public object DateOfBirth { get; set; } = new object();

	[Newtonsoft.Json.JsonProperty("medicinal_product_code", Required = Newtonsoft.Json.Required.Always)]
	[System.ComponentModel.DataAnnotations.Required]
	public object MedicinalProductCode { get; set; } = new object();
}

Verifying is very similar to the blog Present and Verify Verifiable Credentials in ASP.NET Core using Decentralized Identities and MATTR. A new DID of type ed25519 is used to invoke a verify request and also sign the request. The verifying flow in the application presents a QR Code using the redirectURL technic because the signed request is too long to present as a QR Code. This request returns a 302 with the full jws.

The application needs to be started using a public domain because the digital wallet will request back to the API with the data. I use ngrok to test locally. The verifier application can be started and the verify process is started by clicking the verify button which displays the QR Code to verify.

Start the application and start ngrok

ngrok http http://localhost:5000

The QR Code can be scanned to verify.

In the digital wallet, the verification request for the vaccination data can be viewed and if ok sent. The digital wallet displays the data which is disclosed and the data which is not. When the user clicks send, the data is validated and the API from the verifier application is called.

When the Verify application receives the callback from the digital wallet, the data is validated and the challenge ID is used to notify the user of a successful verification. The data is saved to a database and ASP.NET Core SignalR is used to update the UI. When the message from SignalR is sent, the user is redirected to the success page using the challenge ID and the data is displayed with the success image.

Notes

Now we have a full create, holder, verify process implemented for Zero Knowledge Proof verifiable credentials using covid vaccination data. OIDC is used to authenticate and create the claims used for the credentials. The OIDC connect server or identity provider is tightly coupled to the credential issuer because business uses the data from the id_token. When using SIOP, I would use ASP.NET Core Identity and either OpenIddict of Identityserver4 to implement this as part of the credential issuer. You need full control of the claims so using Auth0, Azure AD or Azure B2C would probably be a bad choice here. You could federate then to one of these from the credential issuer to use the profiles as required. Each vaccinated user would also require a user account. ZKP verifiable credentials makes it possible to support user privacy better and mix claims easier from different credentials. Another problem with this solution is the vendor lockdown. This is a problem with any self sovereign solution at the moment. Even though, the specifications are all standard, unless you want to implement this completely yourself, you would choose a vendor specific implementation which locks you down to a specific wallet or with specific features only. Interop does not seem to work at the moment. This is a problem with all security solutions at present not just SSI, all software producers, security services use security reasoning as an excuse to try to force you into lockdown into their specific product. You can see this with most of the existing OIDC solutions and services. Typical quotes for this are “You can use any OIDC client, but we recommend our OIDC client…” SSI will open possibilities for new security solutions and it will be very interesting to see how application security develops in the next five years.

Links

https://mattr.global/

https://learn.mattr.global/tutorials/verify/using-callback/callback-e-to-e

https://mattr.global/get-started/

https://learn.mattr.global/

https://keybase.io/

Generating a ZKP-enabled BBS+ credential using the MATTR Platform

https://learn.mattr.global/tutorials/dids/did-key

https://gunnarpeipman.com/httpclient-remove-charset/

https://auth0.com/

Where to begin with OIDC and SIOP

https://anonyome.com/2020/06/decentralized-identity-key-concepts-explained/

Verifiable-Credentials-Flavors-Explained

Viewing all 269 articles
Browse latest View live