Quantcast
Channel: ASP.NET Core – Software Engineering
Viewing all 269 articles
Browse latest View live

Adding SQL localization data using an Angular 2 form and ASP.NET Core

$
0
0

This article shows how SQL localized data can be added to a database using Angular 2 forms which can then be displayed without restarting the application. The ASP.NET Core localization is implemented using Localization.SqlLocalizer. This NuGet package is used to save and retrieve the dynamic localized data. This makes it possible to add localized data at run-time.

Code: https://github.com/damienbod/Angular2LocalizationAspNetCore

Posts in this series

The ASP.NET Core API provides an HTTP POST action method which allows the user to add a new ProductCreateEditDto object to the application. The view model adds both product data and also localization data to the SQLite database using Entity Framework Core.

[HttpPost]
public IActionResult Post([FromBody]ProductCreateEditDto value)
{
	_productCudProvider.AddProduct(value);
	return Created("http://localhost:5000/api/ShopAdmin/", value);
}

The Angular 2 app uses the ProductService to send the HTTP POST request to the ShopAdmin service. The post methods sends the payload as a json object in the body of the request.

public CreateProduct = (product: ProductCreateEdit): Observable<ProductCreateEdit> => {
	let item: string = JSON.stringify(product);
	this.setHeaders();
	return this._http.post(this.actionUrlShopAdmin, item, {
		headers: this.headers
	}).map((response: Response) => <ProductCreateEdit>response.json())
	.catch(this.handleError);
}

The client model is the same as the server side view model. The ProductCreateEdit class has an array of localized records.

import { LocalizationRecord } from './LocalizationRecord';

export class ProductCreateEdit {
    Id: number;
    Name: string;
    Description: string;
    ImagePath: string;
    PriceEUR: number;
    PriceCHF: number;
    LocalizationRecords: LocalizationRecord[];
}

export class LocalizationRecord {
    Key: string;
    Text: string;
    LocalizationCulture: string;
}

The shop-admin.component.html template contains the form which is used to enter the data and this is then sent to the server using the product service. The forms in Angular 2 have changed a lot compared to Angular 1 forms. The form uses the ngFormModel and the ngControl to define the Angular 2 form specifics. These control items need to be defined in the corresponding ts file.

<form [ngFormModel]="productForm" (ngSubmit)="Create(productForm.value)">

    <div class="form-group" [ngClass]="{ 'has-error' : !name.valid && submitted }">
        <label class="control-label" for="name">{{ 'ADD_PRODUCT_NAME' | translate:lang }}</label>
        <em *ngIf="!name.valid && submitted">Required</em>
        <input id="name" type="text" class="form-control" placeholder="name" ngControl="name" [(ngModel)]="Product.Name">
    </div>

    <div class="form-group" [ngClass]="{ 'has-error' : !description.valid && submitted }">
        <label class="control-label" for="description">{{ 'ADD_PRODUCT_DESCRIPTION' | translate:lang }}</label>
        <em *ngIf="!description.valid && submitted">Required</em>
        <input id="description" type="text" class="form-control" placeholder="description" ngControl="description" [(ngModel)]="Product.Description">
    </div>

    <div class="form-group" [ngClass]="{ 'has-error' : !priceEUR.valid && submitted }">
        <label class="control-label" for="priceEUR">{{ 'ADD_PRODUCT_PRICE_EUR' | translate:lang }}</label>
        <em *ngIf="!priceEUR.valid && submitted">Required</em>
        <input id="priceEUR" type="number" class="form-control" placeholder="priceEUR" ngControl="priceEUR" [(ngModel)]="Product.PriceEUR">
    </div>

    <div class="form-group" [ngClass]="{ 'has-error' : !priceCHF.valid && submitted }">
        <label class="control-label" for="priceCHF">{{ 'ADD_PRODUCT_PRICE_CHF' | translate:lang }}</label>
        <em *ngIf="!priceCHF.valid && submitted">Required</em>
        <input id="priceCHF" type="number" class="form-control" placeholder="priceCHF" ngControl="priceCHF" [(ngModel)]="Product.PriceCHF">
    </div>


    <div class="form-group" [ngClass]="{ 'has-error' : !namede.valid && !namefr.valid && !nameit.valid && !nameen.valid && submitted }">
        <label>{{ 'ADD_PRODUCT_LOCALIZED_NAME' | translate:lang }}</label>
        <div class="row">
            <div class="col-md-3"><em>de</em></div>
            <div class="col-md-9">
                <input class="form-control" type="text" [(ngModel)]="Name_de" ngControl="namede" #name="ngForm" />
            </div>
        </div>
        <div class="row">
            <div class="col-md-3"><em>fr</em></div>
            <div class="col-md-9">
                <input class="form-control" type="text" [(ngModel)]="Name_fr" ngControl="namefr" #name="ngForm" />
            </div>
        </div>
        <div class="row">
            <div class="col-md-3"><em>it</em></div>
            <div class="col-md-9">
                <input class="form-control" type="text" [(ngModel)]="Name_it" ngControl="nameit" #name="ngForm" />
            </div>
        </div>
        <div class="row">
            <div class="col-md-3"><em>en</em></div>
            <div class="col-md-9">
                <input class="form-control" type="text" [(ngModel)]="Name_en" ngControl="nameen" #name="ngForm" />
            </div>
        </div>

    </div>

    <div class="form-group" [ngClass]="{ 'has-error' : !descriptionde.valid && !descriptionfr.valid && !descriptionit.valid && !descriptionen.valid && submitted }">
        <label>{{ 'ADD_PRODUCT_LOCALIZED_DESCRIPTION' | translate:lang }}</label>
        <div class="row">
            <div class="col-md-3"><em>de</em></div>
            <div class="col-md-9">
                <input class="form-control" type="text" [(ngModel)]="Description_de" ngControl="descriptionde" #name="ngForm" />
            </div>
        </div>
        <div class="row">
            <div class="col-md-3"><em>fr</em></div>
            <div class="col-md-9">
                <input class="form-control" type="text" [(ngModel)]="Description_fr" ngControl="descriptionfr" #name="ngForm" />
            </div>
        </div>
        <div class="row">
            <div class="col-md-3"><em>it</em></div>
            <div class="col-md-9">
                <input class="form-control" type="text" [(ngModel)]="Description_it" ngControl="descriptionit" #name="ngForm" />
            </div>
        </div>
        <div class="row">
            <div class="col-md-3"><em>en</em></div>
            <div class="col-md-9">
                <input class="form-control" type="text" [(ngModel)]="Description_en" ngControl="descriptionen" #name="ngForm" />
            </div>
        </div>

    </div>
    <div class="form-group">
        <button type="submit" [disabled]="saving" class="btn btn-primary">{{ 'ADD_PRODUCT_CREATE_NEW_PRODUCT' | translate:lang }}</button>
    </div>

</form>


The built in Angular 2 form components are imported from the ‘@angular/common’ library. The ControlGroup and the different Control items which are used in the HTML template need to be defined in the ts component file. The Control items are also added to the group in the builder function. The different Validators, or your own custom Validators can be added here. The Create method uses the Control items and the Product model to create the full product item and send the data to the Shop Admin Controller on the server. When successfully created, the user is redirected to the Shop component showing all products in the selected language.

import { Component, OnInit } from '@angular/core';
import { CORE_DIRECTIVES, NgForm, FORM_DIRECTIVES, FormBuilder, Control, ControlGroup, Validators } from '@angular/common';
import { Observable } from 'rxjs/Observable';
import { Http } from '@angular/http';
import { Product } from '../services/Product';
import { ProductCreateEdit } from  '../services/ProductCreateEdit';
import { Locale, LocaleService, LocalizationService} from 'angular2localization/angular2localization';
import { ProductService } from '../services/ProductService';
import { TranslatePipe } from 'angular2localization/angular2localization';
import { Router} from '@angular/router';

@Component({
    selector: 'shopadmincomponent',
    template: require('./shop-admin.component.html'),
    directives: [CORE_DIRECTIVES],
    pipes: [TranslatePipe]
})

export class ShopAdminComponent extends Locale implements OnInit  {

    public message: string;
    public Product: ProductCreateEdit;
    public Currency: string;

    public Name_de: string;
    public Name_fr: string;
    public Name_it: string;
    public Name_en: string;
    public Description_de: string;
    public Description_fr: string;
    public Description_it: string;
    public Description_en: string;

    productForm: ControlGroup;
    name: Control;
    description: Control;
    priceEUR: Control;
    priceCHF: Control;
    namede: Control;
    namefr: Control;
    nameit: Control;
    nameen: Control;
    descriptionde: Control;
    descriptionfr: Control;
    descriptionit: Control;
    descriptionen: Control;
    submitAttempt: boolean = false;
    saving: boolean = false;

    constructor(
        private router: Router,
        public _localeService: LocaleService,
        public localization: LocalizationService,
        private _productService: ProductService,
        private builder: FormBuilder) {

        super(null, localization);

        this.message = "shop-admin.component";

        this._localeService.languageCodeChanged.subscribe(item => this.onLanguageCodeChangedDataRecieved(item));

        this.buildForm();

    }

    ngOnInit() {
        console.log("ngOnInit ShopAdminComponent");
        // TODO Get product if Id exists
        this.initProduct();

        this.Currency = this._localeService.getCurrentCurrency();
        if (!(this.Currency === "CHF" || this.Currency === "EUR")) {
            this.Currency = "CHF";
        }
    }

    buildForm(): void {
        this.name = new Control('', Validators.required);
        this.description = new Control('', Validators.required);
        this.priceEUR = new Control('', Validators.required);
        this.priceCHF = new Control('', Validators.required);

        this.namede = new Control('', Validators.required);
        this.namefr = new Control('', Validators.required);
        this.nameit = new Control('', Validators.required);
        this.nameen = new Control('', Validators.required);

        this.descriptionde = new Control('', Validators.required);
        this.descriptionfr = new Control('', Validators.required);
        this.descriptionit = new Control('', Validators.required);
        this.descriptionen = new Control('', Validators.required);

        this.productForm = this.builder.group({
            name: ['', Validators.required],
            description: ['', Validators.required],
            priceEUR: ['', Validators.required],
            priceCHF: ['', Validators.required],
            namede: ['', Validators.required],
            namefr: ['', Validators.required],
            nameit: ['', Validators.required],
            nameen: ['', Validators.required],
            descriptionde: ['', Validators.required],
            descriptionfr: ['', Validators.required],
            descriptionit: ['', Validators.required],
            descriptionen: ['', Validators.required]
        });
    }

    public Create() {

        this.submitAttempt = true;

        if (this.productForm.valid) {
            this.saving = true;

            this.Product.LocalizationRecords = [];
            this.Product.LocalizationRecords.push({ Key: this.Product.Name, LocalizationCulture: "de-CH", Text: this.Name_de });
            this.Product.LocalizationRecords.push({ Key: this.Product.Name, LocalizationCulture: "fr-CH", Text: this.Name_fr });
            this.Product.LocalizationRecords.push({ Key: this.Product.Name, LocalizationCulture: "it-CH", Text: this.Name_it });
            this.Product.LocalizationRecords.push({ Key: this.Product.Name, LocalizationCulture: "en-US", Text: this.Name_en });

            this.Product.LocalizationRecords.push({ Key: this.Product.Description, LocalizationCulture: "de-CH", Text: this.Description_de });
            this.Product.LocalizationRecords.push({ Key: this.Product.Description, LocalizationCulture: "fr-CH", Text: this.Description_fr });
            this.Product.LocalizationRecords.push({ Key: this.Product.Description, LocalizationCulture: "it-CH", Text: this.Description_it });
            this.Product.LocalizationRecords.push({ Key: this.Product.Description, LocalizationCulture: "en-US", Text: this.Description_en });

            this._productService.CreateProduct(this.Product)
                .subscribe(data => {
                    this.saving = false;
                    this.router.navigate(['/shop']);
                }, error => {
                    this.saving = false;
                    console.log(error)
                },
                () => this.saving = false);
        }

    }

    private onLanguageCodeChangedDataRecieved(item) {
        console.log("onLanguageCodeChangedDataRecieved Shop Admin");
        console.log(item + " : "+ this._localeService.getCurrentLanguage());
    }

    private initProduct() {
        this.Product = new ProductCreateEdit();
    }

}

The form can then be used and the data is sent to the server.
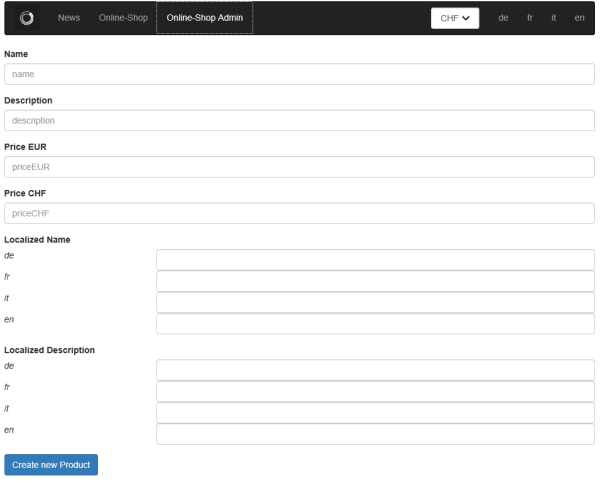
localizedAngular2Form_01

And then displayed in the Shop component.
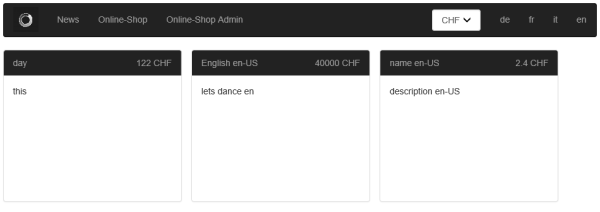
localizedAngular2Form_02

Notes

Angular 2 forms have a few validation issues which makes me uncomfortable using it.

Links

https://angular.io/docs/ts/latest/guide/forms.html

https://auth0.com/blog/2016/05/03/angular2-series-forms-and-custom-validation/

http://odetocode.com/blogs/scott/archive/2016/05/02/the-good-and-the-bad-of-programming-forms-in-angular.aspx

http://blog.thoughtram.io/angular/2016/03/14/custom-validators-in-angular-2.html

https://docs.asp.net/en/latest/fundamentals/localization.html

https://www.nuget.org/profiles/damienbod

https://github.com/robisim74/angular2localization

https://angular.io

http://docs.asp.net/en/1.0.0-rc2/fundamentals/localization.html


ASP.NET Core, Angular2 with Webpack and Visual Studio

$
0
0

This article shows how Webpack could be used together with Visual Studio ASP.NET Core and Angular2. Both the client and the server side of the application is implemented inside one ASP.NET Core project which makes it easier to deploy.

vs_webpack_angular2

Code: https://github.com/damienbod/Angular2WebpackVisualStudio

Authors Fabian Gosebrink, Damien Bowden.
This post is hosted on both http://damienbod.com and http://offering.solutions/ and will be hosted on http://blog.noser.com afterwards.

Setting up the application

The ASP.NET Core application contains both the server side API services and also hosts the Angular 2 client application. The source code for the Angular 2 application is implemented in the angular2App folder. Webpack is then used to deploy the application, using the development build or a production build, which deploys the application to the wwwroot folder. This makes it easy to deploy the application using the standard tools from Visual Studio with the standard configurations.

npm configuration

The npm package.json configuration loads all the required packages for Angular 2 and Webpack. The Webpack packages are all added to the devDependencies. A “npm build” script and also a “npm buildProduction” are also configured, so that the client application can be built using Webpack from the cmd line using “npm build” or “npm buildProduction”. These two scripts just call the same cmd as the Webpack task runner.

{
  "version": "1.0.0",
  "description": "",
  "main": "wwwroot/index.html",
  "author": "",
  "license": "ISC",
    "scripts": {
        "build": "SET NODE_ENV=development && webpack -d --color",
        "buildProduction": "SET NODE_ENV=production && webpack -d --color",
        "tsc": "tsc",
        "tsc:w": "tsc -w",
        "typings": "typings",
        "postinstall": "typings install"
    },
  "dependencies": {
    "@angular/common": "2.0.0-rc.1",
    "@angular/compiler": "2.0.0-rc.1",
    "@angular/core": "2.0.0-rc.1",
    "@angular/http": "2.0.0-rc.1",
    "@angular/platform-browser": "2.0.0-rc.1",
    "@angular/platform-browser-dynamic": "2.0.0-rc.1",
    "@angular/router": "2.0.0-rc.1",
    "bootstrap": "^3.3.6",
    "core-js": "^2.4.0",
    "extract-text-webpack-plugin": "^1.0.1",
    "reflect-metadata": "^0.1.3",
    "rxjs": "5.0.0-beta.6",
    "zone.js": "^0.6.12"
  },
  "devDependencies": {
    "autoprefixer": "^6.3.2",
    "clean-webpack-plugin": "^0.1.9",
    "copy-webpack-plugin": "^2.1.3",
    "css-loader": "^0.23.0",
    "extract-text-webpack-plugin": "^1.0.1",
    "file-loader": "^0.8.4",
    "html-loader": "^0.4.0",
    "html-webpack-plugin": "^2.8.1",
    "jquery": "^2.2.0",
    "json-loader": "^0.5.3",
    "node-sass": "^3.4.2",
    "null-loader": "0.1.1",
    "postcss-loader": "^0.9.1",
    "raw-loader": "0.5.1",
    "rimraf": "^2.5.1",
    "sass-loader": "^3.1.2",
    "style-loader": "^0.13.0",
    "ts-helpers": "^1.1.1",
    "ts-loader": "0.8.2",
    "typescript": "1.8.10",
    "typings": "1.0.4",
    "url-loader": "^0.5.6",
    "webpack": "1.13.0"
    }
}

typings configuration

The typings are configured for webpack builds.


  "globalDependencies": {
    "core-js": "registry:dt/core-js#0.0.0+20160317120654",
    "node": "registry:dt/node#4.0.0+20160501135006"
  }
}

tsconfig configuration

The tsconfig is configured to use commonjs as the module.

{
    "compilerOptions": {
        "target": "es5",
        "module": "commonjs",
        "moduleResolution":  "node",
        "removeComments": true,
        "emitDecoratorMetadata": true,
        "experimentalDecorators": true,
        "noEmitHelpers": false,
        "sourceMap": true
    },
    "exclude": [
        "node_modules"
    ],
    "compileOnSave": false,
    "buildOnSave": false
}

Webpack build

The Webpack development build >webpack -d just uses the source files and creates outputs for development. The production build copies everything required for the client application to the wwwroot folder, and uglifies the js files. The webpack -d –watch can be used to automatically build the dist files if a source file is changed.

The Webpack config file was created using the excellent gihub repository https://github.com/preboot/angular2-webpack. Thanks for this. Small changes were made to this, such as the process.env.NODE_ENV and Webpack uses different source and output folders to match the ASP.NET Core project. If you decide to use two different projects, one for server, and one for client, preboot or angular-cli, or both together would be a good choice for the client application.

Full webpack.config file

/// <binding ProjectOpened='Run - Development' />
var path = require('path');
var webpack = require('webpack');

var CommonsChunkPlugin = webpack.optimize.CommonsChunkPlugin;
var Autoprefixer = require('autoprefixer');
var HtmlWebpackPlugin = require('html-webpack-plugin');
var ExtractTextPlugin = require('extract-text-webpack-plugin');
var CopyWebpackPlugin = require('copy-webpack-plugin');
var CleanWebpackPlugin = require('clean-webpack-plugin');

var isProd = (process.env.NODE_ENV === 'production');

module.exports = function makeWebpackConfig() {

    var config = {};

    // add debug messages
    config.debug = !isProd;

    // clarify output filenames
    var outputfilename = 'dist/[name].js';
    if (isProd) {
        //config.devtool = 'source-map';
        outputfilename = 'dist/[name].[hash].js';
    }

    if (!isProd) {
        config.devtool = 'eval-source-map';
    }


    config.entry = {
        'polyfills': './angular2App/polyfills.ts',
        'vendor': './angular2App/vendor.ts',
        'app': './angular2App/boot.ts' // our angular app
    };


    config.output = {
        path: root('./wwwroot'),
        publicPath: isProd ? '' : 'http://localhost:5000/',
        filename: outputfilename,
        chunkFilename: isProd ? '[id].[hash].chunk.js' : '[id].chunk.js'
    };

    config.resolve = {
        cache: true,
        root: root(),
        extensions: ['', '.ts', '.js', '.json', '.css', '.scss', '.html'],
        alias: {
            'app': 'angular2App/app'
        }
    };

    config.module = {
        loaders: [
            {
                test: /\.ts$/,
                loader: 'ts',
                query: {
                    'ignoreDiagnostics': [
                        2403, // 2403 -> Subsequent variable declarations
                        2300, // 2300 -> Duplicate identifier
                        2374, // 2374 -> Duplicate number index signature
                        2375, // 2375 -> Duplicate string index signature
                        2502 // 2502 -> Referenced directly or indirectly
                    ]
                },
                exclude: [/node_modules\/(?!(ng2-.+))/]
            },

            // copy those assets to output
            {
                test: /\.(png|jpe?g|gif|svg|woff|woff2|ttf|eot|ico)$/,
                loader: 'file?name=fonts/[name].[hash].[ext]?'
            },

            // Support for *.json files.
            {
                test: /\.json$/,
                loader: 'json'
            },

            // Load css files which are required in vendor.ts
            {
                test: /\.css$/,
                exclude: root('angular2App', 'app'),
                loader: "style!css"
            },

            // Extract all files without the files for specific app components
            {
                test: /\.scss$/,
                exclude: root('angular2App', 'app'),
                loader: 'raw!postcss!sass'
            },

            // Extract all files for specific app components
            {
                test: /\.scss$/,
                exclude: root('angular2App', 'style'),
                loader: 'raw!postcss!sass'
            },

            {
                test: /\.html$/,
                loader: 'raw'
            }
        ],
        postLoaders: [],
        noParse: [/.+zone\.js\/dist\/.+/, /.+angular2\/bundles\/.+/, /angular2-polyfills\.js/]
    };


    config.plugins = [
        new CleanWebpackPlugin(['./wwwroot/dist']),

        new webpack.DefinePlugin({
            'process.env': {
                NODE_ENV: JSON.stringify("production")
            }
        }),

        new CommonsChunkPlugin({
            name: ['vendor', 'polyfills']
        }),

        new HtmlWebpackPlugin({
            template: './angular2App/index.html',
            inject: 'body',
            chunksSortMode: packageSort(['polyfills', 'vendor', 'app'])
        }),

        new CopyWebpackPlugin([

            // copy all images to [rootFolder]/images
            { from: root('angular2App/images'), to: 'images' },

            // copy all fonts to [rootFolder]/fonts
            { from: root('angular2App/fonts'), to: 'fonts' }
        ])
    ];


    // Add build specific plugins
    if (isProd) {
        config.plugins.push(
            new webpack.NoErrorsPlugin(),
            new webpack.optimize.DedupePlugin(),
            new webpack.optimize.UglifyJsPlugin()
        );
    }

    config.postcss = [
        Autoprefixer({
            browsers: ['last 2 version']
        })
    ];

    config.sassLoader = {
        //includePaths: [path.resolve(__dirname, "node_modules/foundation-sites/scss")]
    };

    return config;
}();

// Helper functions
function root(args) {
    args = Array.prototype.slice.call(arguments, 0);
    return path.join.apply(path, [__dirname].concat(args));
}

function rootNode(args) {
    args = Array.prototype.slice.call(arguments, 0);
    return root.apply(path, ['node_modules'].concat(args));
}

function packageSort(packages) {
    // packages = ['polyfills', 'vendor', 'app']
    var len = packages.length - 1;
    var first = packages[0];
    var last = packages[len];
    return function sort(a, b) {
        // polyfills always first
        if (a.names[0] === first) {
            return -1;
        }
        // main always last
        if (a.names[0] === last) {
            return 1;
        }
        // vendor before app
        if (a.names[0] !== first && b.names[0] === last) {
            return -1;
        } else {
            return 1;
        }
    }
}

Lets dive into this a bit:

Firstly, all plugins are loaded which are required to process all the js, ts, … files which are included, or used in the project.

var path = require('path');
var webpack = require('webpack');

var CommonsChunkPlugin = webpack.optimize.CommonsChunkPlugin;
var Autoprefixer = require('autoprefixer');
var HtmlWebpackPlugin = require('html-webpack-plugin');
var ExtractTextPlugin = require('extract-text-webpack-plugin');
var CopyWebpackPlugin = require('copy-webpack-plugin');
var CleanWebpackPlugin = require('clean-webpack-plugin');

var isProd = (process.env.NODE_ENV === 'production');

The npm environment variable NODE_ENV is used to define the type of build, either a development build or a production build. The entries are configured depending on this parameter.

    config.entry = {
        'polyfills': './angular2App/polyfills.ts',
        'vendor': './angular2App/vendor.ts',
        'app': './angular2App/boot.ts' // our angular app
    };

The entries provide Webpack with the required information, where to start from, or where to hook in to. Three entry points are defined in this configuration. These strings point to the files required in the solution. The starting point for the app itself is provided in one of these files, boot.ts as a starting-point and also all vendor scripts minified in one file, the vendor.ts.

// Polyfill(s) for older browsers.
import 'core-js/client/core';

// Reflect Metadata.
import 'reflect-metadata';
// RxJS.
import 'rxjs';
// Zone.
import 'zone.js/dist/zone';

// Angular 2.
import '@angular/common';
import '@angular/compiler';
import '@angular/core';
import '@angular/http';
import '@angular/platform-browser';
import '@angular/platform-browser-dynamic';
import '@angular/router';

// Other libraries.
import 'jquery/src/jquery';
import 'bootstrap/dist/js/bootstrap';


import './css/bootstrap.css';
import './css/bootstrap-theme.css';

Webpack knows which paths to run and includes the corresponding files and packages.

The “loaders” section and the “modules” section in the configuration provides Webpack with the following information: which files it needs to get and how to read the files. The modules tells Webpack what to do with the files exactly. Like minifying or whatever.

In this project configuration, if a production node parameter is set, different plugins are pushed into the sections because the files should be treated differently.

Angular 2 index.html

The index.html contains all the references required for the Angular 2 client. The scripts are added as part of the build and not manually. The developer only needs to use the imports.

Source index.html file in the angular2App/public folder:

<!doctype html>
<html>
<head>
    <base href="./">

    <meta charset="utf-8" />
    <meta name="viewport" content="width=device-width, initial-scale=1.0" />
    <title>Angular 2 Webpack Demo</title>

    <meta http-equiv="content-type" content="text/html; charset=utf-8" />

    <meta name="viewport" content="width=device-width, initial-scale=1.0" />

</head>
<body>
    <my-app>Loading...</my-app>
</body>
</html>


And the produced build file in the wwwroot folder. The scripts for the app, vendor and boot have been added using Webpack. Hashes are used in a production build for cache busting.

<!doctype html>
<html>
<head>
    <base href="./">

    <meta charset="utf-8" />
    <meta name="viewport" content="width=device-width, initial-scale=1.0" />
    <title>Angular 2 Webpack Demo</title>

    <meta http-equiv="content-type" content="text/html; charset=utf-8" />

    <meta name="viewport" content="width=device-width, initial-scale=1.0" />

    <link rel="stylesheet" href="css/bootstrap.css">
</head>
<body>
    <my-app>Loading...</my-app>
<script type="text/javascript" src="http://localhost:5000/dist/polyfills.js"></script><script type="text/javascript" src="http://localhost:5000/dist/vendor.js"></script><script type="text/javascript" src="http://localhost:5000/dist/app.js"></script></body>
</html>

Visual Studio tools

Webpack task runner from Mads Kristensen can be downloaded and used to send Webpack commands using the webpack.config.js file. The node NODE_ENV parameter is used to define the build type. The parameter can be set to “development”, or “production”.

vs_webpack_angular2_02

The Webpack task runner can also be used by double clicking the task. The execution results are then displayed in the task runner console.

vs_webpack_angular2_03

This runner provides a number of useful commands which can be activated automatically. These tasks can be attached to Visual Studio events by right clicking the task and selecting a binding. This adds a binding tag to the webpack.config.js file.

/// <binding ProjectOpened='Run - Development' />

Webpack SASS

SASS is used to style the SPA application. The SASS files can be built using the SASS loader. Webpack can build all the styles inline or as an external file, depending on your Webpack config.

{
  test: /\.scss$/,
  exclude: root('angular2App', 'app'),
  loader: ExtractTextPlugin.extract('style', 'css?sourceMap!postcss!sass')
},

Webpack Clean

clean-webpack-plugin is used to clean up the deployment folder inside the wwwroot. This ensures that the application uses the latest files.

The clean task can be configured as follows:

var CleanWebpackPlugin = require('clean-webpack-plugin');

And used in Webpack.

  new CleanWebpackPlugin(['./wwwroot/dist']),

Angular 2 component files

The Angular 2 components are slightly different to the standard example components. The templates and the styles use require, which adds the html or the css, scss to the file directly using Webpack, or as an external link depending on the Webpack config.

import { Observable } from 'rxjs/Observable';
import { Component, OnInit } from '@angular/core';
import { CORE_DIRECTIVES } from '@angular/common';
import { Http } from '@angular/http';
import { DataService } from '../services/DataService';


@Component({
    selector: 'homecomponent',
    template: require('./home.component.html'),
    directives: [CORE_DIRECTIVES],
    providers: [DataService]
})

export class HomeComponent implements OnInit {

    public message: string;
    public values: any[];

    constructor(private _dataService: DataService) {
        this.message = "Hello from HomeComponent constructor";
    }

    ngOnInit() {
        this._dataService
            .GetAll()
            .subscribe(data => this.values = data,
            error => console.log(error),
            () => console.log('Get all complete'));
    }
}

The ASP.NET Core API

The ASP.NET Core API is quite small and tiny. It just provides a demo CRUD service.

 [Route("api/[controller]")]
    public class ValuesController : Microsoft.AspNetCore.Mvc.Controller
    {
        // GET: api/values
        [HttpGet]
        public IActionResult Get()
        {
            return new JsonResult(new string[] { "value1", "value2" });
        }

        // GET api/values/5
        [HttpGet("{id}")]
        public IActionResult Get(int id)
        {
            return new JsonResult("value");
        }

        // POST api/values
        [HttpPost]
        public IActionResult Post([FromBody]string value)
        {
            return new CreatedAtRouteResult("anyroute", null);
        }

        // PUT api/values/5
        [HttpPut("{id}")]
        public IActionResult Put(int id, [FromBody]string value)
        {
            return new OkResult();
        }

        // DELETE api/values/5
        [HttpDelete("{id}")]
        public IActionResult Delete(int id)
        {
            return new NoContentResult();
        }
    }

The Angular2 Http-Service

Note that in a normal environment, you should always return the typed classes and never the plain HTTP response like here. This application only has strings to return, and this is enough for the demo.

import { Injectable } from '@angular/core';
import { Http, Response, Headers } from '@angular/http';
import 'rxjs/add/operator/map'
import { Observable } from 'rxjs/Observable';
import { Configuration } from '../app.constants';

@Injectable()
export class DataService {

    private actionUrl: string;
    private headers: Headers;

    constructor(private _http: Http, private _configuration: Configuration) {

        this.actionUrl = _configuration.Server + 'api/values/';

        this.headers = new Headers();
        this.headers.append('Content-Type', 'application/json');
        this.headers.append('Accept', 'application/json');
    }

    public GetAll = (): Observable =&gt; {
        return this._http.get(this.actionUrl).map((response: Response) =&gt; response.json());
    }

    public GetSingle = (id: number): Observable =&gt; {
        return this._http.get(this.actionUrl + id).map(res =&gt; res.json());
    }

    public Add = (itemName: string): Observable =&gt; {
        var toAdd = JSON.stringify({ ItemName: itemName });

        return this._http.post(this.actionUrl, toAdd, { headers: this.headers }).map(res =&gt; res.json());
    }

    public Update = (id: number, itemToUpdate: any): Observable =&gt; {
        return this._http
            .put(this.actionUrl + id, JSON.stringify(itemToUpdate), { headers: this.headers })
            .map(res =&gt; res.json());
    }

    public Delete = (id: number): Observable =&gt; {
        return this._http.delete(this.actionUrl + id);
    }
}

Notes:

The Webpack configuration could also build all of the scss and css files to a separate app.css or app.”hash”.css which could be loaded as a single file in the distribution. Some of the vendor js and css could also be loaded directly in the html header using the index.html file and not included in the Webpack build.

If you are building both the client application and the server application in separate projects, you could also consider angular-cli of angular2-webpack for the client application.

Debugging the Angular 2 in Visual Studio with breakpoints is not possible with this setup. The SPA app can be debugged in chrome.

Links:

https://github.com/preboot/angular2-webpack

https://webpack.github.io/docs/

https://github.com/jtangelder/sass-loader

https://github.com/petehunt/webpack-howto/blob/master/README.md

http://www.sochix.ru/how-to-integrate-webpack-into-visual-studio-2015/

http://sass-lang.com/

WebPack Task Runner from Mads Kristensen

http://blog.thoughtram.io/angular/2016/06/08/component-relative-paths-in-angular-2.html

https://angular.io/docs/ts/latest/guide/webpack.html


Import and Export CSV in ASP.NET Core

$
0
0

This article shows how to import and export csv data in an ASP.NET Core application. The InputFormatter and the OutputFormatter classes are used to convert the csv data to the C# model classes.

Code: https://github.com/damienbod/AspNetCoreCsvImportExport

The LocalizationRecord class is used as the model class to import and export to and from csv data.

using System;

namespace AspNetCoreCsvImportExport.Model
{
    public class LocalizationRecord
    {
        public long Id { get; set; }
        public string Key { get; set; }
        public string Text { get; set; }
        public string LocalizationCulture { get; set; }
        public string ResourceKey { get; set; }
    }
}

The MVC Controller CsvTestController makes it possible to import and export the data. The Get method exports the data using the Accept header in the HTTP Request. Per default, Json will be returned. If the Accept Header is set to ‘text/csv’, the data will be returned as csv. The GetDataAsCsv method always returns csv data because the Produces attribute is used to force this. This makes it easy the download csv data in a browser.

The Import method uses the Content-Type HTTP Request Header, to decide how to handle the request body. If the ‘text/csv’ is defined, the custom csv input formatter will be used.

using System.Collections.Generic;
using AspNetCoreCsvImportExport.Model;
using Microsoft.AspNetCore.Mvc;

namespace AspNetCoreCsvImportExport.Controllers
{
    [Route("api/[controller]")]
    public class CsvTestController : Controller
    {
        // GET api/csvtest
        [HttpGet]
        public IActionResult Get()
        {
            return Ok(DummyData());
        }

        [HttpGet]
        [Route("data.csv")]
        [Produces("text/csv")]
        public IActionResult GetDataAsCsv()
        {
            return Ok( DummyData());
        }

        private static IEnumerable<LocalizationRecord> DummyData()
        {
            var model = new List<LocalizationRecord>
            {
                new LocalizationRecord
                {
                    Id = 1,
                    Key = "test",
                    Text = "test text",
                    LocalizationCulture = "en-US",
                    ResourceKey = "test"

                },
                new LocalizationRecord
                {
                    Id = 2,
                    Key = "test",
                    Text = "test2 text de-CH",
                    LocalizationCulture = "de-CH",
                    ResourceKey = "test"

                }
            };

            return model;
        }

        // POST api/csvtest/import
        [HttpPost]
        [Route("import")]
        public IActionResult Import([FromBody]List<LocalizationRecord> value)
        {
            if (!ModelState.IsValid)
            {
                return BadRequest(ModelState);
            }
            else
            {
                List<LocalizationRecord> data = value;
                return Ok();
            }
        }

    }
}

The csv input formatter implements the InputFormatter class. This checks if the context ModelType property is a type of IList and if so, converts the csv data to a List of Objects of type T using reflection. This is implemented in the read stream method. The implementation is very basic and will not work if you have more complex structures in your model class.

using System;
using System.Collections;
using System.Collections.Generic;
using System.IO;
using System.Reflection;
using System.Threading.Tasks;
using Microsoft.AspNetCore.Mvc.Formatters;
using Microsoft.Net.Http.Headers;

namespace AspNetCoreCsvImportExport.Formatters
{
    /// <summary>
    /// ContentType: text/csv
    /// </summary>
    public class CsvInputFormatter : InputFormatter
    {
        private readonly CsvFormatterOptions _options;

        public CsvInputFormatter(CsvFormatterOptions csvFormatterOptions)
        {
            if (csvFormatterOptions == null)
            {
                throw new ArgumentNullException(nameof(csvFormatterOptions));
            }

            _options = csvFormatterOptions;
        }

        public override Task<InputFormatterResult> ReadRequestBodyAsync(InputFormatterContext context)
        {
            var type = context.ModelType;
            var request = context.HttpContext.Request;
            MediaTypeHeaderValue requestContentType = null;
            MediaTypeHeaderValue.TryParse(request.ContentType, out requestContentType);


            var result = readStream(type, request.Body);
            return InputFormatterResult.SuccessAsync(result);
        }

        public override bool CanRead(InputFormatterContext context)
        {
            var type = context.ModelType;
            if (type == null)
                throw new ArgumentNullException("type");

            return isTypeOfIEnumerable(type);
        }

        private bool isTypeOfIEnumerable(Type type)
        {

            foreach (Type interfaceType in type.GetInterfaces())
            {

                if (interfaceType == typeof(IList))
                    return true;
            }

            return false;
        }

        private object readStream(Type type, Stream stream)
        {
            Type itemType;
            var typeIsArray = false;
            IList list;
            if (type.GetGenericArguments().Length > 0)
            {
                itemType = type.GetGenericArguments()[0];
                list = (IList)Activator.CreateInstance(itemType);
            }
            else
            {
                typeIsArray = true;
                itemType = type.GetElementType();

                var listType = typeof(List<>);
                var constructedListType = listType.MakeGenericType(itemType);

                list = (IList)Activator.CreateInstance(constructedListType);
            }


            var reader = new StreamReader(stream);

            bool skipFirstLine = _options.UseSingleLineHeaderInCsv;
            while (!reader.EndOfStream)
            {
                var line = reader.ReadLine();
                var values = line.Split(_options.CsvDelimiter.ToCharArray());
                if(skipFirstLine)
                {
                    skipFirstLine = false;
                }
                else
                {
                    var itemTypeInGeneric = list.GetType().GetTypeInfo().GenericTypeArguments[0];
                    var item = Activator.CreateInstance(itemTypeInGeneric);
                    var properties = item.GetType().GetProperties();
                    for (int i = 0;i<values.Length; i++)
                    {
                        properties[i].SetValue(item, Convert.ChangeType(values[i], properties[i].PropertyType), null);
                    }

                    list.Add(item);
                }

            }

            if(typeIsArray)
            {
                Array array = Array.CreateInstance(itemType, list.Count);

                for(int t = 0; t < list.Count; t++)
                {
                    array.SetValue(list[t], t);
                }
                return array;
            }

            return list;
        }
    }
}

The csv output formatter is implemented using the code from Tugberk Ugurlu’s blog with some small changes. Thanks for this. This formatter uses ‘;’ to separate the properties and a new line for each object. The headers are added tot he first line.

using System;
using System.Collections;
using System.Collections.Generic;
using System.IO;
using System.Linq;
using System.Reflection;
using System.Threading.Tasks;
using Microsoft.AspNetCore.Mvc.Formatters;

namespace AspNetCoreCsvImportExport.Formatters
{
    /// <summary>
    /// Original code taken from
    /// http://www.tugberkugurlu.com/archive/creating-custom-csvmediatypeformatter-in-asp-net-web-api-for-comma-separated-values-csv-format
    /// Adapted for ASP.NET Core and uses ; instead of , for delimiters
    /// </summary>
    public class CsvOutputFormatter :  OutputFormatter
    {
        private readonly CsvFormatterOptions _options;

        public string ContentType { get; private set; }

        public CsvOutputFormatter(CsvFormatterOptions csvFormatterOptions)
        {
            ContentType = "text/csv";
            SupportedMediaTypes.Add(Microsoft.Net.Http.Headers.MediaTypeHeaderValue.Parse("text/csv"));

            if (csvFormatterOptions == null)
            {
                throw new ArgumentNullException(nameof(csvFormatterOptions));
            }

            _options = csvFormatterOptions;

            //SupportedEncodings.Add(Encoding.GetEncoding("utf-8"));
        }

        protected override bool CanWriteType(Type type)
        {

            if (type == null)
                throw new ArgumentNullException("type");

            return isTypeOfIEnumerable(type);
        }

        private bool isTypeOfIEnumerable(Type type)
        {

            foreach (Type interfaceType in type.GetInterfaces())
            {

                if (interfaceType == typeof(IList))
                    return true;
            }

            return false;
        }

        public async override Task WriteResponseBodyAsync(OutputFormatterWriteContext context)
        {
            var response = context.HttpContext.Response;

            Type type = context.Object.GetType();
            Type itemType;

            if (type.GetGenericArguments().Length > 0)
            {
                itemType = type.GetGenericArguments()[0];
            }
            else
            {
                itemType = type.GetElementType();
            }

            StringWriter _stringWriter = new StringWriter();

            if (_options.UseSingleLineHeaderInCsv)
            {
                _stringWriter.WriteLine(
                    string.Join<string>(
                        _options.CsvDelimiter, itemType.GetProperties().Select(x => x.Name)
                    )
                );
            }


            foreach (var obj in (IEnumerable<object>)context.Object)
            {

                var vals = obj.GetType().GetProperties().Select(
                    pi => new {
                        Value = pi.GetValue(obj, null)
                    }
                );

                string _valueLine = string.Empty;

                foreach (var val in vals)
                {

                    if (val.Value != null)
                    {

                        var _val = val.Value.ToString();

                        //Check if the value contans a comma and place it in quotes if so
                        if (_val.Contains(","))
                            _val = string.Concat("\"", _val, "\"");

                        //Replace any \r or \n special characters from a new line with a space
                        if (_val.Contains("\r"))
                            _val = _val.Replace("\r", " ");
                        if (_val.Contains("\n"))
                            _val = _val.Replace("\n", " ");

                        _valueLine = string.Concat(_valueLine, _val, _options.CsvDelimiter);

                    }
                    else
                    {

                        _valueLine = string.Concat(string.Empty, _options.CsvDelimiter);
                    }
                }

                _stringWriter.WriteLine(_valueLine.TrimEnd(_options.CsvDelimiter.ToCharArray()));
            }

            var streamWriter = new StreamWriter(response.Body);
            await streamWriter.WriteAsync(_stringWriter.ToString());
            await streamWriter.FlushAsync();
        }
    }
}

The custom formatters need to be added to the MVC middleware, so that it knows how to handle media types ‘text/csv’.

public void ConfigureServices(IServiceCollection services)
{
  var csvFormatterOptions = new CsvFormatterOptions();

  services.AddMvc(options =>
  {
     options.InputFormatters.Add(new CsvInputFormatter(csvFormatterOptions));
     options.OutputFormatters.Add(new CsvOutputFormatter(csvFormatterOptions));
     options.FormatterMappings.SetMediaTypeMappingForFormat("csv", MediaTypeHeaderValue.Parse("text/csv"));
  })
}

When the data.csv link is requested, a csv type response is returned to the client, which can be saved. This data contains the header texts and the value of each property in each object. This can then be opened in excel.

http://localhost:10336/api/csvtest/data.csv

Id;Key;Text;LocalizationCulture;ResourceKey
1;test;test text;en-US;test
2;test;test2 text de-CH;de-CH;test

This data can then be used to upload the csv data to the server which is then converted back to a C# object. I use fiddler, postman or curl can also be used, or any HTTP Client where you can set the header Content-Type.


 http://localhost:10336/api/csvtest/import

 User-Agent: Fiddler
 Content-Type: text/csv
 Host: localhost:10336
 Content-Length: 110


 Id;Key;Text;LocalizationCulture;ResourceKey
 1;test;test text;en-US;test
 2;test;test2 text de-CH;de-CH;test

The following image shows that the data is imported correctly.

importExportCsv

Notes

The implementation of the InputFormatter and the OutputFormatter classes are specific for a list of simple classes with only properties. If you require or use more complex classes, these implementations need to be changed.

Links

http://www.tugberkugurlu.com/archive/creating-custom-csvmediatypeformatter-in-asp-net-web-api-for-comma-separated-values-csv-format

ASP.NET Core 1.0 MVC 6 Custom Protobuf Formatters

http://www.strathweb.com/2014/11/formatters-asp-net-mvc-6/

https://wildermuth.com/2016/03/16/Content_Negotiation_in_ASP_NET_Core


Injecting Configurations in Razor Views in ASP.NET Core

$
0
0

This article shows how application configurations can be injected and used directly in razor views in an ASP.NET Core MVC application. This is useful when an SPA requires application URLs which are different with each deployment and need to be deployed as configurations in a json or xml file.

Code: https://github.com/damienbod/AspNetCoreInjectConfigurationRazor

The required configuration properties are added to the ApplicationConfigurations configuration section in the appsettings.json file.

{
    "Logging": {
        "IncludeScopes": false,
        "LogLevel": {
            "Default": "Debug",
            "System": "Information",
            "Microsoft": "Information"
        }
    },
    "ApplicationConfigurations": {
        "ApplicationHostUrl": "https://damienbod.com/",
        "RestServiceTwo": "http://someapp/api/"
    }
}

An ApplicationConfigurations class is created which will be used to read the configuration properties.

namespace AspNetCoreInjectConfigurationRazor.Configuration
{
    public class ApplicationConfigurations
    {
        public string ApplicationHostUrl { get; set; }

        public string RestServiceTwo { get; set; }
    }
}

In the Startup class, the appsetting.json file is loaded into the IConfigurationRoot in the constructor.

public Startup(IHostingEnvironment env)
{
	var builder = new ConfigurationBuilder()
		.SetBasePath(env.ContentRootPath)
		.AddJsonFile("appsettings.json", optional: true, reloadOnChange: true)
		.AddJsonFile($"appsettings.{env.EnvironmentName}.json", optional: true)
		.AddEnvironmentVariables();
	Configuration = builder.Build();
}

public IConfigurationRoot Configuration { get; }

The ApplicationConfigurations section is then added to the default ASP.NET Core IoC in the ConfigureServices method in the startup class.

public void ConfigureServices(IServiceCollection services)
{
	services.Configure<ApplicationConfigurations>(
          Configuration.GetSection("ApplicationConfigurations"));

	services.AddMvc();
}

The IOptions object is directly injected into the cshtml razor view using the @inject. The values can then be used and for example, added to input hidden HTML objects, which can then be used from any javascript framework.

@using Microsoft.Extensions.Options;
@using AspNetCoreInjectConfigurationRazor.Configuration;

@inject IOptions<ApplicationConfigurations> OptionsApplicationConfiguration

@{
    ViewData["Title"] = "Home Page";
}

<h2>Injected properties direct from configuration file:</h2>
<ol>
    <li>@OptionsApplicationConfiguration.Value.ApplicationHostUrl</li>
    <li>@OptionsApplicationConfiguration.Value.RestServiceTwo</li>
</ol>

@*Could be used in an SPA app using hidden inputs*@
<input id="ApplicationHostUrl"
       name="ApplicationHostUrl"
       type="hidden"
       value="@OptionsApplicationConfiguration.Value.ApplicationHostUrl"/>
<input id="RestServiceTwo"
       name="id="RestServiceTwo"
       type="hidden"
       value="@OptionsApplicationConfiguration.Value.RestServiceTwo" />

When to application is started, the view is then returned with the configuration properties from the json file and the hidden inputs can be viewed using the F12 debug function in the browser.

AspNetCoreInjectConfigurationRazor_01

Links:

https://docs.asp.net/en/latest/mvc/views/dependency-injection.html


Import, Export ASP.NET Core localized data as CSV

$
0
0

This article shows how localized data can be imported and exported using Localization.SqlLocalizer. The data is exported as CSV using the Formatter defined in the WebApiContrib.Core.Formatter.Csv package. The data can be imported using a file upload.

This makes it possible to export the applications localized data to a CSV format. A translation company can then translate the data, and it can be imported back into the application.

Code: https://github.com/damienbod/AspNet5Localization

The two required packages are added to the project.json file. The Localization.SqlLocalizer package is used for the ASP.NET Core localization. The WebApiContrib.Core.Formatter.Csv package defines the CSV InputFormatter and OutputFormatter.

"Localization.SqlLocalizer": "1.0.3",
"WebApiContrib.Core.Formatter.Csv": "1.0.0"

The packages are then added in the Startup class. The DBContext LocalizationModelContext is added and also the ASP.NET Core localization middleware. The InputFormatter and the OutputFormatter are alos added to the MVC service.

using System;
using System.Collections.Generic;
using System.Globalization;
using Localization.SqlLocalizer.DbStringLocalizer;
using Microsoft.AspNetCore.Builder;
using Microsoft.AspNetCore.Hosting;
using Microsoft.AspNetCore.Localization;
using Microsoft.EntityFrameworkCore;
using Microsoft.Extensions.Configuration;
using Microsoft.Extensions.DependencyInjection;
using Microsoft.Extensions.Logging;
using Microsoft.Extensions.Options;
using Microsoft.Net.Http.Headers;
using WebApiContrib.Core.Formatter.Csv;

namespace ImportExportLocalization
{
    public class Startup
    {
        public Startup(IHostingEnvironment env)
        {
            var builder = new ConfigurationBuilder()
                .SetBasePath(env.ContentRootPath)
                .AddJsonFile("appsettings.json", optional: true, reloadOnChange: true)
                .AddJsonFile($"appsettings.{env.EnvironmentName}.json", optional: true)
                .AddEnvironmentVariables();
            Configuration = builder.Build();
        }

        public IConfigurationRoot Configuration { get; }

        // This method gets called by the runtime. Use this method to add services to the container.
        public void ConfigureServices(IServiceCollection services)
        {
            var sqlConnectionString = Configuration["DbStringLocalizer:ConnectionString"];

            services.AddDbContext<LocalizationModelContext>(options =>
                options.UseSqlite(
                    sqlConnectionString,
                    b => b.MigrationsAssembly("ImportExportLocalization")
                )
            );

            // Requires that LocalizationModelContext is defined
            services.AddSqlLocalization(options => options.UseTypeFullNames = true);

            services.AddMvc()
                .AddViewLocalization()
                .AddDataAnnotationsLocalization();

            services.Configure<RequestLocalizationOptions>(
                options =>
                {
                    var supportedCultures = new List<CultureInfo>
                        {
                            new CultureInfo("en-US"),
                            new CultureInfo("de-CH"),
                            new CultureInfo("fr-CH"),
                            new CultureInfo("it-CH")
                        };

                    options.DefaultRequestCulture = new RequestCulture(culture: "en-US", uiCulture: "en-US");
                    options.SupportedCultures = supportedCultures;
                    options.SupportedUICultures = supportedCultures;
                });

            var csvFormatterOptions = new CsvFormatterOptions();

            services.AddMvc(options =>
            {
                options.InputFormatters.Add(new CsvInputFormatter(csvFormatterOptions));
                options.OutputFormatters.Add(new CsvOutputFormatter(csvFormatterOptions));
                options.FormatterMappings.SetMediaTypeMappingForFormat("csv", MediaTypeHeaderValue.Parse("text/csv"));
            });

            services.AddScoped<ValidateMimeMultipartContentFilter>();
        }

        // This method gets called by the runtime. Use this method to configure the HTTP request pipeline.
        public void Configure(IApplicationBuilder app, IHostingEnvironment env, ILoggerFactory loggerFactory)
        {
            loggerFactory.AddConsole(Configuration.GetSection("Logging"));
            loggerFactory.AddDebug();

            var locOptions = app.ApplicationServices.GetService<IOptions<RequestLocalizationOptions>>();
            app.UseRequestLocalization(locOptions.Value);

            if (env.IsDevelopment())
            {
                app.UseDeveloperExceptionPage();
                app.UseBrowserLink();
            }
            else
            {
                app.UseExceptionHandler("/Home/Error");
            }

            app.UseStaticFiles();

            app.UseMvc(routes =>
            {
                routes.MapRoute(
                    name: "default",
                    template: "{controller=Home}/{action=Index}/{id?}");
            });
        }
    }
}

The ImportExportController makes it possible to download all the localized data as a csv file. This is implemented in the GetDataAsCsv method. This file can then be emailed or whatever to a translation company. When the updated file is returned, it can be imported using the ImportCsvFileForExistingData method. The method accepts the file and updates the data in the database. It is also possible to add new csv data, but care has to be taken as the key has to match the configuration of the Localization.SqlLocalizer middleware.

using System;
using System.Collections.Generic;
using System.IO;
using System.Reflection;
using System.Threading.Tasks;
using Localization.SqlLocalizer.DbStringLocalizer;
using Microsoft.AspNetCore.Mvc;
using Microsoft.Net.Http.Headers;
using Newtonsoft.Json;

namespace ImportExportLocalization.Controllers
{
    [Route("api/ImportExport")]
    public class ImportExportController : Controller
    {
        private IStringExtendedLocalizerFactory _stringExtendedLocalizerFactory;

        public ImportExportController(IStringExtendedLocalizerFactory stringExtendedLocalizerFactory)
        {
            _stringExtendedLocalizerFactory = stringExtendedLocalizerFactory;
        }

        // http://localhost:6062/api/ImportExport/localizedData.csv
        [HttpGet]
        [Route("localizedData.csv")]
        [Produces("text/csv")]
        public IActionResult GetDataAsCsv()
        {
            return Ok(_stringExtendedLocalizerFactory.GetLocalizationData());
        }

        [Route("update")]
        [HttpPost]
        [ServiceFilter(typeof(ValidateMimeMultipartContentFilter))]
        public IActionResult ImportCsvFileForExistingData(CsvImportDescription csvImportDescription)
        {
            // TODO validate that data is a csv file.
            var contentTypes = new List<string>();

            if (ModelState.IsValid)
            {
                foreach (var file in csvImportDescription.File)
                {
                    if (file.Length > 0)
                    {
                        var fileName = ContentDispositionHeaderValue.Parse(file.ContentDisposition).FileName.Trim('"');
                        contentTypes.Add(file.ContentType);

                        var inputStream = file.OpenReadStream();
                        var items = readStream(file.OpenReadStream());
                        _stringExtendedLocalizerFactory.UpdatetLocalizationData(items, csvImportDescription.Information);
                    }
                }
            }

            return RedirectToAction("Index", "Home");
        }

        [Route("new")]
        [HttpPost]
        [ServiceFilter(typeof(ValidateMimeMultipartContentFilter))]
        public IActionResult ImportCsvFileForNewData(CsvImportDescription csvImportDescription)
        {
            // TODO validate that data is a csv file.
            var contentTypes = new List<string>();

            if (ModelState.IsValid)
            {
                foreach (var file in csvImportDescription.File)
                {
                    if (file.Length > 0)
                    {
                        var fileName = ContentDispositionHeaderValue.Parse(file.ContentDisposition).FileName.Trim('"');
                        contentTypes.Add(file.ContentType);

                        var inputStream = file.OpenReadStream();
                        var items = readStream(file.OpenReadStream());
                        _stringExtendedLocalizerFactory.AddNewLocalizationData(items, csvImportDescription.Information);
                    }
                }
            }

            return RedirectToAction("Index", "Home");
        }

        private List<LocalizationRecord> readStream(Stream stream)
        {
            bool skipFirstLine = true;
            string csvDelimiter = ";";

            List<LocalizationRecord> list = new List<LocalizationRecord>();
            var reader = new StreamReader(stream);


            while (!reader.EndOfStream)
            {
                var line = reader.ReadLine();
                var values = line.Split(csvDelimiter.ToCharArray());
                if (skipFirstLine)
                {
                    skipFirstLine = false;
                }
                else
                {
                    var itemTypeInGeneric = list.GetType().GetTypeInfo().GenericTypeArguments[0];
                    var item = new LocalizationRecord();
                    var properties = item.GetType().GetProperties();
                    for (int i = 0; i < values.Length; i++)
                    {
                        properties[i].SetValue(item, Convert.ChangeType(values[i], properties[i].PropertyType), null);
                    }

                    list.Add(item);
                }

            }

            return list;
        }
    }
}

The index razor view has a download link and also 2 upload buttons to manage the localization data.


<fieldset>
    <legend style="padding-top: 10px; padding-bottom: 10px;">Download existing translations</legend>

    <a href="http://localhost:6062/api/ImportExport/localizedData.csv" target="_blank">localizedData.csv</a>

</fieldset>

<hr />

<div>
    <form enctype="multipart/form-data" method="post" action="http://localhost:6062/api/ImportExport/update" id="ajaxUploadForm" novalidate="novalidate">
        <fieldset>
            <legend style="padding-top: 10px; padding-bottom: 10px;">Upload existing CSV data</legend>

            <div class="col-xs-12" style="padding: 10px;">
                <div class="col-xs-4">
                    <label>Upload Information</label>
                </div>
                <div class="col-xs-7">
                    <textarea rows="2" placeholder="Information" class="form-control" name="information" id="information"></textarea>
                </div>
            </div>

            <div class="col-xs-12" style="padding: 10px;">
                <div class="col-xs-4">
                    <label>Upload CSV data</label>
                </div>
                <div class="col-xs-7">
                    <input type="file" name="file" id="fileInput">
                </div>
            </div>

            <div class="col-xs-12" style="padding: 10px;">
                <div class="col-xs-4">
                    <input type="submit" value="Upload Updated Data" id="ajaxUploadButton" class="btn">
                </div>
                <div class="col-xs-7">

                </div>
            </div>

        </fieldset>
    </form>
</div>

<div>
    <form enctype="multipart/form-data" method="post" action="http://localhost:6062/api/ImportExport/new" id="ajaxUploadForm" novalidate="novalidate">
        <fieldset>
            <legend style="padding-top: 10px; padding-bottom: 10px;">Upload new CSV data</legend>

            <div class="col-xs-12" style="padding: 10px;">
                <div class="col-xs-4">
                    <label>Upload Information</label>
                </div>
                <div class="col-xs-7">
                    <textarea rows="2" placeholder="Information" class="form-control" name="information" id="information"></textarea>
                </div>
            </div>

            <div class="col-xs-12" style="padding: 10px;">
                <div class="col-xs-4">
                    <label>Upload CSV data</label>
                </div>
                <div class="col-xs-7">
                    <input type="file" name="file" id="fileInput">
                </div>
            </div>

            <div class="col-xs-12" style="padding: 10px;">
                <div class="col-xs-4">
                    <input type="submit" value="Upload New Data" id="ajaxUploadButton" class="btn">
                </div>
                <div class="col-xs-7">

                </div>
            </div>

        </fieldset>
    </form>
</div>

The data can then be managed as required.

localizedDataCsvImportExport_01

The IStringExtendedLocalizerFactory offers all the import export functionality which is supported by Localization.SqlLocalizer. If anything else is required, please create an issue or use the source code and extend it yourself.

public interface IStringExtendedLocalizerFactory : IStringLocalizerFactory
{
	void ResetCache();

	void ResetCache(Type resourceSource);

	IList GetImportHistory();

	IList GetExportHistory();

	IList GetLocalizationData(string reason = "export");

	IList GetLocalizationData(DateTime from, string culture = null, string reason = "export");

	void UpdatetLocalizationData(List<LocalizationRecord> data, string information);

	void AddNewLocalizationData(List<LocalizationRecord> data, string information);
}

Links:

https://www.nuget.org/packages/Localization.SqlLocalizer/

https://www.nuget.org/packages/WebApiContrib.Core.Formatter.Csv/


ASP.NET Core logging with NLog and Microsoft SQL Server

$
0
0

This article shows how to setup logging in an ASP.NET Core application which logs to a Microsoft SQL Server using NLog.

Code: https://github.com/damienbod/AspNetCoreNlog

The NLog.Extensions.Logging is required to add NLog to a ASP.NET Core application. This package as well as the System.Data.SqlClient are added to the dependencies in the project.json file.

 "dependencies": {
        "Microsoft.NETCore.App": {
            "version": "1.0.0",
            "type": "platform"
        },
        "Microsoft.AspNetCore.Mvc": "1.0.0",
        "Microsoft.AspNetCore.Server.IISIntegration": "1.0.0",
        "Microsoft.AspNetCore.Diagnostics": "1.0.0",
        "Microsoft.AspNetCore.Server.Kestrel": "1.0.0",
        "Microsoft.Extensions.Configuration.EnvironmentVariables": "1.0.0",
        "Microsoft.Extensions.Configuration.FileExtensions": "1.0.0",
        "Microsoft.Extensions.Configuration.Json": "1.0.0",
        "Microsoft.Extensions.Logging": "1.0.0",
        "Microsoft.Extensions.Logging.Console": "1.0.0",
        "Microsoft.Extensions.Logging.Debug": "1.0.0",
        "Microsoft.Extensions.Options.ConfigurationExtensions": "1.0.0",
        "NLog.Extensions.Logging": "1.0.0-rtm-alpha4",
        "System.Data.SqlClient": "4.1.0"
  },

Now a nlog.config file is created and added to the project. This file contains the configuration for NLog. In the file, the targets for the logs are defined as well as the rules. An internal log file is also defined, so that if something is wrong with the logging configuration, you can find out why.

<?xml version="1.0" encoding="utf-8" ?>
<nlog xmlns="http://www.nlog-project.org/schemas/NLog.xsd"
      xmlns:xsi="http://www.w3.org/2001/XMLSchema-instance"
      autoReload="true"
      internalLogLevel="Warn"
      internalLogFile="C:\git\damienbod\AspNetCoreNlog\Logs\internal-nlog.txt">

  <targets>
    <target xsi:type="File" name="allfile" fileName="nlog-all.log"
                layout="${longdate}|${event-properties:item=EventId.Id}|${logger}|${uppercase:${level}}|${message} ${exception}" />

    <target xsi:type="File" name="ownFile-web" fileName="nlog-own.log"
             layout="${longdate}|${event-properties:item=EventId.Id}|${logger}|${uppercase:${level}}|  ${message} ${exception}" />

    <target xsi:type="Null" name="blackhole" />

    <target name="database" xsi:type="Database" >

    <connectionString>
        Data Source=N275\MSSQLSERVER2014;Initial Catalog=Nlogs;Integrated Security=True;
    </connectionString>
<!--
  Remarks:
    The appsetting layouts require the NLog.Extended assembly.
    The aspnet-* layouts require the NLog.Web assembly.
    The Application value is determined by an AppName appSetting in Web.config.
    The "NLogDb" connection string determines the database that NLog write to.
    The create dbo.Log script in the comment below must be manually executed.

  Script for creating the dbo.Log table.

  SET ANSI_NULLS ON
  SET QUOTED_IDENTIFIER ON
  CREATE TABLE [dbo].[Log] (
      [Id] [int] IDENTITY(1,1) NOT NULL,
      [Application] [nvarchar](50) NOT NULL,
      [Logged] [datetime] NOT NULL,
      [Level] [nvarchar](50) NOT NULL,
      [Message] [nvarchar](max) NOT NULL,
      [Logger] [nvarchar](250) NULL,
      [Callsite] [nvarchar](max) NULL,
      [Exception] [nvarchar](max) NULL,
    CONSTRAINT [PK_dbo.Log] PRIMARY KEY CLUSTERED ([Id] ASC)
      WITH (PAD_INDEX  = OFF, STATISTICS_NORECOMPUTE  = OFF, IGNORE_DUP_KEY = OFF, ALLOW_ROW_LOCKS  = ON, ALLOW_PAGE_LOCKS  = ON) ON [PRIMARY]
  ) ON [PRIMARY]
-->

          <commandText>
              insert into dbo.Log (
              Application, Logged, Level, Message,
              Logger, CallSite, Exception
              ) values (
              @Application, @Logged, @Level, @Message,
              @Logger, @Callsite, @Exception
              );
          </commandText>

          <parameter name="@application" layout="AspNetCoreNlog" />
          <parameter name="@logged" layout="${date}" />
          <parameter name="@level" layout="${level}" />
          <parameter name="@message" layout="${message}" />

          <parameter name="@logger" layout="${logger}" />
          <parameter name="@callSite" layout="${callsite:filename=true}" />
          <parameter name="@exception" layout="${exception:tostring}" />
      </target>

  </targets>

  <rules>
    <!--All logs, including from Microsoft-->
    <logger name="*" minlevel="Trace" writeTo="allfile" />

    <logger name="*" minlevel="Trace" writeTo="database" />

    <!--Skip Microsoft logs and so log only own logs-->
    <logger name="Microsoft.*" minlevel="Trace" writeTo="blackhole" final="true" />
    <logger name="*" minlevel="Trace" writeTo="ownFile-web" />
  </rules>
</nlog>

The nlog.config also needs to be added to the publishOptions in the project.json file.

 "publishOptions": {
    "include": [
        "wwwroot",
        "Views",
        "Areas/**/Views",
        "appsettings.json",
        "web.config",
        "nlog.config"
    ]
  },

Now the database can be setup. You can create a new database, or use and existing one and add the dbo.Log table to it using the script below.

  SET ANSI_NULLS ON
  SET QUOTED_IDENTIFIER ON
  CREATE TABLE [dbo].[Log] (
      [Id] [int] IDENTITY(1,1) NOT NULL,
      [Application] [nvarchar](50) NOT NULL,
      [Logged] [datetime] NOT NULL,
      [Level] [nvarchar](50) NOT NULL,
      [Message] [nvarchar](max) NOT NULL,
      [Logger] [nvarchar](250) NULL,
      [Callsite] [nvarchar](max) NULL,
      [Exception] [nvarchar](max) NULL,
    CONSTRAINT [PK_dbo.Log] PRIMARY KEY CLUSTERED ([Id] ASC)
      WITH (PAD_INDEX  = OFF, STATISTICS_NORECOMPUTE  = OFF, IGNORE_DUP_KEY = OFF, ALLOW_ROW_LOCKS  = ON, ALLOW_PAGE_LOCKS  = ON) ON [PRIMARY]
  ) ON [PRIMARY]

The table in the database must match the configuration defined in the nlog.config file. The database target defines the connection string, the command used to add a log and also the parameters required.

You can change this as required. As yet, most of the NLog parameters, do not work with ASP.NET Core, but this will certainly change as it is in early development. The NLog.Web Nuget package, when completed will contain the ASP.NET Core parameters.

Now NLog can be added to the application in the Startup class in the configure method. The AddNLog extension method is used and the logging directory can be defined.

public void Configure(IApplicationBuilder app, IHostingEnvironment env, ILoggerFactory loggerFactory)
{
    loggerFactory.AddNLog();

    var configDir = "C:\\git\\damienbod\\AspNetCoreNlog\\Logs";

    if (configDir != string.Empty)
    {
        var logEventInfo = NLog.LogEventInfo.CreateNullEvent();


        foreach (FileTarget target in LogManager.Configuration.AllTargets.Where(t =&gt; t is FileTarget))
        {
            var filename = target.FileName.Render(logEventInfo).Replace("'", "");
            target.FileName = Path.Combine(configDir, filename);
        }

        LogManager.ReconfigExistingLoggers();
    }

    //env.ConfigureNLog("nlog.config");

    //loggerFactory.AddConsole(Configuration.GetSection("Logging"));
    //loggerFactory.AddDebug();

    app.UseMvc();
}

Now the logging can be used, using the default logging framework from ASP.NET Core.

An example of an ActionFilter

using Microsoft.AspNetCore.Mvc.Filters;
using Microsoft.Extensions.Logging;

namespace AspNetCoreNlog
{
    public class LogFilter : ActionFilterAttribute
    {
        private readonly ILogger _logger;

        public LogFilter(ILoggerFactory loggerFactory)
        {
            _logger = loggerFactory.CreateLogger("LogFilter");
        }

        public override void OnActionExecuting(ActionExecutingContext context)
        {
            _logger.LogInformation("OnActionExecuting");
            base.OnActionExecuting(context);
        }

        public override void OnActionExecuted(ActionExecutedContext context)
        {
            _logger.LogInformation("OnActionExecuted");
            base.OnActionExecuted(context);
        }

        public override void OnResultExecuting(ResultExecutingContext context)
        {
            _logger.LogInformation("OnResultExecuting");
            base.OnResultExecuting(context);
        }

        public override void OnResultExecuted(ResultExecutedContext context)
        {
            _logger.LogInformation("OnResultExecuted");
            base.OnResultExecuted(context);
        }
    }
}

The action filter is added in the Startup ConfigureServices services.

public void ConfigureServices(IServiceCollection services)
{

    // Add framework services.
    services.AddMvc();

    services.AddScoped<LogFilter>();
}

And some logging can be added to a MVC controller.

using System;
using System.Collections.Generic;
using Microsoft.AspNetCore.Mvc;
using Microsoft.Extensions.Logging;

namespace AspNetCoreNlog.Controllers
{
    [ServiceFilter(typeof(LogFilter))]
    [Route("api/[controller]")]
    public class ValuesController : Controller
    {
        private  ILogger _logger;

        public ValuesController(ILogger logger)
        {
            _logger = logger;
        }

        [HttpGet]
        public IEnumerable Get()
        {
            _logger.LogCritical("nlog is working from a controller");
            throw new ArgumentException("way wrong");
            return new string[] { "value1", "value2" };
        }

When the application is started, the logs are written to a local file in the Logs folder and also to the database.

sqlaspnetdatabselogger_01

Notes

NLog for ASP.NET Core is in early development, and the documentation is for .NET and not for dotnetcore, so a lot of parameters, layouts, targets, etc do not work. This project is open source, so you can extend it and contribute to if if you want.

Links

https://github.com/NLog/NLog.Extensions.Logging

https://github.com/NLog

https://docs.asp.net/en/latest/fundamentals/logging.html

https://msdn.microsoft.com/en-us/magazine/mt694089.aspx

https://github.com/nlog/NLog/wiki/Database-target


ASP.NET Core logging with NLog and Elasticsearch

$
0
0

This article shows how to Log to Elasticsearch using NLog in an ASP.NET Core application. NLog is a free open-source logging for .NET.

Code: https://github.com/damienbod/AspNetCoreNlog

NLog posts in this series:

  1. ASP.NET Core logging with NLog and Microsoft SQL Server
  2. ASP.NET Core logging with NLog and Elasticsearch

NLog.Extensions.Logging is required to use NLog in an ASP.NET Core application. This is added to the dependencies of the project. NLog.Targets.ElasticSearch is also added to the dependencies. This project is at present NOT the NuGet package from ReactiveMarkets, but the source code from ReactiveMarkets and updated to dotnetcore. Thanks to ReactiveMarkets for this library, hopefully the NuGet package will be updated and the NuGet package can be used directly.

The NLog configuration file also needs to be added to the publishOptions in the project.json file.

"dependencies": {
	"Microsoft.NETCore.App": {
		"version": "1.0.0",
		"type": "platform"
	},
	"Microsoft.AspNetCore.Mvc": "1.0.0",
	"Microsoft.AspNetCore.Server.IISIntegration": "1.0.0",
	"Microsoft.AspNetCore.Diagnostics": "1.0.0",
	"Microsoft.AspNetCore.Server.Kestrel": "1.0.0",
	"Microsoft.Extensions.Configuration.EnvironmentVariables": "1.0.0",
	"Microsoft.Extensions.Configuration.FileExtensions": "1.0.0",
	"Microsoft.Extensions.Configuration.Json": "1.0.0",
	"Microsoft.Extensions.Logging": "1.0.0",
	"Microsoft.Extensions.Logging.Console": "1.0.0",
	"Microsoft.Extensions.Logging.Debug": "1.0.0",
	"Microsoft.Extensions.Options.ConfigurationExtensions": "1.0.0",
	"NLog.Extensions.Logging": "1.0.0-rtm-alpha4",
	"NLog.Targets.ElasticSearch": "1.0.0-*"
},

"publishOptions": {
    "include": [
        "wwwroot",
        "Views",
        "Areas/**/Views",
        "appsettings.json",
        "web.config",
        "nlog.config"
    ]
},

The NLog configuration is added to the Startup.cs class in the Configure method.

public void Configure(IApplicationBuilder app, IHostingEnvironment env, ILoggerFactory loggerFactory)
{
	loggerFactory.AddNLog();

	var configDir = "C:\\git\\damienbod\\AspNetCoreNlog\\Logs";

	if (configDir != string.Empty)
	{
		var logEventInfo = NLog.LogEventInfo.CreateNullEvent();


		foreach (FileTarget target in LogManager.Configuration.AllTargets.Where(t => t is FileTarget))
		{
			var filename = target.FileName.Render(logEventInfo).Replace("'", "");
			target.FileName = Path.Combine(configDir, filename);
		}

		LogManager.ReconfigExistingLoggers();
	}

	//env.ConfigureNLog("nlog.config");

	//loggerFactory.AddConsole(Configuration.GetSection("Logging"));
	//loggerFactory.AddDebug();

	app.UseMvc();
}

The nlog.config target and rules can be configured to log to Elasticsearch. NLog.Targets.ElasticSearch is an extension and needs to be added using the extensions tag.

<?xml version="1.0" encoding="utf-8" ?>
<nlog xmlns="http://www.nlog-project.org/schemas/NLog.xsd"
      xmlns:xsi="http://www.w3.org/2001/XMLSchema-instance"
      autoReload="true"
      internalLogLevel="Warn"
      internalLogFile="C:\git\damienbod\AspNetCoreNlog\Logs\internal-nlog.txt">

    <extensions>
        <add assembly="NLog.Targets.ElasticSearch"/>
    </extensions>

  <targets>

    <target name="ElasticSearch" xsi:type="BufferingWrapper" flushTimeout="5000">
      <target xsi:type="ElasticSearch"/>
    </target>

  </targets>

  <rules>
    <logger name="*" minlevel="Trace" writeTo="ElasticSearch" />

  </rules>
</nlog>

The NLog.Targets.ElasticSearch package Elasticsearch URL can be configured using the ElasticsearchUrl property. This can be defined in the appsettings configuration file.

{
    "Logging": {
        "IncludeScopes": false,
        "LogLevel": {
            "Default": "Debug",
            "System": "Information",
            "Microsoft": "Information"
        }
    },
    "ElasticsearchUrl": "http://localhost:9200"
}

NLog.Targets.ElasticSearch ( ReactiveMarkets )

The existing NLog.Targets.ElasticSearch project from ReactiveMarkets is updated to a NETStandard Library. This class library requires Elasticsearch.Net, NLog and Newtonsoft.Json. The dependencies are added to the project.json file. The library supports both netstandard1.6 and also net451.

{
  "version": "1.0.0-*",

    "dependencies": {
        "NETStandard.Library": "1.6.0",
        "NLog": "4.4.0-betaV15",
        "Newtonsoft.Json": "9.0.1",
        "Elasticsearch.Net": "2.4.3",
        "Microsoft.Extensions.Configuration": "1.0.0",
        "Microsoft.Extensions.Configuration.FileExtensions": "1.0.0",
        "Microsoft.Extensions.Configuration.Json": "1.0.0"
    },

    "frameworks": {
        "netstandard1.6": {
            "imports": "dnxcore50"
        },
        "net451": {
            "frameworkAssemblies": {
                "System.Runtime.Serialization": "",
                "System.Runtime": ""
            }
        }
    }
}

The StringExtensions class is extended to make it possible to define the Elasticsearch URL in a configuration file.
( original code from ReactiveMarkets )

using System;
using System.IO;
#if NET45
#else
using Microsoft.Extensions.Configuration;
#endif

namespace NLog.Targets.ElasticSearch
{
    internal static class StringExtensions
    {
        public static object ToSystemType(this string field, Type type)
        {
            switch (type.FullName)
            {
                case "System.Boolean":
                    return Convert.ToBoolean(field);
                case "System.Double":
                    return Convert.ToDouble(field);
                case "System.DateTime":
                    return Convert.ToDateTime(field);
                case "System.Int32":
                    return Convert.ToInt32(field);
                case "System.Int64":
                    return Convert.ToInt64(field);
                default:
                    return field;
            }
        }

        public static string GetConnectionString(this string name)
        {
            var value = GetEnvironmentVariable(name);
            if (!string.IsNullOrEmpty(value))
                return value;
#if NET45
            var connectionString = ConfigurationManager.ConnectionStrings[name];
            return connectionString?.ConnectionString;
#else
            IConfigurationRoot configuration;
            var builder = new Microsoft.Extensions.Configuration.ConfigurationBuilder()
                .SetBasePath(Directory.GetCurrentDirectory())
                .AddJsonFile("appsettings.json", optional: true, reloadOnChange: true);

            configuration = builder.Build();
            return configuration["ElasticsearchUrl"];
#endif

        }

        private static string GetEnvironmentVariable(this string name)
        {
            return string.IsNullOrEmpty(name) ? null : Environment.GetEnvironmentVariable(name);
        }
    }
}

When the application is started the logs are written to Elasticsearch. These logs can be viewed in Elasticsearch

http://localhost:9200/logstash-‘date’/_search

{
	"took": 2,
	"timed_out": false,
	"_shards": {
		"total": 5,
		"successful": 5,
		"failed": 0
	},
	"hits": {
		"total": 18,
		"max_score": 1.0,
		"hits": [{
			"_index": "logstash-2016.08.19",
			"_type": "logevent",
			"_id": "AVaiJHPycDWw4BKmTWqP",
			"_score": 1.0,
			"_source": {
				"@timestamp": "2016-08-19T09:31:44.5790894Z",
				"level": "Debug",
				"message": "2016-08-19 11:31:44.5790|DEBUG|Microsoft.AspNetCore.Hosting.Internal.WebHost|Hosting starting"
			}
		},
		{
			"_index": "logstash-2016.08.19",
			"_type": "logevent",
			"_id": "AVaiJHPycDWw4BKmTWqU",
			"_score": 1.0,
			"_source": {
				"@timestamp": "2016-08-19T09:31:45.4788003Z",
				"level": "Info",
				"message": "2016-08-19 11:31:45.4788|INFO|Microsoft.AspNetCore.Hosting.Internal.WebHost|Request starting HTTP/1.1 DEBUG http://localhost:55423/  0"
			}
		},
		{
			"_index": "logstash-2016.08.19",
			"_type": "logevent",
			"_id": "AVaiJHPycDWw4BKmTWqW",
			"_score": 1.0,
			"_source": {
				"@timestamp": "2016-08-19T09:31:45.6248512Z",
				"level": "Debug",
				"message": "2016-08-19 11:31:45.6248|DEBUG|Microsoft.AspNetCore.Server.Kestrel|Connection id \"0HKU82EHFC0S9\" completed keep alive response."
			}
		},

Links

https://github.com/NLog/NLog.Extensions.Logging

https://github.com/ReactiveMarkets/NLog.Targets.ElasticSearch

https://github.com/NLog

https://docs.asp.net/en/latest/fundamentals/logging.html

https://msdn.microsoft.com/en-us/magazine/mt694089.aspx

https://github.com/nlog/NLog/wiki/Database-target

https://www.elastic.co/products/elasticsearch

https://github.com/elastic/logstash

https://github.com/elastic/elasticsearch-net

https://www.nuget.org/packages/Elasticsearch.Net/

https://github.com/nlog/NLog/wiki/File-target#size-based-file-archival

http://www.danesparza.net/2014/06/things-your-dad-never-told-you-about-nlog/


ASP.NET Core 1.0 with MySQL and Entity Framework Core

$
0
0

This article shows how to use MySQL with ASP.NET Core 1.0 using Entity Framework Core.

Code: https://github.com/damienbod/AspNet5MultipleProject

Thanks to Noah Potash for creating this example and adding his code to this code base.

The Entity Framework MySQL package can be downloaded using the NuGet package SapientGuardian.EntityFrameworkCore.MySql. At present no official provider from MySQL exists for Entity Framework Core which can be used in an ASP.NET Core application.

The SapientGuardian.EntityFrameworkCore.MySql package can be added to the project.json file.

{
  "dependencies": {
    "Microsoft.NETCore.App": {
      "version": "1.0.0",
      "type": "platform"
    },
    "DomainModel": "*",
    "SapientGuardian.EntityFrameworkCore.MySql": "7.1.4"
  },

  "frameworks": {
    "netcoreapp1.0": {
      "imports": [
        "dotnet5.6",
        "dnxcore50",
        "portable-net45+win8"
      ]
    }
  }
}

An EfCore DbContext can be added like any other context supported by Entity Framework Core.

using System;
using System.Linq;
using DomainModel.Model;
using Microsoft.EntityFrameworkCore;
using Microsoft.Extensions.Configuration;

namespace DataAccessMySqlProvider
{
    // >dotnet ef migration add testMigration
    public class DomainModelMySqlContext : DbContext
    {
        public DomainModelMySqlContext(DbContextOptions<DomainModelMySqlContext> options) :base(options)
        { }

        public DbSet<DataEventRecord> DataEventRecords { get; set; }

        public DbSet<SourceInfo> SourceInfos { get; set; }

        protected override void OnModelCreating(ModelBuilder builder)
        {
            builder.Entity<DataEventRecord>().HasKey(m => m.DataEventRecordId);
            builder.Entity<SourceInfo>().HasKey(m => m.SourceInfoId);

            // shadow properties
            builder.Entity<DataEventRecord>().Property<DateTime>("UpdatedTimestamp");
            builder.Entity<SourceInfo>().Property<DateTime>("UpdatedTimestamp");

            base.OnModelCreating(builder);
        }

        public override int SaveChanges()
        {
            ChangeTracker.DetectChanges();

            updateUpdatedProperty<SourceInfo>();
            updateUpdatedProperty<DataEventRecord>();

            return base.SaveChanges();
        }

        private void updateUpdatedProperty<T>() where T : class
        {
            var modifiedSourceInfo =
                ChangeTracker.Entries<T>()
                    .Where(e => e.State == EntityState.Added || e.State == EntityState.Modified);

            foreach (var entry in modifiedSourceInfo)
            {
                entry.Property("UpdatedTimestamp").CurrentValue = DateTime.UtcNow;
            }
        }
    }
}

In an ASP.NET Core web application, the DbContext is added to the application in the startup class. In this example, the DbContext is defined in a different class library. The MigrationsAssembly needs to be defined, so that the migrations will work. If the context and the migrations are defined in the same assembly, this is not required.

public Startup(IHostingEnvironment env)
{
	var builder = new ConfigurationBuilder()
		.SetBasePath(env.ContentRootPath)
		.AddJsonFile("appsettings.json", optional: true, reloadOnChange: true)
		.AddJsonFile("config.json", optional: true, reloadOnChange: true);

	Configuration = builder.Build();
}

public void ConfigureServices(IServiceCollection services)
{
	var sqlConnectionString = Configuration["DataAccessMySqlProvider:ConnectionString"];

	services.AddDbContext<DomainModelMySqlContext>(options =>
		options.UseMySQL(
			sqlConnectionString,
			b => b.MigrationsAssembly("AspNet5MultipleProject")
		)
	);
}

The application uses the configuration from the config.json. This file is used to get the MySQL connection string, which is used in the Startup class.

  "DataAccessMySqlProvider": {
    "ConnectionString": "server=localhost;userid=damienbod;password=1234;database=damienbod;"
  }

MySQL workbench can be used to add the schema ‘damienbod’ to the MySQL database. The user ‘damienbod’ is also required, which must match the defined user in the connection string. If you configure the MySQL database differently, then you need to change the connection string in the config.json file.

mySql_ercore_aspnetcore_01

Now the database migrations can be created and the database can be updated.

>
> dotnet ef migrations add testMySql
>
> dotnet ef database update
>

If successful, the tables are created.

mySql_ercore_aspnetcore_02

The MySQL provider can be used in a MVC 6 controller using construction injection.

using System.Collections.Generic;
using DomainModel;
using DomainModel.Model;
using Microsoft.AspNetCore.Mvc;
using Newtonsoft.Json;

namespace AspNet5MultipleProject.Controllers
{
    [Route("api/[controller]")]
    public class DataEventRecordsController : Controller
    {
        private readonly IDataAccessProvider _dataAccessProvider;

        public DataEventRecordsController(IDataAccessProvider dataAccessProvider)
        {
            _dataAccessProvider = dataAccessProvider;
        }

        [HttpGet]
        public IEnumerable<DataEventRecord> Get()
        {
            return _dataAccessProvider.GetDataEventRecords();
        }

        [HttpGet]
        [Route("SourceInfos")]
        public IEnumerable<SourceInfo> GetSourceInfos(bool withChildren)
        {
            return _dataAccessProvider.GetSourceInfos(withChildren);
        }

        [HttpGet("{id}")]
        public DataEventRecord Get(long id)
        {
            return _dataAccessProvider.GetDataEventRecord(id);
        }

        [HttpPost]
        public void Post([FromBody]DataEventRecord value)
        {
            _dataAccessProvider.AddDataEventRecord(value);
        }

        [HttpPut("{id}")]
        public void Put(long id, [FromBody]DataEventRecord value)
        {
            _dataAccessProvider.UpdateDataEventRecord(id, value);
        }

        [HttpDelete("{id}")]
        public void Delete(long id)
        {
            _dataAccessProvider.DeleteDataEventRecord(id);
        }
    }
}

The controller api can be called using Fiddler:

POST http://localhost:5000/api/dataeventrecords HTTP/1.1
User-Agent: Fiddler
Host: localhost:5000
Content-Length: 135
Content-Type: application/json;

{
  "DataEventRecordId":3,
  "Name":"Funny data",
  "Description":"yes",
  "Timestamp":"2015-12-27T08:31:35Z",
   "SourceInfo":
  {
    "SourceInfoId":0,
    "Name":"Beauty",
    "Description":"second Source",
    "Timestamp":"2015-12-23T08:31:35+01:00",
    "DataEventRecords":[]
  },
 "SourceInfoId":0
}

The data is added to the database as required.

mySql_ercore_aspnetcore_03

Links:

https://github.com/SapientGuardian/SapientGuardian.EntityFrameworkCore.MySql

http://dev.mysql.com/downloads/mysql/

Experiments with Entity Framework Core and ASP.NET Core 1.0 MVC


Implementing UNDO, REDO in ASP.NET Core

$
0
0

The article shows how to implement UNDO, REDO functionality in an ASP.NET Core application using EFCore and MS SQL Server.

This is the first blog in a 3 part series. The second blog will implement the UI using Angular 2 and the third article will improve the concurrent stacks with max limits to prevent memory leaks etc.

Code: https://github.com/damienbod/Angular2AutoSaveCommands

The application was created using the ASP.NET Core Web API template. The CommandDto class is used for all commands sent from the UI. The class is used for the create, update and delete requests. The class has 4 properties. The CommandType property defines the types of commands which can be sent. The supported CommandType values are defined as constants in the CommandTypes class. The PayloadType is used to define the type for the Payload JObject. The server application can then use this, to convert the JObject to a C# object. The ActualClientRoute is required to support the UNDO and REDO logic. Once the REDO or UNDO is executed, the client needs to know where to navigate to. The values are strings and are totally controlled by the client SPA application. The server just persists these for each command.

using Newtonsoft.Json.Linq;

namespace Angular2AutoSaveCommands.Models
{
    public class CommandDto
    {
        public string CommandType { get; set; }
        public string PayloadType { get; set; }
        public JObject Payload { get; set; }
        public string ActualClientRoute { get; set;}
    }

    public static  class CommandTypes
    {
        public const string ADD = "ADD";
        public const string UPDATE = "UPDATE";
        public const string DELETE = "DELETE";
        public const string UNDO = "UNDO";
        public const string REDO = "REDO";
    }

    public static class PayloadTypes
    {
        public const string Home = "HOME";
        public const string ABOUT = "ABOUT";
        public const string NONE = "NONE";
    }
}

The CommandController is used to provide the Execute, UNDO and REDO support for the UI, or any other client which will use the service. The controller injects the ICommandHandler which implements the logic for the HTTP POST requests.

using Angular2AutoSaveCommands.Models;
using Angular2AutoSaveCommands.Providers;
using Microsoft.AspNetCore.Mvc;
using Newtonsoft.Json.Linq;

namespace Angular2AutoSaveCommands.Controllers
{
    [Route("api/[controller]")]
    public class CommandController : Controller
    {
        private readonly ICommandHandler _commandHandler;
        public CommandController(ICommandHandler commandHandler)
        {
            _commandHandler = commandHandler;
        }

        [HttpPost]
        [Route("Execute")]
        public IActionResult Post([FromBody]CommandDto value)
        {
            if (!ModelState.IsValid)
            {
                return BadRequest("Model is invalid");
            }

            if (!validateCommandType(value))
            {
                return BadRequest($"CommandType: {value.CommandType} is invalid");
            }

            if (!validatePayloadType(value))
            {
                return BadRequest($"PayloadType: {value.CommandType} is invalid");
            }

            _commandHandler.Execute(value);
            return Ok(value);
        }

        [HttpPost]
        [Route("Undo")]
        public IActionResult Undo()
        {
            var commandDto = _commandHandler.Undo();
            return Ok(commandDto);
        }

        [HttpPost]
        [Route("Redo")]
        public IActionResult Redo()
        {
            var commandDto = _commandHandler.Redo();
            return Ok(commandDto);
        }

        private bool validateCommandType(CommandDto value)
        {
            return true;
        }

        private bool validatePayloadType(CommandDto value)
        {
            return true;
        }
    }
}

The ICommandHandler has three methods, Execute, Undo and Redo. The Undo and the Redo methods return a CommandDto class. This class contains the actual data and the URL for the client routing.

using Angular2AutoSaveCommands.Models;

namespace Angular2AutoSaveCommands.Providers
{
    public interface ICommandHandler
    {
        void Execute(CommandDto commandDto);
        CommandDto Undo();
        CommandDto Redo();
    }
}

The CommandHandler class implements the ICommandHandler interface. This class provides the two ConcurrentStack fields for the REDO and the UNDO stack. The stacks are static and so need to be thread safe. The UNDO and the REDO return a CommandDTO which contains the relevant data after the operation which has been executed.

The Execute method just calls the execution depending on the payload. This method then creates the appropriate command, adds the command to the database for the history, executes the logic and adds the command to the UNDO stack.

The undo method pops a command from the undo stack, calls the Unexecute method, adds the command to the redo stack, and saves everything to the database.

The redo method pops a command from the redo stack, calls the Execute method, adds the command to the undo stack, and saves everything to the database.

using System;
using System.Collections.Concurrent;
using System.Collections.Generic;
using Angular2AutoSaveCommands.Models;
using Angular2AutoSaveCommands.Providers.Commands;
using Microsoft.Extensions.Logging;

namespace Angular2AutoSaveCommands.Providers
{
    public class CommandHandler : ICommandHandler
    {
        private readonly ICommandDataAccessProvider _commandDataAccessProvider;
        private readonly DomainModelMsSqlServerContext _context;
        private readonly ILoggerFactory _loggerFactory;
        private readonly ILogger _logger;

        // TODO remove these and used persistent stacks
        private static ConcurrentStack<ICommand> _undocommands = new ConcurrentStack<ICommand>();
        private static ConcurrentStack<ICommand> _redocommands = new ConcurrentStack<ICommand>();

        public CommandHandler(ICommandDataAccessProvider commandDataAccessProvider, DomainModelMsSqlServerContext context, ILoggerFactory loggerFactory)
        {
            _commandDataAccessProvider = commandDataAccessProvider;
            _context = context;
            _loggerFactory = loggerFactory;
            _logger = loggerFactory.CreateLogger("CommandHandler");
        }

        public void Execute(CommandDto commandDto)
        {
            if (commandDto.PayloadType == PayloadTypes.ABOUT)
            {
                ExecuteAboutDataCommand(commandDto);
                return;
            }

            if (commandDto.PayloadType == PayloadTypes.Home)
            {
                ExecuteHomeDataCommand(commandDto);
                return;
            }

            if (commandDto.PayloadType == PayloadTypes.NONE)
            {
                ExecuteNoDataCommand(commandDto);
                return;
            }
        }

        // TODO add return object for UI
        public CommandDto Undo()
        {
            var commandDto = new CommandDto();
            commandDto.CommandType = CommandTypes.UNDO;
            commandDto.PayloadType = PayloadTypes.NONE;
            commandDto.ActualClientRoute = "NONE";

            if (_undocommands.Count > 0)
            {
                ICommand command;
                if (_undocommands.TryPop(out command))
                {
                    _redocommands.Push(command);
                    command.UnExecute(_context);
                    commandDto.Payload = command.ActualCommandDtoForNewState(CommandTypes.UNDO).Payload;
                    _commandDataAccessProvider.AddCommand(CommandEntity.CreateCommandEntity(commandDto));
                    _commandDataAccessProvider.Save();
                    return command.ActualCommandDtoForNewState(CommandTypes.UNDO);
                }
            }

            return commandDto;
        }

        // TODO add return object for UI
        public CommandDto Redo()
        {
            var commandDto = new CommandDto();
            commandDto.CommandType = CommandTypes.REDO;
            commandDto.PayloadType = PayloadTypes.NONE;
            commandDto.ActualClientRoute = "NONE";

            if (_redocommands.Count > 0)
            {
                ICommand command;
                if(_redocommands.TryPop(out command))
                {
                    _undocommands.Push(command);
                    command.Execute(_context);
                    commandDto.Payload = command.ActualCommandDtoForNewState(CommandTypes.REDO).Payload;
                    _commandDataAccessProvider.AddCommand(CommandEntity.CreateCommandEntity(commandDto));
                    _commandDataAccessProvider.Save();
                    return command.ActualCommandDtoForNewState(CommandTypes.REDO);
                }
            }

            return commandDto;
        }

        private void ExecuteHomeDataCommand(CommandDto commandDto)
        {
            if (commandDto.CommandType == CommandTypes.ADD)
            {
                ICommandAdd command = new AddHomeDataCommand(_loggerFactory, commandDto);
                command.Execute(_context);
                _commandDataAccessProvider.AddCommand(CommandEntity.CreateCommandEntity(commandDto));
                _commandDataAccessProvider.Save();
                command.UpdateIdforNewItems();
                _undocommands.Push(command);
            }

            if (commandDto.CommandType == CommandTypes.UPDATE)
            {
                ICommand command = new UpdateHomeDataCommand(_loggerFactory, commandDto);
                command.Execute(_context);
                _commandDataAccessProvider.AddCommand(CommandEntity.CreateCommandEntity(commandDto));
                _commandDataAccessProvider.Save();
                _undocommands.Push(command);
            }

            if (commandDto.CommandType == CommandTypes.DELETE)
            {
                ICommand command = new DeleteHomeDataCommand(_loggerFactory, commandDto);
                command.Execute(_context);
                _commandDataAccessProvider.AddCommand(CommandEntity.CreateCommandEntity(commandDto));
                _commandDataAccessProvider.Save();
                _undocommands.Push(command);
            }
        }

        private void ExecuteAboutDataCommand(CommandDto commandDto)
        {
            if(commandDto.CommandType == CommandTypes.ADD)
            {
                ICommandAdd command = new AddAboutDataCommand(_loggerFactory, commandDto);
                command.Execute(_context);
                _commandDataAccessProvider.AddCommand(CommandEntity.CreateCommandEntity(commandDto));
                _commandDataAccessProvider.Save();
                command.UpdateIdforNewItems();
                _undocommands.Push(command);
            }

            if (commandDto.CommandType == CommandTypes.UPDATE)
            {
                ICommand command = new UpdateAboutDataCommand(_loggerFactory, commandDto);
                command.Execute(_context);
                _commandDataAccessProvider.AddCommand(CommandEntity.CreateCommandEntity(commandDto));
                _commandDataAccessProvider.Save();
                _undocommands.Push(command);
            }

            if (commandDto.CommandType == CommandTypes.DELETE)
            {
                ICommand command = new DeleteAboutDataCommand(_loggerFactory, commandDto);
                command.Execute(_context);
                _commandDataAccessProvider.AddCommand(CommandEntity.CreateCommandEntity(commandDto));
                _commandDataAccessProvider.Save();
                _undocommands.Push(command);
            }
        }

        private void ExecuteNoDataCommand(CommandDto commandDto)
        {
            _commandDataAccessProvider.AddCommand(CommandEntity.CreateCommandEntity(commandDto));
            _commandDataAccessProvider.Save();
        }

    }
}

The ICommand interface contains the public methods required for the commands in this application. The DBContext is used as a parameter in the Execute and the Unexecute method because the context from the HTTP request is used, and not the original context from the Execute HTTP request.

using Angular2AutoSaveCommands.Models;

namespace Angular2AutoSaveCommands.Providers.Commands
{
    public interface ICommand
    {
        void Execute(DomainModelMsSqlServerContext context);
        void UnExecute(DomainModelMsSqlServerContext context);

        CommandDto ActualCommandDtoForNewState(string commandType);
    }
}

The UpdateAboutDataCommand class implements the ICommand interface. This command supplies the logic to update and also to undo an update in the execute and the unexecute methods. For the undo, the previous state of the entity is saved in the command.

using System;
using System.Linq;
using Angular2AutoSaveCommands.Models;
using Microsoft.Extensions.Logging;
using Newtonsoft.Json.Linq;

namespace Angular2AutoSaveCommands.Providers.Commands
{
    public class UpdateAboutDataCommand : ICommand
    {
        private readonly ILogger _logger;
        private readonly CommandDto _commandDto;
        private AboutData _previousAboutData;

        public UpdateAboutDataCommand(ILoggerFactory loggerFactory, CommandDto commandDto)
        {
            _logger = loggerFactory.CreateLogger("UpdateAboutDataCommand");
            _commandDto = commandDto;
        }

        public void Execute(DomainModelMsSqlServerContext context)
        {
            _previousAboutData = new AboutData();

            var aboutData = _commandDto.Payload.ToObject<AboutData>();
            var entity = context.AboutData.First(t => t.Id == aboutData.Id);

            _previousAboutData.Description = entity.Description;
            _previousAboutData.Deleted = entity.Deleted;
            _previousAboutData.Id = entity.Id;

            entity.Description = aboutData.Description;
            entity.Deleted = aboutData.Deleted;
            _logger.LogDebug("Executed");
        }

        public void UnExecute(DomainModelMsSqlServerContext context)
        {
            var aboutData = _commandDto.Payload.ToObject<AboutData>();
            var entity = context.AboutData.First(t => t.Id == aboutData.Id);

            entity.Description = _previousAboutData.Description;
            entity.Deleted = _previousAboutData.Deleted;
            _logger.LogDebug("Unexecuted");
        }

        public CommandDto ActualCommandDtoForNewState(string commandType)
        {
            if (commandType == CommandTypes.UNDO)
            {
                var commandDto = new CommandDto();
                commandDto.ActualClientRoute = _commandDto.ActualClientRoute;
                commandDto.CommandType = _commandDto.CommandType;
                commandDto.PayloadType = _commandDto.PayloadType;

                commandDto.Payload = JObject.FromObject(_previousAboutData);
                return commandDto;
            }
            else
            {
                return _commandDto;
            }
        }
    }
}

The startup class adds the interface/class pairs to the built-in IoC. The MS SQL Server is defined here using the appsettings to read the database connection string. EFCore migrations are used to create the database.

using System;
using System.Linq;
using Microsoft.AspNetCore.Builder;
using Microsoft.AspNetCore.Http;
using Microsoft.AspNetCore.Hosting;
using Microsoft.Extensions.Configuration;
using Microsoft.Extensions.DependencyInjection;
using Microsoft.Extensions.Logging;
using Angular2AutoSaveCommands.Providers;
using Microsoft.EntityFrameworkCore;

namespace Angular2AutoSaveCommands
{
    public class Startup
    {
        public Startup(IHostingEnvironment env)
        {
            var builder = new ConfigurationBuilder()
                .SetBasePath(env.ContentRootPath)
                .AddJsonFile("appsettings.json", optional: true, reloadOnChange: true)
                .AddJsonFile($"appsettings.{env.EnvironmentName}.json", optional: true)
                .AddEnvironmentVariables();
            Configuration = builder.Build();
        }

        public IConfigurationRoot Configuration { get; }

        public void ConfigureServices(IServiceCollection services)
        {
            var sqlConnectionString = Configuration.GetConnectionString("DataAccessMsSqlServerProvider");

            services.AddDbContext<DomainModelMsSqlServerContext>(options =>
                options.UseSqlServer(  sqlConnectionString )
            );

            services.AddMvc();

            services.AddScoped<ICommandDataAccessProvider, CommandDataAccessProvider>();
            services.AddScoped<ICommandHandler, CommandHandler>();
        }

        public void Configure(IApplicationBuilder app, IHostingEnvironment env, ILoggerFactory loggerFactory)
        {
            loggerFactory.AddConsole(Configuration.GetSection("Logging"));
            loggerFactory.AddDebug();

            var angularRoutes = new[] {
                 "/home",
                 "/about"
             };

            app.Use(async (context, next) =>
            {
                if (context.Request.Path.HasValue && null != angularRoutes.FirstOrDefault(
                    (ar) => context.Request.Path.Value.StartsWith(ar, StringComparison.OrdinalIgnoreCase)))
                {
                    context.Request.Path = new PathString("/");
                }

                await next();
            });

            app.UseDefaultFiles();

            app.UseStaticFiles();

            app.UseMvc(routes =>
            {
                routes.MapRoute(
                    name: "default",
                    template: "{controller=Home}/{action=Index}/{id?}");
            });
        }
    }
}

The application api can be tested using fiddler. The following HTTP POST requests are sent in this order, execute(ADD), execute(UPDATE), Undo, Undo, Redo

http://localhost:5000/api/command/execute
User-Agent: Fiddler
Host: localhost:5000
Content-Type: application/json

{
  "commandType":"ADD",
  "payloadType":"ABOUT",
  "payload":
   {
      "Id":0,
      "Description":"add a new about item",
      "Deleted":false
    },
   "actualClientRoute":"https://damienbod.com/add"
}

http://localhost:5000/api/command/execute
User-Agent: Fiddler
Host: localhost:5000
Content-Type: application/json

{
  "commandType":"UPDATE",
  "payloadType":"ABOUT",
  "payload":
   {
      "Id":10003,
      "Description":"update the existing about item",
      "Deleted":false
    },
   "actualClientRoute":"https://damienbod.com/update"
}

http://localhost:5000/api/command/undo
http://localhost:5000/api/command/redo

The data is sent in this order and the undo, redo works as required.
undoRedofiddler_01

The data can also be validated in the database using the CommandEntity table.

undoRedosql_02

Links:

http://www.codeproject.com/Articles/33384/Multilevel-Undo-and-Redo-Implementation-in-Cshar


Angular 2 Auto Save, Undo and Redo

$
0
0

This article shows how to implement auto save, Undo and Redo commands in an Angular 2 SPA. The Undo and the Redo commands work for the whole application and not just for single components. The Angular 2 app uses an ASP.NET Core service implemented in the previous blog.

Code: https://github.com/damienbod/Angular2AutoSaveCommands

Other articles in this series:

  1. Implementing UNDO, REDO in ASP.NET Core
  2. Angular 2 Auto Save, Undo and Redo
  3. ASP.NET Core Action Arguments Validation using an ActionFilter

The CommandDto class is used for all create, update and delete HTTP requests to the server. This class is used in the different components and so the payload is always different. The CommandType defines the type of command to be executed. Possible values supported by the server are ADD, UPDATE, DELETE, UNDO, REDO. The PayloadType defines the type of object used in the Payload. The PayloadType is used by the server to convert the Payload object to a c# specific class object. The ActualClientRoute is used for the Undo, Redo functions. When an Undo command is executed, or a Redo, the next client path is returned in the CommandDto response. As this is an Angular 2 application, the Angular 2 routing value is used.

export class CommandDto {
    constructor(commandType: string,
		 payloadType: string,
		 payload: any,
		 actualClientRoute: string) {

        this.CommandType = commandType;
        this.PayloadType = payloadType;
        this.Payload = payload;
        this.ActualClientRoute = actualClientRoute;
    }

    CommandType: string;
    PayloadType: string;
    Payload: any;
    ActualClientRoute: string;
}

The CommandService is used to access the ASP.NET Core API implemented in the CommandController class. The service implements the Execute, Undo and Redo HTTP POST requests to the server using the CommandDto as the body. The service also implements an EventEmitter output which can be used to update child components, if an Undo command or a Redo command has been executed. When the function UndoRedoUpdate is called, the event is sent to all listeners.

import { Injectable, EventEmitter, Output } from '@angular/core';
import { Http, Response, Headers } from '@angular/http';
import 'rxjs/add/operator/map'
import { Observable } from 'rxjs/Observable';
import { Configuration } from '../app.constants';
import { CommandDto } from './CommandDto';

@Injectable()
export class CommandService {

    @Output() OnUndoRedo = new EventEmitter<string>();

    private actionUrl: string;
    private headers: Headers;

    constructor(private _http: Http, private _configuration: Configuration) {

        this.actionUrl = `${_configuration.Server}api/command/`;

        this.headers = new Headers();
        this.headers.append('Content-Type', 'application/json');
        this.headers.append('Accept', 'application/json');
    }

    public Execute = (command: CommandDto): Observable<CommandDto> => {
        let url = `${this.actionUrl}execute`;
        return this._http.post(url, command, { headers: this.headers }).map(res => res.json());
    }

    public Undo = (): Observable<CommandDto> => {
        let url = `${this.actionUrl}undo`;
        return this._http.post(url, '', { headers: this.headers }).map(res => res.json());
    }

    public Redo = (): Observable<CommandDto> => {
        let url = `${this.actionUrl}redo`;
        return this._http.post(url, '', { headers: this.headers }).map(res => res.json());
    }

    public GetAll = (): Observable<any> => {
        return this._http.get(this.actionUrl).map((response: Response) => <any>response.json());
    }

    public UndoRedoUpdate = (payloadType: string) => {
        this.OnUndoRedo.emit(payloadType);
    }
}

The app.component implements the Undo and the Redo user interface.

<div class="container" style="margin-top: 15px;">

    <nav class="navbar navbar-inverse">
        <div class="container-fluid">
            <div class="navbar-header">
                <a class="navbar-brand" [routerLink]="['/commands']">Commands</a>
            </div>
            <ul class="nav navbar-nav">
                <li><a [routerLink]="['/home']">Home</a></li>
                <li><a [routerLink]="['/about']">About</a></li>
                <li><a [routerLink]="['/httprequests']">HTTP API Requests</a></li>
            </ul>
            <ul class="nav navbar-nav navbar-right">
                <li><a (click)="Undo()">Undo</a></li>
                <li><a (click)="Redo()">Redo</a></li>
                <li><a href="https://twitter.com/damien_bod"><img src="assets/damienbod.jpg" height="40" style="margin-top: -10px;" /></a></li>

            </ul>
        </div>
    </nav>

    <router-outlet></router-outlet>

    <footer>
        <p>
            <a href="https://twitter.com/damien_bod">twitter(damienbod)</a>&nbsp; <a href="https://damienbod.com/">damienbod.com</a>
            &copy; 2016
        </p>
    </footer>
</div>

The Undo method uses the _commandService to execute an Undo HTTP POST request. If successful, the UndoRedoUpdate function from the _commandService is executed, which broadcasts an update event in the client app, and then the application navigates to the route returned in the Undo commandDto response using the ActualClientRoute.

import { Component, OnInit } from '@angular/core';
import { Router } from '@angular/router';
import { CommandService } from './services/commandService';
import { CommandDto } from './services/commandDto';

@Component({
    selector: 'my-app',
    template: require('./app.component.html'),
    styles: [require('./app.component.scss'), require('../style/app.scss')]
})

export class AppComponent {

    constructor(private router: Router, private _commandService: CommandService) {
    }

    public Undo() {
        let resultCommand: CommandDto;

        this._commandService.Undo()
            .subscribe(
                data => resultCommand = data,
                error => console.log(error),
                () => {
                    this._commandService.UndoRedoUpdate(resultCommand.PayloadType);
                    this.router.navigate(['/' + resultCommand.ActualClientRoute]);
                }
            );
    }

    public Redo() {
        let resultCommand: CommandDto;

        this._commandService.Redo()
            .subscribe(
                data => resultCommand = data,
                error => console.log(error),
                () => {
                    this._commandService.UndoRedoUpdate(resultCommand.PayloadType);
                    this.router.navigate(['/' + resultCommand.ActualClientRoute]);
                }
            );
    }
}

The HomeComponent is used to implement the ADD, UPDATE, DELETE for the HomeData object. A simple form is used to add, or update the different items with an auto save implemented on the input element using the keyup event. A list of existing HomeData items are displayed in a table which can be updated or deleted.

<div class="container">
    <div class="col-lg-12">
        <h1>Selected Item: {{model.Id}}</h1>
        <form *ngIf="active" (ngSubmit)="onSubmit()" #homeItemForm="ngForm">

            <input type="hidden" class="form-control" id="id" [(ngModel)]="model.Id" name="id" #id="ngModel">
            <input type="hidden" class="form-control" id="deleted" [(ngModel)]="model.Deleted" name="deleted" #id="ngModel">

            <div class="form-group">
                <label for="name">Name</label>
                <input type="text" class="form-control" id="name" required  (keyup)="createCommand($event)" [(ngModel)]="model.Name" name="name" #name="ngModel">
                <div [hidden]="name.valid || name.pristine" class="alert alert-danger">
                    Name is required
                </div>
            </div>

            <button type="button" class="btn btn-default" (click)="newHomeData()">New Home</button>

        </form>
    </div>
</div>

<hr />

<div>

    <table class="table">
        <thead>
            <tr>
                <th>Id</th>
                <th>Name</th>
                <th></th>
                <th></th>
            </tr>
        </thead>
        <tbody>
            <tr style="height:20px;" *ngFor="let homeItem of HomeDataItems">
                <td>{{homeItem.Id}}</td>
                <td>{{homeItem.Name}}</td>
                <td>
                    <button class="btn btn-default" (click)="Edit(homeItem)">Edit</button>
                </td>
                <td>
                    <button class="btn btn-default" (click)="Delete(homeItem)">Delete</button>
                </td>
            </tr>
        </tbody>
    </table>

</div>

The HomeDataService is used to selected all the HomeData items using the ASP.NET Core service implemented in rhe HomeController class.

import { Injectable } from '@angular/core';
import { Http, Response, Headers } from '@angular/http';
import 'rxjs/add/operator/map'
import { Observable } from 'rxjs/Observable';
import { Configuration } from '../app.constants';

@Injectable()
export class HomeDataService {

    private actionUrl: string;
    private headers: Headers;

    constructor(private _http: Http, private _configuration: Configuration) {

        this.actionUrl = `${_configuration.Server}api/home/`;

        this.headers = new Headers();
        this.headers.append('Content-Type', 'application/json');
        this.headers.append('Accept', 'application/json');
    }

    public GetAll = (): Observable<any> => {
        return this._http.get(this.actionUrl).map((response: Response) => <any>response.json());
    }

}

The HomeComponent implements the different CUD operations and also the listeners for Undo, Redo events, which are relevant for its display. When a keyup is received, the createCommand is executed. This function adds the data to the keyDownEvents subject. A deboucedInput Observable is used together with debounceTime, so that only when the user has not entered any inputs for more than a second, a command is sent to the server using the OnSumbit function.

The component also subscribes to the OnUndoRedo event sent from the _commandservice. When this event is received, the OnUndoRedoRecieved is called. The function updates the table with the actual data if the undo, redo command has changed data displayed in this component.

import { Component, OnInit } from '@angular/core';
import { FormControl } from '@angular/forms';
import { Http } from '@angular/http';
import { HomeData } from './HomeData';
import { CommandService } from '../services/commandService';
import { CommandDto } from '../services/commandDto';
import { HomeDataService } from '../services/homeDataService';

import { Observable } from 'rxjs/Observable';
import { Subject } from 'rxjs/Subject';

import 'rxjs/add/observable/of';
import 'rxjs/add/observable/throw';

// Observable operators
import 'rxjs/add/operator/catch';
import 'rxjs/add/operator/debounceTime';
import 'rxjs/add/operator/distinctUntilChanged';
import 'rxjs/add/operator/do';
import 'rxjs/add/operator/filter';
import 'rxjs/add/operator/map';
import 'rxjs/add/operator/switchMap';

@Component({
    selector: 'homecomponent',
    template: require('./home.component.html')
})

export class HomeComponent implements OnInit {

    public message: string;
    public model: HomeData;
    public submitted: boolean;
    public active: boolean;
    public HomeDataItems: HomeData[];

    private deboucedInput: Observable<string>;
    private keyDownEvents = new Subject<string>();

    constructor(private _commandService: CommandService, private _homeDataService: HomeDataService) {
        this.message = "Hello from Home";
        this._commandService.OnUndoRedo.subscribe(item => this.OnUndoRedoRecieved(item));
    }

    ngOnInit() {
        this.model = new HomeData(0, 'name', false);
        this.submitted = false;
        this.active = true;
        this.GetHomeDataItems();

        this.deboucedInput = this.keyDownEvents;
        this.deboucedInput
            .debounceTime(1000)
            .distinctUntilChanged()
            .subscribe((filter: string) => {
                this.onSubmit();
            });
    }

    public GetHomeDataItems() {
        console.log('HomeComponent starting...');
        this._homeDataService.GetAll()
            .subscribe((data) => {
                this.HomeDataItems = data;
            },
            error => console.log(error),
            () => {
                console.log('HomeDataService:GetAll completed');
            }
        );
    }

    public Edit(aboutItem: HomeData) {
        this.model.Name = aboutItem.Name;
        this.model.Id = aboutItem.Id;
    }

    // TODO remove the get All request and update the list using the return item
    public Delete(homeItem: HomeData) {
        let myCommand = new CommandDto("DELETE", "HOME", homeItem, "home");

        console.log(myCommand);
        this._commandService.Execute(myCommand)
            .subscribe(
            data => this.GetHomeDataItems(),
            error => console.log(error),
            () => {
                if (this.model.Id === homeItem.Id) {
                    this.newHomeData();
                }
            }
            );
    }

    public createCommand(evt: any) {
        this.keyDownEvents.next(this.model.Name);
    }

    // TODO remove the get All request and update the list using the return item
    public onSubmit() {
        if (this.model.Name != "") {
            this.submitted = true;
            let myCommand = new CommandDto("ADD", "HOME", this.model, "home");

            if (this.model.Id > 0) {
                myCommand.CommandType = "UPDATE";
            }

            console.log(myCommand);
            this._commandService.Execute(myCommand)
                .subscribe(
                data => {
                    this.model.Id = data.Payload.Id;
                    this.GetHomeDataItems();
                },
                error => console.log(error),
                () => console.log('Command executed')
                );
        }
    }

    public newHomeData() {
        this.model = new HomeData(0, 'add a new name', false);
        this.active = false;
        setTimeout(() => this.active = true, 0);
    }

    private OnUndoRedoRecieved(payloadType) {
        if (payloadType === "HOME") {
            this.GetHomeDataItems();
           // this.newHomeData();
            console.log("OnUndoRedoRecieved Home");
            console.log(payloadType);
        }
    }
}

When the application is built (both server and client) and started, the items can be added, updated or deleted using the commands.

angular2autosaveundoredo_01

The executed commands can be viewed using the commands tab in the Angular 2 application.

angular2autosaveundoredo_03

And the commands or the data can also be viewed in the SQL database.

angular2autosaveundoredo_02

Links

http://blog.thoughtram.io/angular/2016/02/22/angular-2-change-detection-explained.html

https://angular.io/docs/ts/latest/guide/forms.html


ASP.NET Core Action Arguments Validation using an ActionFilter

$
0
0

This article shows how to use an ActionFilter to validate the model from a HTTP POST request in an ASP.NET Core MVC application.

Code: https://github.com/damienbod/Angular2AutoSaveCommands

Other articles in this series:

  1. Implementing UNDO, REDO in ASP.NET Core
  2. Angular 2 Auto Save, Undo and Redo
  3. ASP.NET Core Action Arguments Validation using an ActionFilter

In an ASP.NET Core MVC application, custom validation logic can be implemented in an ActionFilter. Because the ActionFilter is processed after the model binding in the action execution, the model and action parameters can be used in an ActionFilter without having to read from the Request Body, or the URL.

The model can be accessed using the context.ActionArguments dictionary. The key for the property has to match the parameter name in the MVC Controller action method. Ryan Nowak also explained in this issue, that the context.ActionDescriptor.Parameters can also be used to access the request payload data.

If the model is invalid, the context status code is set to 400 (bad request) and the reason is added to the context result using a ContentResult object. The request is then no longer processed but short circuited using the terminology from the ASP.NET Core documentation.

using System;
using System.IO;
using System.Text;
using Angular2AutoSaveCommands.Models;
using Microsoft.AspNetCore.Mvc;
using Microsoft.AspNetCore.Mvc.Filters;
using Microsoft.Extensions.Logging;

namespace Angular2AutoSaveCommands.ActionFilters
{
    public class ValidateCommandDtoFilter : ActionFilterAttribute
    {
        private readonly ILogger _logger;

        public ValidateCommandDtoFilter(ILoggerFactory loggerFactory)
        {
            _logger = loggerFactory.CreateLogger("ValidatePayloadTypeFilter");
        }

        public override void OnActionExecuting(ActionExecutingContext context)
        {
            var commandDto = context.ActionArguments["commandDto"] as CommandDto;
            if (commandDto == null)
            {
                context.HttpContext.Response.StatusCode = 400;
                context.Result = new ContentResult()
                {
                    Content = "The body is not a CommandDto type"
                };
                return;
            }

            _logger.LogDebug("validating CommandType");
            if (!CommandTypes.AllowedTypes.Contains(commandDto.CommandType))
            {
                context.HttpContext.Response.StatusCode = 400;
                context.Result = new ContentResult()
                {
                    Content = "CommandTypes not allowed"
                };
                return;
            }

            _logger.LogDebug("validating PayloadType");
            if (!PayloadTypes.AllowedTypes.Contains(commandDto.PayloadType))
            {
                context.HttpContext.Response.StatusCode = 400;
                context.Result = new ContentResult()
                {
                    Content = "PayloadType not allowed"
                };
                return;
            }

            base.OnActionExecuting(context);
        }
    }
}

The ActionFilter is added to the services in the Startup class. This is not needed if the ActionFilter is used directly in the MVC Controller.

services.AddScoped<ValidateCommandDtoFilter>();

The filter can then be used in the MVC Controller using the ServiceFilter attribute. If the commandDto model is invalid, a BadRequest response is returned without processing the business in the action method.

[ServiceFilter(typeof(ValidateCommandDtoFilter))]
[HttpPost]
[Route("Execute")]
public IActionResult Post([FromBody]CommandDto commandDto)
{
	_commandHandler.Execute(commandDto);
	return Ok(commandDto);
}

Links

https://docs.asp.net/en/latest/mvc/controllers/filters.html

https://github.com/aspnet/Mvc/issues/5260#issuecomment-245936046

https://github.com/aspnet/Mvc/blob/dev/src/Microsoft.AspNetCore.Mvc.Abstractions/Filters/ActionExecutingContext.cs


Full Server logout with IdentityServer4 and OpenID Connect Implicit Flow

$
0
0

The article shows how to fully logout from IdentityServer4 using an OpenID Connect Implicit Flow. Per design when using an access token to use protected data from a resource server, even if the client has logged out from the server, the access token can be used so long it is valid (AccessTokenLifetime) as it is a consent. This it the normal use case.

Sometimes, it is required that once a user logs out from IdentityServer4, no client with the same user can continue to use the protected data without logging in again. Reference tokens can be used to implement this. With reference tokens, you have full control over the lifecycle.

Code: https://github.com/damienbod/AspNet5IdentityServerAngularImplicitFlow

Other posts in this series:

To use reference tokens in IdentityServer4, the client can be defined with the AccessTokenType property set to AccessTokenType.Reference. When a user and the client successfully login, a reference token as well as an id_token is returned to the client and not an access token and an id_token. (response_type: id_token token)

public static IEnumerable<Client> GetClients()
{
	// client credentials client
	return new List<Client>
	{
		new Client
		{
			ClientName = "angular2client",
			ClientId = "angular2client",
			AccessTokenType = AccessTokenType.Reference,
			AllowedGrantTypes = GrantTypes.Implicit,
			AllowAccessTokensViaBrowser = true,
			RedirectUris = new List<string>
			{
				"https://localhost:44311"

			},
			PostLogoutRedirectUris = new List<string>
			{
				"https://localhost:44311/Unauthorized"
			},
			AllowedCorsOrigins = new List<string>
			{
				"https://localhost:44311",
				"http://localhost:44311"
			},
			AllowedScopes = new List<string>
			{
				"openid",
				"dataEventRecords",
				"securedFiles"
			}
		}
	};
}

In IdentityServer4, when a user decides to logout, the IPersistedGrantService can be used to remove reference tokens for this user and client. The RemoveAllGrantsAsync method from the IPersistedGrantService uses the Identity subject and the client id to delete all of the corresponding grants. The GetSubjectId method is an IdentityServer4 extension method for the Identity. The HttpContext.User can be used to get this. The client id must match the client from the configuration.

using System;
using System.Collections.Generic;
using System.Linq;
using System.Security.Claims;
using System.Threading.Tasks;
using Microsoft.AspNetCore.Authorization;
using Microsoft.AspNetCore.Identity;
using Microsoft.AspNetCore.Mvc;
using Microsoft.AspNetCore.Mvc.Rendering;
using Microsoft.Extensions.Logging;
using IdentityServerWithAspNetIdentity.Models;
using IdentityServerWithAspNetIdentity.Models.AccountViewModels;
using IdentityServerWithAspNetIdentity.Services;
using IdentityServer4.Services;
using IdentityServer4.Quickstart.UI.Models;
using Microsoft.AspNetCore.Http.Authentication;
using IdentityServer4.Extensions;

namespace IdentityServerWithAspNetIdentity.Controllers
{
    [Authorize]
    public class AccountController : Controller
    {
        private readonly UserManager<ApplicationUser> _userManager;
        private readonly SignInManager<ApplicationUser> _signInManager;
        private readonly IEmailSender _emailSender;
        private readonly ISmsSender _smsSender;
        private readonly ILogger _logger;
        private readonly IIdentityServerInteractionService _interaction;
        private readonly IPersistedGrantService _persistedGrantService;

        public AccountController(
            IIdentityServerInteractionService interaction,
            IPersistedGrantService persistedGrantService,
            UserManager<ApplicationUser> userManager,
            SignInManager<ApplicationUser> signInManager,
            IEmailSender emailSender,
            ISmsSender smsSender,
            ILoggerFactory loggerFactory)
        {
            _interaction = interaction;
            _persistedGrantService = persistedGrantService;
            _userManager = userManager;
            _signInManager = signInManager;
            _emailSender = emailSender;
            _smsSender = smsSender;
            _logger = loggerFactory.CreateLogger<AccountController>();
        }

        /// <summary>
        /// Handle logout page postback
        /// </summary>
        [HttpPost]
        [ValidateAntiForgeryToken]
        public async Task<IActionResult> Logout(LogoutViewModel model)
        {
            var subjectId = HttpContext.User.Identity.GetSubjectId();

            // delete authentication cookie
            await HttpContext.Authentication.SignOutAsync();


            // set this so UI rendering sees an anonymous user
            HttpContext.User = new ClaimsPrincipal(new ClaimsIdentity());

            // get context information (client name, post logout redirect URI and iframe for federated signout)
            var logout = await _interaction.GetLogoutContextAsync(model.LogoutId);

            var vm = new LoggedOutViewModel
            {
                PostLogoutRedirectUri = logout?.PostLogoutRedirectUri,
                ClientName = logout?.ClientId,
                SignOutIframeUrl = logout?.SignOutIFrameUrl
            };


            await _persistedGrantService.RemoveAllGrantsAsync(subjectId, "angular2client");

            return View("LoggedOut", vm);
        }

The IdentityServer4.AccessTokenValidation NuGet package is used on the resource server to validate the reference token sent from the client. The IdentityServerAuthenticationOptions options are configured as required.

"IdentityServer4.AccessTokenValidation": "1.0.1-rc1"

This package is configured in the Startup class in the Configure method.

public void Configure(IApplicationBuilder app, IHostingEnvironment env, ILoggerFactory loggerFactory)
{
	loggerFactory.AddConsole();
	loggerFactory.AddDebug();

	app.UseExceptionHandler("/Home/Error");
	app.UseCors("corsGlobalPolicy");
	app.UseStaticFiles();

	JwtSecurityTokenHandler.DefaultInboundClaimTypeMap.Clear();

	IdentityServerAuthenticationOptions identityServerValidationOptions = new IdentityServerAuthenticationOptions
	{
		Authority = "https://localhost:44318/",
		ScopeName = "dataEventRecords",
		ScopeSecret = "dataEventRecordsSecret",
		AutomaticAuthenticate = true,
		SupportedTokens = SupportedTokens.Both,
		// required if you want to return a 403 and not a 401 for forbidden responses

		AutomaticChallenge = true,
	};

	app.UseIdentityServerAuthentication(identityServerValidationOptions);

	app.UseMvc(routes =>
	{
		routes.MapRoute(
			name: "default",
			template: "{controller=Home}/{action=Index}/{id?}");
	});
}

The SPA client can then be used to login, logout from the server. If 2 or more clients with the same user are logged in, once the user logs out from the server, none will have access to the protected data. All existing reference tokens for this user and client can no longer be used to access the protected data.

By using reference tokens, you have full control over the access lifecycle to the protected data. Caution should be taken when using long running access tokens.

Another strategy would be to use short lived access tokens and make the client refresh this regularly. This reduces to time which an access token lives after a logout, but the access token can still be used to access the private data until it has timed out.

Links

http://openid.net/specs/openid-connect-core-1_0.html

http://openid.net/specs/openid-connect-implicit-1_0.html

https://github.com/IdentityServer/IdentityServer4/issues/313#issuecomment-247589782

https://github.com/IdentityServer/IdentityServer4

https://leastprivilege.com

https://github.com/IdentityServer/IdentityServer4/issues/313

https://github.com/IdentityServer/IdentityServer4/issues/310


Setting the NLog database connection string in the ASP.NET Core appsettings.json

$
0
0

This article shows how the NLog connection string for the DatabaseTarget can be configured in the appsettings.json in an ASP.NET Core project and not the XML nlog.config file. All the NLog target properties can be configured in code if required and not just in the NLog XML configuration file.

Code: https://github.com/damienbod/AspNetCoreNlog

NLog posts in this series:

  1. ASP.NET Core logging with NLog and Microsoft SQL Server
  2. ASP.NET Core logging with NLog and Elasticsearch
  3. Settings the NLog database connection string in the ASP.NET Core appsettings.json

The XML nlog.config file is the same as in the previous post, with no database connection string configured.

<?xml version="1.0" encoding="utf-8" ?>
<nlog xmlns="http://www.nlog-project.org/schemas/NLog.xsd"
      xmlns:xsi="http://www.w3.org/2001/XMLSchema-instance"
      autoReload="true"
      internalLogLevel="Warn"
      internalLogFile="C:\git\damienbod\AspNetCoreNlog\Logs\internal-nlog.txt">


  <targets>

    <target name="database" xsi:type="Database" >

<!-- THIS is not required, read from the appsettings.json

<connectionString>
        Data Source=N275\MSSQLSERVER2014;Initial Catalog=Nlogs;Integrated Security=True;
</connectionString>
-->

<!--
  Remarks:
    The appsetting layouts require the NLog.Extended assembly.
    The aspnet-* layouts require the NLog.Web assembly.
    The Application value is determined by an AppName appSetting in Web.config.
    The "NLogDb" connection string determines the database that NLog write to.
    The create dbo.Log script in the comment below must be manually executed.

  Script for creating the dbo.Log table.

  SET ANSI_NULLS ON
  SET QUOTED_IDENTIFIER ON
  CREATE TABLE [dbo].[Log] (
      [Id] [int] IDENTITY(1,1) NOT NULL,
      [Application] [nvarchar](50) NOT NULL,
      [Logged] [datetime] NOT NULL,
      [Level] [nvarchar](50) NOT NULL,
      [Message] [nvarchar](max) NOT NULL,
      [Logger] [nvarchar](250) NULL,
      [Callsite] [nvarchar](max) NULL,
      [Exception] [nvarchar](max) NULL,
    CONSTRAINT [PK_dbo.Log] PRIMARY KEY CLUSTERED ([Id] ASC)
      WITH (PAD_INDEX  = OFF, STATISTICS_NORECOMPUTE  = OFF, IGNORE_DUP_KEY = OFF, ALLOW_ROW_LOCKS  = ON, ALLOW_PAGE_LOCKS  = ON) ON [PRIMARY]
  ) ON [PRIMARY]
-->

          <commandText>
              insert into dbo.Log (
              Application, Logged, Level, Message,
              Logger, CallSite, Exception
              ) values (
              @Application, @Logged, @Level, @Message,
              @Logger, @Callsite, @Exception
              );
          </commandText>

          <parameter name="@application" layout="AspNetCoreNlog" />
          <parameter name="@logged" layout="${date}" />
          <parameter name="@level" layout="${level}" />
          <parameter name="@message" layout="${message}" />

          <parameter name="@logger" layout="${logger}" />
          <parameter name="@callSite" layout="${callsite:filename=true}" />
          <parameter name="@exception" layout="${exception:tostring}" />
      </target>

  </targets>

  <rules>
    <logger name="*" minlevel="Trace" writeTo="database" />

  </rules>
</nlog>

The NLog DatabaseTarget connectionstring is configured in the appsettings.json as described in the ASP.NET Core configuration docs.

{
    "Logging": {
        "IncludeScopes": false,
        "LogLevel": {
            "Default": "Debug",
            "System": "Information",
            "Microsoft": "Information"
        }
    },
    "ElasticsearchUrl": "http://localhost:9200",
    "ConnectionStrings": {
        "NLogDb": "Data Source=N275\\MSSQLSERVER2014;Initial Catalog=Nlogs;Integrated Security=True;"
    }
}

The configuration is then read in the Startup constructor.

public Startup(IHostingEnvironment env)
{
	var builder = new ConfigurationBuilder()
		.SetBasePath(env.ContentRootPath)
		.AddJsonFile("appsettings.json", optional: true, reloadOnChange: true)
		.AddJsonFile($"appsettings.{env.EnvironmentName}.json", optional: true)
		.AddEnvironmentVariables();
	Configuration = builder.Build();
}

The Nlog DatabaseTagert is then configured to use the connection string from the app settings and sets all the DatabaseTarget instances for NLog to use this. All target properties can be configured in this way if required.

public void Configure(IApplicationBuilder app, IHostingEnvironment env, ILoggerFactory loggerFactory)
{
	loggerFactory.AddNLog();

	foreach (DatabaseTarget target in LogManager.Configuration.AllTargets.Where(t => t is DatabaseTarget))
	{
		target.ConnectionString = Configuration.GetConnectionString("NLogDb");
	}

	LogManager.ReconfigExistingLoggers();

	app.UseMvc();
}

Links

https://github.com/NLog/NLog.Extensions.Logging

https://github.com/NLog

https://github.com/NLog/NLog/blob/38aef000f916bd5ffd8b80a5576afa2423192e84/examples/targets/Configuration%20API/Database/MSSQL/Example.cs

https://docs.asp.net/en/latest/fundamentals/logging.html

https://msdn.microsoft.com/en-us/magazine/mt694089.aspx

https://github.com/nlog/NLog/wiki/Database-target

https://docs.asp.net/en/latest/fundamentals/configuration.html


IdentityServer4, Web API and Angular2 in a single ASP.NET Core project

$
0
0

This article shows how IdentityServer4 with Identity, a data Web API, and an Angular 2 SPA could be setup inside a single ASP.NET Core project. The application uses the OpenID Connect Implicit Flow with reference tokens to access the API. The Angular 2 application uses webpack to build.

Code: https://github.com/damienbod/AspNet5IdentityServerAngularImplicitFlow

Other posts in this series:

Step 1: Create app and add IdentityServer4

Use the Quickstart6 AspNetIdentity from IdentityServer 4 to setup the application. Then edit the project json file to add your packages as required. I added the Microsoft.AspNetCore.Authentication.JwtBearer package and also the IdentityServer4.AccessTokenValidation package. The buildOptions have to be extended to ignore the node_modules folder.

{
  "userSecretsId": "aspnet-IdentityServerWithAspNetIdentity-1e7bf5d8-6c32-4dd3-b77d-2d7d2e0f5099",

    "dependencies": {
        "IdentityServer4": "1.0.0-rc1-update2",
        "IdentityServer4.AspNetIdentity": "1.0.0-rc1-update2",

        "Microsoft.NETCore.App": {
            "version": "1.0.1",
            "type": "platform"
        },
        "Microsoft.AspNetCore.Authentication.Cookies": "1.0.0",
        "Microsoft.AspNetCore.Diagnostics": "1.0.0",
        "Microsoft.AspNetCore.Diagnostics.EntityFrameworkCore": "1.0.0",
        "Microsoft.AspNetCore.Identity.EntityFrameworkCore": "1.0.0",
        "Microsoft.AspNetCore.Mvc": "1.0.0",
        "Microsoft.AspNetCore.Razor.Tools": {
            "version": "1.0.0-preview2-final",
            "type": "build"
        },
        "Microsoft.AspNetCore.Server.IISIntegration": "1.0.0",
        "Microsoft.AspNetCore.Server.Kestrel": "1.0.0",
        "Microsoft.AspNetCore.StaticFiles": "1.0.0",
        "Microsoft.EntityFrameworkCore.Sqlite": "1.0.0",
        "Microsoft.EntityFrameworkCore.Sqlite.Design": {
            "version": "1.0.0",
            "type": "build"
        },
        "Microsoft.EntityFrameworkCore.Tools": {
            "version": "1.0.0-preview2-final",
            "type": "build"
        },
        "Microsoft.Extensions.Configuration.EnvironmentVariables": "1.0.0",
        "Microsoft.Extensions.Configuration.Json": "1.0.0",
        "Microsoft.Extensions.Configuration.UserSecrets": "1.0.0",
        "Microsoft.Extensions.Logging": "1.0.0",
        "Microsoft.Extensions.Logging.Console": "1.0.0",
        "Microsoft.Extensions.Logging.Debug": "1.0.0",
        "Microsoft.Extensions.Options.ConfigurationExtensions": "1.0.0",
        "Microsoft.VisualStudio.Web.BrowserLink.Loader": "14.0.0",
        "Microsoft.VisualStudio.Web.CodeGeneration.Tools": {
            "version": "1.0.0-preview2-final",
            "type": "build"
        },
        "Microsoft.VisualStudio.Web.CodeGenerators.Mvc": {
            "version": "1.0.0-preview2-final",
            "type": "build"
        },
        "Microsoft.AspNetCore.Authentication.JwtBearer": "1.0.0",
        "IdentityServer4.AccessTokenValidation": "1.0.1-rc1"
    },

  "tools": {
    "BundlerMinifier.Core": "2.0.238",
    "Microsoft.AspNetCore.Razor.Tools": "1.0.0-preview2-final",
    "Microsoft.AspNetCore.Server.IISIntegration.Tools": "1.0.0-preview2-final",
    "Microsoft.EntityFrameworkCore.Tools": "1.0.0-preview2-final",
    "Microsoft.Extensions.SecretManager.Tools": "1.0.0-preview2-final",
    "Microsoft.VisualStudio.Web.CodeGeneration.Tools": {
      "version": "1.0.0-preview2-final",
      "imports": [
        "portable-net45+win8"
      ]
    }
  },

  "frameworks": {
    "netcoreapp1.0": {
      "imports": [
        "dotnet5.6",
        "portable-net45+win8"
      ]
    }
  },

  "buildOptions": {
    "emitEntryPoint": true,
    "preserveCompilationContext": true,
    "compile": {
        "exclude": [ "node_modules" ]
    }
  },

  "runtimeOptions": {
    "configProperties": {
      "System.GC.Server": true
    }
  },

  "publishOptions": {
    "include": [
      "wwwroot",
      "Views",
      "Areas/**/Views",
      "appsettings.json",
      "web.config"
    ]
  },

  "scripts": {
    "prepublish": [ "bower install", "dotnet bundle" ],
    "postpublish": [ "dotnet publish-iis --publish-folder %publish:OutputPath% --framework %publish:FullTargetFramework%" ]
  }
}

The IProfileService interface is implemented to add your user claims to the tokens. The IdentityWithAdditionalClaimsProfileService class implements the IProfileService interface in this example and is added to the services in the Startup class.

using System;
using System.Collections.Generic;
using System.Linq;
using System.Security.Claims;
using System.Threading.Tasks;
using IdentityModel;
using IdentityServer4.Extensions;
using IdentityServer4.Models;
using IdentityServer4.Services;
using IdentityServerWithAspNetIdentity.Models;
using Microsoft.AspNetCore.Identity;

namespace ResourceWithIdentityServerWithClient
{
    public class IdentityWithAdditionalClaimsProfileService : IProfileService
    {
        private readonly IUserClaimsPrincipalFactory<ApplicationUser> _claimsFactory;
        private readonly UserManager<ApplicationUser> _userManager;

        public IdentityWithAdditionalClaimsProfileService(UserManager<ApplicationUser> userManager,  IUserClaimsPrincipalFactory<ApplicationUser> claimsFactory)
        {
            _userManager = userManager;
            _claimsFactory = claimsFactory;
        }

        public async Task GetProfileDataAsync(ProfileDataRequestContext context)
        {
            var sub = context.Subject.GetSubjectId();

            var user = await _userManager.FindByIdAsync(sub);
            var principal = await _claimsFactory.CreateAsync(user);

            var claims = principal.Claims.ToList();
            if (!context.AllClaimsRequested)
            {
                claims = claims.Where(claim => context.RequestedClaimTypes.Contains(claim.Type)).ToList();
            }

            claims.Add(new Claim(JwtClaimTypes.GivenName, user.UserName));
            //new Claim(JwtClaimTypes.Role, "admin"),
            //new Claim(JwtClaimTypes.Role, "dataEventRecords.admin"),
            //new Claim(JwtClaimTypes.Role, "dataEventRecords.user"),
            //new Claim(JwtClaimTypes.Role, "dataEventRecords"),
            //new Claim(JwtClaimTypes.Role, "securedFiles.user"),
            //new Claim(JwtClaimTypes.Role, "securedFiles.admin"),
            //new Claim(JwtClaimTypes.Role, "securedFiles")

            if (user.IsAdmin)
            {
                claims.Add(new Claim(JwtClaimTypes.Role, "admin"));
            }
            else
            {
                claims.Add(new Claim(JwtClaimTypes.Role, "user"));
            }

            if (user.DataEventRecordsRole == "dataEventRecords.admin")
            {
                claims.Add(new Claim(JwtClaimTypes.Role, "dataEventRecords.admin"));
                claims.Add(new Claim(JwtClaimTypes.Role, "dataEventRecords.user"));
                claims.Add(new Claim(JwtClaimTypes.Role, "dataEventRecords"));
            }
            else
            {
                claims.Add(new Claim(JwtClaimTypes.Role, "dataEventRecords.user"));
                claims.Add(new Claim(JwtClaimTypes.Role, "dataEventRecords"));
            }

            if (user.SecuredFilesRole == "securedFiles.admin")
            {
                claims.Add(new Claim(JwtClaimTypes.Role, "securedFiles.admin"));
                claims.Add(new Claim(JwtClaimTypes.Role, "securedFiles.user"));
                claims.Add(new Claim(JwtClaimTypes.Role, "securedFiles"));
            }
            else
            {
                claims.Add(new Claim(JwtClaimTypes.Role, "securedFiles.user"));
                claims.Add(new Claim(JwtClaimTypes.Role, "securedFiles"));
            }

            claims.Add(new System.Security.Claims.Claim(StandardScopes.Email.Name, user.Email));


            context.IssuedClaims = claims;
        }

        public async Task IsActiveAsync(IsActiveContext context)
        {
            var sub = context.Subject.GetSubjectId();
            var user = await _userManager.FindByIdAsync(sub);
            context.IsActive = user != null;
        }
    }
}

Step 2: Add the Web API for the resource data

The MVC Controller DataEventRecordsController is used for CRUD API requests. This is just a dummy implementation. I would implement all resource server logic in a separate project. The Authorize attribute is used with and without policies. The policies are configured in the Startup class.

using ResourceWithIdentityServerWithClient.Model;

using Microsoft.AspNetCore.Authorization;
using Microsoft.AspNetCore.Mvc;
using System.Collections.Generic;
using System;

namespace ResourceWithIdentityServerWithClient.Controllers
{
    [Authorize]
    [Route("api/[controller]")]
    public class DataEventRecordsController : Controller
    {
        [Authorize("dataEventRecordsUser")]
        [HttpGet]
        public IActionResult Get()
        {
            return Ok(new List<DataEventRecord> { new DataEventRecord { Id =1, Description= "Fake", Name="myname", Timestamp= DateTime.UtcNow } });
        }

        [Authorize("dataEventRecordsAdmin")]
        [HttpGet("{id}")]
        public IActionResult Get(long id)
        {
            return Ok(new DataEventRecord { Id = 1, Description = "Fake", Name = "myname", Timestamp = DateTime.UtcNow });
        }

        [Authorize("dataEventRecordsAdmin")]
        [HttpPost]
        public void Post([FromBody]DataEventRecord value)
        {

        }

        [Authorize("dataEventRecordsAdmin")]
        [HttpPut("{id}")]
        public void Put(long id, [FromBody]DataEventRecord value)
        {

        }

        [Authorize("dataEventRecordsAdmin")]
        [HttpDelete("{id}")]
        public void Delete(long id)
        {

        }
    }
}

Step 3: Add client Angular 2 client API

The Angular 2 client part of the application is setup and using the ASP.NET Core, Angular2 with Webpack and Visual Studio article. Webpack is then used to build the client application.

Any SPA client can be used which supports the OpenID Connect Implicit Flow. IdentityServer4 (IdentityModel) also have good examples using the OIDC javascript client.

Step 4: Configure application host URL

The URL host is the same for both the client and the server. This is configured in the Config class as a static property HOST_URL and used throughout the server side of the application.

public class Config
{
        public static string HOST_URL =  "https://localhost:44363";

The client application reads the configuration from the app.constants.ts provider.

import { Injectable } from '@angular/core';

@Injectable()
export class Configuration {
    public Server: string = "https://localhost:44363";
}

IIS Express is configured to run with HTTPS and matches these configurations. If a different port is used, you need to change these two code configurations. In a production environment, the data should be configurable pro deployment.

Step 5: Deactivate the consent view

The consent view is deactivated because the client is the only client to use this data resource and always requires the same consent. To improve the user experience, the consent view is removed from the flow. This is done by setting the RequireConsent property to false in the client configuration.

public static IEnumerable<Client> GetClients()
{
	// client credentials client
	return new List<Client>
	{
		new Client
		{
			ClientName = "singleapp",
			ClientId = "singleapp",
			RequireConsent = false,
			AccessTokenType = AccessTokenType.Reference,
			//AccessTokenLifetime = 600, // 10 minutes, default 60 minutes
			AllowedGrantTypes = GrantTypes.Implicit,
			AllowAccessTokensViaBrowser = true,
			RedirectUris = new List<string>
			{
				HOST_URL

			},
			PostLogoutRedirectUris = new List<string>
			{
				HOST_URL + "/Unauthorized"
			},
			AllowedCorsOrigins = new List<string>
			{
				HOST_URL
			},
			AllowedScopes = new List<string>
			{
				"openid",
				"dataEventRecords"
			}
		}
	};
}

Step 6: Deactivate logout screens

When the Angular 2 client requests a logout, the client is logged out, reference tokens are invalidated for this application and user, and the user is redirected back to the Angular 2 application without the server account logout views. This improves the user experience.

The existing 2 Logout action methods are removed from the AccountController and the following is implemented. The controller requires the IPersistedGrantService to remove the reference tokens.

/// <summary>
/// special logout to skip logout screens
/// </summary>
/// <param name="logoutId"></param>
/// <returns></returns>
[HttpGet]
public async Task<IActionResult> Logout(string logoutId)
{
	var user = HttpContext.User.Identity.Name;
	var subjectId = HttpContext.User.Identity.GetSubjectId();

	// delete authentication cookie
	await HttpContext.Authentication.SignOutAsync();


	// set this so UI rendering sees an anonymous user
	HttpContext.User = new ClaimsPrincipal(new ClaimsIdentity());

	// get context information (client name, post logout redirect URI and iframe for federated signout)
	var logout = await _interaction.GetLogoutContextAsync(logoutId);

	var vm = new LoggedOutViewModel
	{
		PostLogoutRedirectUri = logout?.PostLogoutRedirectUri,
		ClientName = logout?.ClientId,
		SignOutIframeUrl = logout?.SignOutIFrameUrl
	};


	await _persistedGrantService.RemoveAllGrantsAsync(subjectId, "singleapp");

	return Redirect(Config.HOST_URL + "/Unauthorized");
}

Step 7: Configure Startup to use all three application parts

The Startup class configures all three application parts to run together. The Angular 2 application requires that its client routes are routed on the client and not the server. Middleware is added so that the server does not handle the client routes.

The API service needs to check the reference token and validate. Policies are added for this and also the extension method UseIdentityServerAuthentication is used to check the reference tokens for each request.

IdentityServer4 is setup to use Identity with a SQLite database.

using Microsoft.AspNetCore.Builder;
using Microsoft.AspNetCore.Hosting;
using Microsoft.AspNetCore.Identity.EntityFrameworkCore;
using Microsoft.EntityFrameworkCore;
using Microsoft.Extensions.Configuration;
using Microsoft.Extensions.DependencyInjection;
using Microsoft.Extensions.Logging;
using IdentityServerWithAspNetIdentity.Data;
using IdentityServerWithAspNetIdentity.Models;
using IdentityServerWithAspNetIdentity.Services;
using QuickstartIdentityServer;
using IdentityServer4.Services;
using System.Security.Cryptography.X509Certificates;
using System.IO;
using System.Linq;
using Microsoft.AspNetCore.Http;
using System.Collections.Generic;
using System.IdentityModel.Tokens.Jwt;
using System;
using Microsoft.AspNetCore.Authorization;
using IdentityServer4.AccessTokenValidation;

namespace ResourceWithIdentityServerWithClient
{
    public class Startup
    {
        private readonly IHostingEnvironment _environment;

        public Startup(IHostingEnvironment env)
        {
            var builder = new ConfigurationBuilder()
                .SetBasePath(env.ContentRootPath)
                .AddJsonFile("appsettings.json", optional: true, reloadOnChange: true)
                .AddJsonFile($"appsettings.{env.EnvironmentName}.json", optional: true);

            if (env.IsDevelopment())
            {
                builder.AddUserSecrets();
            }

            _environment = env;

            builder.AddEnvironmentVariables();
            Configuration = builder.Build();
        }

        public IConfigurationRoot Configuration { get; }

        public void ConfigureServices(IServiceCollection services)
        {
            var cert = new X509Certificate2(Path.Combine(_environment.ContentRootPath, "damienbodserver.pfx"), "");

            services.AddDbContext<ApplicationDbContext>(options =>
                options.UseSqlite(Configuration.GetConnectionString("DefaultConnection")));

            services.AddIdentity<ApplicationUser, IdentityRole>()
            .AddEntityFrameworkStores<ApplicationDbContext>()
            .AddDefaultTokenProviders();

            var guestPolicy = new AuthorizationPolicyBuilder()
            .RequireAuthenticatedUser()
            .RequireClaim("scope", "dataEventRecords")
            .Build();

            services.AddAuthorization(options =>
            {
                options.AddPolicy("dataEventRecordsAdmin", policyAdmin =>
                {
                    policyAdmin.RequireClaim("role", "dataEventRecords.admin");
                });
                options.AddPolicy("dataEventRecordsUser", policyUser =>
                {
                    policyUser.RequireClaim("role", "dataEventRecords.user");
                });

            });

            services.AddMvc();

            services.AddTransient<IProfileService, IdentityWithAdditionalClaimsProfileService>();

            services.AddTransient<IEmailSender, AuthMessageSender>();
            services.AddTransient<ISmsSender, AuthMessageSender>();

            services.AddDeveloperIdentityServer()
                .SetSigningCredential(cert)
                .AddInMemoryScopes(Config.GetScopes())
                .AddInMemoryClients(Config.GetClients())
                .AddAspNetIdentity<ApplicationUser>()
                .AddProfileService<IdentityWithAdditionalClaimsProfileService>();
        }

        public void Configure(IApplicationBuilder app, IHostingEnvironment env, ILoggerFactory loggerFactory)
        {
            loggerFactory.AddConsole(Configuration.GetSection("Logging"));
            loggerFactory.AddDebug();

            var angularRoutes = new[] {
                "/Unauthorized",
                "/Forbidden",
                "/home",
                "/dataeventrecords/",
                "/dataeventrecords/create",
                "/dataeventrecords/edit/",
                "/dataeventrecords/list",
                };

            app.Use(async (context, next) =>
            {
                if (context.Request.Path.HasValue && null != angularRoutes.FirstOrDefault(
                    (ar) => context.Request.Path.Value.StartsWith(ar, StringComparison.OrdinalIgnoreCase)))
                {
                    context.Request.Path = new PathString("/");
                }

                await next();
            });

            app.UseDefaultFiles();

            if (env.IsDevelopment())
            {
                app.UseDeveloperExceptionPage();
                app.UseDatabaseErrorPage();
                app.UseBrowserLink();
            }
            else
            {
                app.UseExceptionHandler("/Home/Error");
            }

            app.UseIdentity();
            app.UseIdentityServer();

            app.UseStaticFiles();

            JwtSecurityTokenHandler.DefaultInboundClaimTypeMap.Clear();

            IdentityServerAuthenticationOptions identityServerValidationOptions = new IdentityServerAuthenticationOptions
            {
                Authority = Config.HOST_URL + "/",
                ScopeName = "dataEventRecords",
                ScopeSecret = "dataEventRecordsSecret",
                AutomaticAuthenticate = true,
                SupportedTokens = SupportedTokens.Both,
                // TokenRetriever = _tokenRetriever,
                // required if you want to return a 403 and not a 401 for forbidden responses
                AutomaticChallenge = true,
            };

            app.UseIdentityServerAuthentication(identityServerValidationOptions);

            app.UseMvcWithDefaultRoute();
        }
    }
}

The application can then be run and tested. To test, right click the project and debug.

Links

https://github.com/IdentityServer/IdentityServer4

http://docs.identityserver.io/en/dev/

https://github.com/IdentityServer/IdentityServer4.Samples

https://docs.asp.net/en/latest/security/authentication/identity.html

https://github.com/IdentityServer/IdentityServer4/issues/349

ASP.NET Core, Angular2 with Webpack and Visual Studio


Angular2 autocomplete with ASP.NET Core and Elasticsearch

$
0
0

This article shows how autocomplete could be implemented in Angular 2 using ASP.NET Core MVC as a data service. The API uses Elasticsearch to query the data requests. ng2-completer is used to implement the Angular 2 autocomplete functionality.

Code: https://github.com/damienbod/Angular2AutoCompleteAspNetCoreElasticsearch

To use autocomplete in the Angular 2 application, the ng2-completer package needs to be added to the dependencies in the npm packages.json file.

"ng2-completer": "^0.2.2"

This project uses Webpack to build the Angular 2 application and all vendor packages are added to the vendor.ts which can then be used throughout the application. The ng2-completer package is added to the vendor.ts file which is then built using Webpack.

import '@angular/platform-browser-dynamic';
import '@angular/platform-browser';
import '@angular/core';
import '@angular/http';
import '@angular/router';

import 'ng2-completer';

import 'bootstrap/dist/js/bootstrap';

import './css/bootstrap.css';
import './css/bootstrap-theme.css';

PersonCity is used as the data model for the autocomplete. The server side of the application uses the PersonCity model to store and search for data.

export class PersonCity {
    public id: number;
    public name: string;
    public info: string;
    public familyName: string;
}

The ng2-completer autocomplete is used within the PersonCityAutocompleteSearchComponent. This component returns a PersonCity object to the using component. When a new search request is finished, the @Output bindModelPersonCityChange is updated. The @Output is chained to the onPersonCitySelected event from ng2-completer.

A custom CompleterService, PersoncityautocompleteDataService, is used to request the data from the server.

import { Component, Inject, EventEmitter, Input, Output, OnInit, AfterViewInit, ElementRef } from '@angular/core';
import { Http, Response } from "@angular/http";

import { Subscription } from 'rxjs/Subscription';
import { Observable } from 'rxjs/Observable';
import { Router } from  '@angular/router';

import { Configuration } from '../app.constants';
import { PersoncityautocompleteDataService } from './personcityautocompleteService';
import { PersonCity } from '../model/personCity';

import { CompleterService, CompleterItem } from 'ng2-completer';

import './personcityautocomplete.component.scss';

@Component({
    selector: 'personcityautocomplete',
  template: `
<ng2-completer [dataService]="dataService" (selected)="onPersonCitySelected($event)" [minSearchLength]="0" [disableInput]="disableAutocomplete"></ng2-completer>

`
})

export class PersoncityautocompleteComponent implements OnInit    {

    constructor(private completerService: CompleterService, private http: Http, private _configuration: Configuration) {

        this.dataService = new PersoncityautocompleteDataService(http, _configuration); ////completerService.local("name, info, familyName", 'name');
    }

    @Output() bindModelPersonCityChange = new EventEmitter<PersonCity>();
    @Input() bindModelPersonCity: PersonCity;
    @Input() disableAutocomplete: boolean = false;

    private searchStr: string;
    private dataService: PersoncityautocompleteDataService;

    ngOnInit() {
        console.log("ngOnInit PersoncityautocompleteComponent");
    }

    public onPersonCitySelected(selected: CompleterItem) {
        console.log(selected);
        this.bindModelPersonCityChange.emit(selected.originalObject);
    }
}


The PersonCityDataService extends the CompleterItem and implements the CompleterData as described in the ng-completer documentation. When PersonCity items are returned from the service, the results are mapped to CompleterItem items as required. This could also be done on the server and then the default remote service could be used. By using the custom service, it can easily be extended to add the security headers for the data service as required.

import { Http, Response } from "@angular/http";
import { Subject } from "rxjs/Subject";

import { CompleterData, CompleterItem } from 'ng2-completer';
import { Configuration } from '../app.constants';

export class PersoncityautocompleteDataService extends Subject<CompleterItem[]> implements CompleterData {
    constructor(private http: Http, private _configuration: Configuration) {
        super();

        this.actionUrl = _configuration.Server + 'api/personcity/querystringsearch/';
    }

    private actionUrl: string;

    public search(term: string): void {
        this.http.get(this.actionUrl + term)
            .map((res: Response) => {
                // Convert the result to CompleterItem[]
                let data = res.json();
                let matches: CompleterItem[] = data.map((personcity: any) => {
                    return {
                        title: personcity.name,
                        description: personcity.familyName + ", " + personcity.cityCountry,
                        originalObject: personcity
                    }
                });
                this.next(matches);
            })
            .subscribe();
    }

    public cancel() {
        // Handle cancel
    }
}

The PersonCityAutocompleteSearchComponent also implemented the specific styles using the personcityautocomplete.componentscss file. The ng-completer components comes with css classes which can be extended or overwritten.


.completer-input {
    width: 500px;
    display: block;
    height: 34px;
    padding: 6px 12px;
    font-size: 14px;
    line-height: 1.42857143;
    color: #555;
    background-color: #fff;
    background-image: none;
    border: 1px solid #ccc;
    border-radius: 4px;
  -webkit-box-shadow: inset 0 1px 1px rgba(0, 0, 0, .075);
          box-shadow: inset 0 1px 1px rgba(0, 0, 0, .075);
  -webkit-transition: border-color ease-in-out .15s, -webkit-box-shadow ease-in-out .15s;
       -o-transition: border-color ease-in-out .15s, box-shadow ease-in-out .15s;
          transition: border-color ease-in-out .15s, box-shadow ease-in-out .15s;
}

.completer-dropdown {
    width: 480px !important;
}

ASP.NET Core MVC API

The PersonCityController MVC Controller implements the service which is used by the Angular 2 application. This service implements the Search action method which uses the IPersonCitySearchProvider to search for the data. Helper methods to create and add some documents to Elasticsearch are also implemented so that the search service can be tested.

using Microsoft.AspNetCore.Mvc;

namespace Angular2AutoCompleteAspNetCoreElasticsearch.Controllers
{
    [Route("api/[controller]")]
    public class PersonCityController : Controller
    {
        private readonly IPersonCitySearchProvider _personCitySearchProvider;

        public PersonCityController(IPersonCitySearchProvider personCitySearchProvider)
        {
            _personCitySearchProvider = personCitySearchProvider;
        }

        [HttpGet("search/{searchtext}")]
        public IActionResult Search(string searchtext)
        {
            return Ok(_personCitySearchProvider.QueryString(searchtext));
        }

        [HttpGet("createindex")]
        public IActionResult CreateIndex()
        {
            _personCitySearchProvider.CreateIndex();
            return Created("http://localhost:5000/api/PersonCity/createindex/", "index created");
        }

        [HttpGet("createtestdata")]
        public IActionResult CreateTestData()
        {
            _personCitySearchProvider.CreateTestData();
            return Created("http://localhost:5000/api/PersonCity/createtestdata/", "test data created");
        }

        [HttpGet("indexexists")]
        public IActionResult GetElasticsearchStatus()
        {
            return Ok(_personCitySearchProvider.GetStatus());
        }
    }
}

The ElasticsearchCrud Nuget package is used to access Elasticsearch. The PersonCitySearchProvider implements this logic. Nest could also be used, only the PersonCitySearchProvider implementation needs to be changed to support this.

"ElasticsearchCRUD":  "2.4.1.1"

The PersonCitySearchProvider class implements the IPersonCitySearchProvider interface which is used in the MVC controller. The IPersonCitySearchProvider needs to be added to the services in the Startup class. The search uses a QueryStringQuery search with wildcards. Any other query, aggregation could be used here, depending on the search requirements.

using System.Collections.Generic;
using System.Linq;
using ElasticsearchCRUD;
using ElasticsearchCRUD.ContextAddDeleteUpdate.IndexModel.SettingsModel;
using ElasticsearchCRUD.Model.SearchModel;
using ElasticsearchCRUD.Model.SearchModel.Queries;
using ElasticsearchCRUD.Tracing;

namespace Angular2AutoCompleteAspNetCoreElasticsearch
{
    public class PersonCitySearchProvider : IPersonCitySearchProvider
    {
        private readonly IElasticsearchMappingResolver _elasticsearchMappingResolver = new ElasticsearchMappingResolver();
        private const string ConnectionString = "http://localhost:9200";
        private readonly ElasticsearchContext _context;

        public PersonCitySearchProvider()
        {
            _context = new ElasticsearchContext(ConnectionString, new ElasticsearchSerializerConfiguration(_elasticsearchMappingResolver))
            {
                TraceProvider = new ConsoleTraceProvider()
            };
        }

        public IEnumerable<PersonCity> QueryString(string term)
        {
            var results = _context.Search<PersonCity>(BuildQueryStringSearch(term));

            return results.PayloadResult.Hits.HitsResult.Select(t => t.Source);
        }

        /// <summary>
        /// TODO protect against injection!
        /// </summary>
        /// <param name="term"></param>
        /// <returns></returns>
        private Search BuildQueryStringSearch(string term)
        {
            var names = "";
            if (term != null)
            {
                names = term.Replace("+", " OR *");
            }

            var search = new Search
            {
                Query = new Query(new QueryStringQuery(names + "*"))
            };

            return search;
        }

        public bool GetStatus()
        {
            return _context.IndexExists<PersonCity>();
        }

        public void CreateIndex()
        {
            _context.IndexCreate<PersonCity>(new IndexDefinition());
        }

        public void CreateTestData()
        {
            PersonCityData.CreateTestData();

            foreach (var item in PersonCityData.Data)
            {
                _context.AddUpdateDocument(item, item.Id);
            }

            _context.SaveChanges();
        }
    }
}

When the application is started, the autocomplete is deactivated as no index exists.

angular2autocompleteaspnetcoreelasticsearch_01

Once the index exists, data can be added to the Elasticsearch index.
angular2autocompleteaspnetcoreelasticsearch_02

And the autocomplete can be used.

angular2autocompleteaspnetcoreelasticsearch_03

Links:

https://github.com/oferh/ng2-completer

https://github.com/damienbod/Angular2WebpackVisualStudio

https://www.elastic.co/guide/en/elasticsearch/reference/current/query-dsl-query-string-query.html

https://www.elastic.co/products/elasticsearch

https://www.nuget.org/packages/ElasticsearchCRUD/

https://github.com/damienbod/ElasticsearchCRUD


Angular2 search with ASP.NET Core and Elasticsearch

$
0
0

This article shows how a website search could be implemented using Angular 2, ASP.NET Core and Elasticsearch. Most users expect autocomplete and a flexible search like some of known search websites. When the user enters a char in the search input field, an autocomplete using a shingle token filter with a terms aggregation used to suggest possible search terms. When a term is selected, a match query request is sent and uses an edge ngram indexed field to search for hits or matches. Server side paging is then implemented to iterate though the results.

Code: https://github.com/damienbod/Angular2AutoCompleteAspNetCoreElasticsearch

ASP.NET Core server side search

The Elasticsearch index and queries was built using the ideas from these 2 excellent blogs, bilyachat and qbox.io. ElasticsearchCrud is used as the dotnet core client for Elasticsearch. To setup the index, a mapping needs to be defined as well as the index with the required settings analysis with filters, analyzers and tokenizers. See the Elasticsearch documentation for detailed information.

In this example, 2 custom analyzers are defined, one for the autocomplete and one for the search. The autocomplete analyzer uses a custom shingle token filter called autocompletefilter, a stopwords token filter, lowercase token filter and a stemmer token filter. The edge_ngram_search analyzer uses an edge ngram token filter and a lowercase filter.

private IndexDefinition CreateNewIndexDefinition()
{
	return new IndexDefinition
	{
		IndexSettings =
		{
			Analysis = new Analysis
			{
				Filters =
				{
					CustomFilters = new List<AnalysisFilterBase>
					{
						new StemmerTokenFilter("stemmer"),
						new ShingleTokenFilter("autocompletefilter")
						{
							MaxShingleSize = 5,
							MinShingleSize = 2
						},
						new StopTokenFilter("stopwords"),
						new EdgeNGramTokenFilter("edge_ngram_filter")
						{
							MaxGram = 20,
							MinGram = 2
						}
					}
				},
				Analyzer =
				{
					Analyzers = new List<AnalyzerBase>
					{
						new CustomAnalyzer("edge_ngram_search")
						{
							Tokenizer = DefaultTokenizers.Standard,
							Filter = new List<string> {DefaultTokenFilters.Lowercase, "edge_ngram_filter"},
							CharFilter = new List<string> {DefaultCharFilters.HtmlStrip}
						},
						new CustomAnalyzer("autocomplete")
						{
							Tokenizer = DefaultTokenizers.Standard,
							Filter = new List<string> {DefaultTokenFilters.Lowercase, "autocompletefilter", "stopwords", "stemmer"},
							CharFilter = new List<string> {DefaultCharFilters.HtmlStrip}
						},
						new CustomAnalyzer("default")
						{
							Tokenizer = DefaultTokenizers.Standard,
							Filter = new List<string> {DefaultTokenFilters.Lowercase, "stopwords", "stemmer"},
							CharFilter = new List<string> {DefaultCharFilters.HtmlStrip}
						}


					}
				}
			}
		},
	};
}

The PersonCity is used to add and search for documents in Elasticsearch. The default index and type for this class using ElasticsearchCrud is personcitys and personcity.

public class PersonCity
{
	public long Id { get; set; }
	public string Name { get; set; }
	public string FamilyName { get; set; }
	public string Info { get; set; }
	public string CityCountry { get; set; }
	public string Metadata { get; set; }
	public string Web { get; set; }
	public string Github { get; set; }
	public string Twitter { get; set; }
	public string Mvp { get; set; }
}

A PersonCityMapping class is defined so that required mapping from the PersonCityMappingDto mapping class can be defined for the personcitys index and the personcity type. This class overrides the ElasticsearchMapping to define the index and type.

using System;
using ElasticsearchCRUD;

namespace SearchComponent
{
    public class PersonCityMapping : ElasticsearchMapping
    {
        public override string GetIndexForType(Type type)
        {
            return "personcitys";
        }

        public override string GetDocumentType(Type type)
        {
            return "personcity";
        }
    }
}

The PersonCityMapping class is then used to map the C# type PersonCityMappingDto to the default index from the PersonCity class using the PersonCityMapping. The PersonCityMapping maps to the default index of the PersonCity class.

public PersonCitySearchProvider()
{
	_elasticsearchMappingResolver.AddElasticSearchMappingForEntityType(typeof(PersonCityMappingDto), new PersonCityMapping());
	_context = new ElasticsearchContext(ConnectionString, new ElasticsearchSerializerConfiguration(_elasticsearchMappingResolver))
	{
		TraceProvider = new ConsoleTraceProvider()
	};
}

A specific mapping DTO class is used to define the mapping in Elasticsearch. This class is required, if a non default mapping is required in Elasticsearch. The class uses the ElasticsearchString attribute to define a copy mapping. The field in Elasticsearch should be copied to the autocomplete and the searchfield field when adding a new document. The searchfield and the autocomplete field uses the two analyzers which where defined in the index when adding data. This class is only used to define the type mapping in Elasticsearch.

using ElasticsearchCRUD.ContextAddDeleteUpdate.CoreTypeAttributes;

namespace SearchComponent
{
    public class PersonCityMappingDto
    {
        public long Id { get; set; }

        [ElasticsearchString(CopyToList = new[] { "autocomplete", "searchfield" })]
        public string Name { get; set; }

        [ElasticsearchString(CopyToList = new[] { "autocomplete", "searchfield" })]
        public string FamilyName { get; set; }

        [ElasticsearchString(CopyToList = new[] { "autocomplete", "searchfield" })]
        public string Info { get; set; }

        [ElasticsearchString(CopyToList = new[] { "autocomplete", "searchfield" })]
        public string CityCountry { get; set; }

        [ElasticsearchString(CopyToList = new[] { "autocomplete", "searchfield" })]
        public string Metadata { get; set; }

        public string Web { get; set; }

        public string Github { get; set; }

        public string Twitter { get; set; }

        public string Mvp { get; set; }

        [ElasticsearchString(Analyzer = "edge_ngram_search", SearchAnalyzer = "standard", TermVector = TermVector.yes)]
        public string searchfield { get; set; }

        [ElasticsearchString(Analyzer = "autocomplete")]
        public string autocomplete { get; set; }
    }
}

The IndexCreate method creates a new index and mapping in elasticsearch.

public void CreateIndex()
{
	_context.IndexCreate<PersonCityMappingDto>(CreateNewIndexDefinition());
}

The Elasticsearch settings can be viewed using the HTTP GET:

http://localhost:9200/_settings

{
	"personcitys": {
		"settings": {
			"index": {
				"creation_date": "1477642409728",
				"analysis": {
					"filter": {
						"stemmer": {
							"type": "stemmer"
						},
						"autocompletefilter": {
							"max_shingle_size": "5",
							"min_shingle_size": "2",
							"type": "shingle"
						},
						"stopwords": {
							"type": "stop"
						},
						"edge_ngram_filter": {
							"type": "edgeNGram",
							"min_gram": "2",
							"max_gram": "20"
						}
					},
					"analyzer": {
						"edge_ngram_search": {
							"filter": ["lowercase",
							"edge_ngram_filter"],
							"char_filter": ["html_strip"],
							"type": "custom",
							"tokenizer": "standard"
						},
						"autocomplete": {
							"filter": ["lowercase",
							"autocompletefilter",
							"stopwords",
							"stemmer"],
							"char_filter": ["html_strip"],
							"type": "custom",
							"tokenizer": "standard"
						},
						"default": {
							"filter": ["lowercase",
							"stopwords",
							"stemmer"],
							"char_filter": ["html_strip"],
							"type": "custom",
							"tokenizer": "standard"
						}
					}
				},
				"number_of_shards": "5",
				"number_of_replicas": "1",
				"uuid": "TxS9hdy7SmGPr4FSSNaPiQ",
				"version": {
					"created": "2040199"
				}
			}
		}
	}
}

The Elasticsearch mapping can be viewed using the HTTP GET:

http://localhost:9200/_mapping

{
	"personcitys": {
		"mappings": {
			"personcity": {
				"properties": {
					"autocomplete": {
						"type": "string",
						"analyzer": "autocomplete"
					},
					"citycountry": {
						"type": "string",
						"copy_to": ["autocomplete",
						"searchfield"]
					},
					"familyname": {
						"type": "string",
						"copy_to": ["autocomplete",
						"searchfield"]
					},
					"github": {
						"type": "string"
					},
					"id": {
						"type": "long"
					},
					"info": {
						"type": "string",
						"copy_to": ["autocomplete",
						"searchfield"]
					},
					"metadata": {
						"type": "string",
						"copy_to": ["autocomplete",
						"searchfield"]
					},
					"mvp": {
						"type": "string"
					},
					"name": {
						"type": "string",
						"copy_to": ["autocomplete",
						"searchfield"]
					},
					"searchfield": {
						"type": "string",
						"term_vector": "yes",
						"analyzer": "edge_ngram_search",
						"search_analyzer": "standard"
					},
					"twitter": {
						"type": "string"
					},
					"web": {
						"type": "string"
					}
				}
			}
		}
	}
}

Now documents can be added using the PersonCity class which has no Elasticsearch definitions.

Autocomplete search

A terms aggregation search is used for the autocomplete request. The terms aggregation uses the autocomplete field which only exists in Elasticsearch. A list of strings is returned to the user from this request.

public IEnumerable<string> AutocompleteSearch(string term)
{
	var search = new Search
	{
		Size = 0,
		Aggs = new List<IAggs>
		{
			new TermsBucketAggregation("autocomplete", "autocomplete")
			{
				Order= new OrderAgg("_count", OrderEnum.desc),
				Include = new IncludeExpression(term + ".*")
			}
		}
	};

	var items = _context.Search<PersonCity>(search);
	var aggResult = items.PayloadResult.Aggregations.GetComplexValue<TermsBucketAggregationsResult>("autocomplete");
	IEnumerable<string> results = aggResult.Buckets.Select(t =>  t.Key.ToString());
	return results;
}

The request is sent to Elasticsearch as follows:

POST http://localhost:9200/personcitys/personcity/_search HTTP/1.1
Content-Type: application/json
Accept-Encoding: gzip, deflate
Connection: Keep-Alive
Content-Length: 124
Host: localhost:9200

{
	"size": 0,
	"aggs": {
		"autocomplete": {
			"terms": {
				"field": "autocomplete",
				"order": {
					"_count": "desc"
				},
				"include": {
					"pattern": "as.*"
				}
			}
		}
	}
}

Search Query

When an autocomplete string is selected, a search request is sent to Elasticsearch using a Match Query on the searchfield field which returns 10 hits from the 0 document. If the paging request is sent, the from value is a multiple of 10 depending on the page.

public PersonCitySearchResult Search(string term, int from)
{
	var personCitySearchResult = new PersonCitySearchResult();
	var search = new Search
	{
		Size = 10,
		From = from,
		Query = new Query(new MatchQuery("did_you_mean", term))
	};

	var results = _context.Search<PersonCity>(search);

	personCitySearchResult.PersonCities = results.PayloadResult.Hits.HitsResult.Select(t => t.Source);
	personCitySearchResult.Hits = results.PayloadResult.Hits.Total;
	personCitySearchResult.Took = results.PayloadResult.Took;
	return personCitySearchResult;
}

The search query as sent as follows:

POST http://localhost:9200/personcitys/personcity/_search HTTP/1.1
Content-Type: application/json
Accept-Encoding: gzip, deflate
Connection: Keep-Alive
Content-Length: 74
Host: localhost:9200

{
	"from": 0,
	"size": 10,
	"query": {
		"match": {
			"searchfield": {
				"query": "asp.net"
			}
		}
	}
}

Angular 2 client side search

The Angular 2 client uses an autocomplete input control and then uses a ngFor to display all the search results. Bootstrap paging is used if more than 10 results are found for the search term.

<div class="panel-group">

    <personcitysearch
      *ngIf="IndexExists"
      (onTermSelectedEvent)="onTermSelectedEvent($event)"
      [disableAutocomplete]="!IndexExists">
    </personcitysearch>

    <em *ngIf="PersonCitySearchData.took > 0" style="font-size:smaller; color:lightgray;">
      <span>Hits: {{PersonCitySearchData.hits}}</span>
    </em><br />
    <br />

    <div  *ngFor="let personCity of PersonCitySearchData.personCities">
        <b><span>{{personCity.name}} {{personCity.familyName}} </span></b>
        <a *ngIf="personCity.twitter"  href="{{personCity.twitter}}">
          <img src="assets/socialTwitter.png" />
        </a>
        <a *ngIf="personCity.github" href="{{personCity.github}}">
          <img src="assets/github.png" />
        </a>
        <a *ngIf="personCity.mvp" href="{{personCity.mvp}}">
          <img src="assets/mvp.png" width="24" />
        </a><br />

        <em style="font-size:large"><a href="{{personCity.web}}">{{personCity.web}}</a></em><br />
        <em><span>{{personCity.metadata}}</span></em><br />
        <span>{{personCity.info}}</span><br />
        <br />
        <br />

    </div>

    <ul class="pagination" *ngIf="ShowPaging">
        <li><a (click)="PreviousPage()" >&laquo;</a></li>

        <li><a *ngFor="let page of Pages" (click)="LoadDataForPage(page)">{{page}}</a></li>

        <li><a (click)="NextPage()">&raquo;</a></li>
    </ul>
</div>

The personcitysearch Angular 2 component implements the autocomplete functionality using the ng2-completer component. When a char is entered into the input, a HTTP request is sent to the server which in turns sends a request to the Elasticsearch server.

import { Component, Inject, EventEmitter, Input, Output, OnInit, AfterViewInit, ElementRef } from '@angular/core';
import { Http, Response } from "@angular/http";

import { Subscription } from 'rxjs/Subscription';
import { Observable } from 'rxjs/Observable';
import { Router } from  '@angular/router';

import { Configuration } from '../app.constants';
import { PersoncityautocompleteDataService } from './personcityautocompleteService';
import { PersonCity } from '../model/personCity';

import { CompleterService, CompleterItem } from 'ng2-completer';

import './personcityautocomplete.component.scss';

@Component({
    selector: 'personcityautocomplete',
  template: `
<ng2-completer [dataService]="dataService" (selected)="onPersonCitySelected($event)" [minSearchLength]="0" [disableInput]="disableAutocomplete"></ng2-completer>

`
})

export class PersoncityautocompleteComponent implements OnInit    {

    constructor(private completerService: CompleterService, private http: Http, private _configuration: Configuration) {

        this.dataService = new PersoncityautocompleteDataService(http, _configuration); ////completerService.local("name, info, familyName", 'name');
    }

    @Output() bindModelPersonCityChange = new EventEmitter<PersonCity>();
    @Input() bindModelPersonCity: PersonCity;
    @Input() disableAutocomplete: boolean = false;

    private searchStr: string;
    private dataService: PersoncityautocompleteDataService;

    ngOnInit() {
        console.log("ngOnInit PersoncityautocompleteComponent");
    }

    public onPersonCitySelected(selected: CompleterItem) {
        console.log(selected);
        this.bindModelPersonCityChange.emit(selected.originalObject);
    }
}

And the data service for the CompleterService which is used by the ng2-completer component:

import { Http, Response } from "@angular/http";
import { Subject } from "rxjs/Subject";

import { CompleterData, CompleterItem } from 'ng2-completer';
import { Configuration } from '../app.constants';

export class PersoncityautocompleteDataService extends Subject<CompleterItem[]> implements CompleterData {
    constructor(private http: Http, private _configuration: Configuration) {
        super();

        this.actionUrl = _configuration.Server + 'api/personcity/querystringsearch/';
    }

    private actionUrl: string;

    public search(term: string): void {
        this.http.get(this.actionUrl + term)
            .map((res: Response) => {
                // Convert the result to CompleterItem[]
                let data = res.json();
                let matches: CompleterItem[] = data.map((personcity: any) => {
                    return {
                        title: personcity.name,
                        description: personcity.familyName + ", " + personcity.cityCountry,
                        originalObject: personcity
                    }
                });
                this.next(matches);
            })
            .subscribe();
    }

    public cancel() {
        // Handle cancel
    }
}

The HomeSearchComponent implements the paging for the search results and and also displays the data. The SearchDataService implements the API calls to the MVC ASP.NET Core API service. The paging css uses bootstrap to display the data.

import { Observable } from 'rxjs/Observable';
import { Component, OnInit } from '@angular/core';
import { Http } from '@angular/http';

import { SearchDataService } from '../services/searchDataService';
import { PersonCity } from '../model/personCity';
import { PersonCitySearchResult } from '../model/personCitySearchResult';
import { PersoncitysearchComponent } from '../personcitysearch/personcitysearch.component';

@Component({
    selector: 'homesearchcomponent',
    templateUrl: 'homesearch.component.html',
    providers: [SearchDataService]
})

export class HomeSearchComponent implements OnInit {

    public message: string;
    public PersonCitySearchData: PersonCitySearchResult;
    public SelectedTerm: string;
    public IndexExists: boolean = false;

    constructor(private _dataService: SearchDataService, private _personcitysearchComponent: PersoncitysearchComponent) {
        this.message = "Hello from HomeSearchComponent constructor";
        this.SelectedTerm = "none";
        this.PersonCitySearchData = new PersonCitySearchResult();
    }

    public onTermSelectedEvent(term: string) {
        this.SelectedTerm = term;
        this.findDataForSearchTerm(term, 0)
    }

    private findDataForSearchTerm(term: string, from: number) {
        console.log("findDataForSearchTerm:" + term);
        this._dataService.FindAllForTerm(term, from)
            .subscribe((data) => {
                console.log(data)
                this.PersonCitySearchData = data;
                this.configurePagingDisplay(this.PersonCitySearchData.hits);
            },
            error => console.log(error),
            () => {
                console.log('PersonCitySearch:findDataForSearchTerm completed');
            }
            );
    }

    ngOnInit() {
        this._dataService
            .IndexExists()
            .subscribe(data => this.IndexExists = data,
            error => console.log(error),
            () => console.log('Get IndexExists complete'));
    }

    public ShowPaging: boolean = false;
    public CurrentPage: number = 0;
    public TotalHits: number = 0;
    public PagesCount: number = 0;
    public Pages: number[] = [];

    public LoadDataForPage(page: number) {
        var from = page * 10;
        this.findDataForSearchTerm(this.SelectedTerm, from)
        this.CurrentPage = page;
    }

    public NextPage() {
        var page = this.CurrentPage;
        console.log("TotalHits" + this.TotalHits + "NextPage: " + ((this.CurrentPage + 1) * 10) + "CurrentPage" + this.CurrentPage );

        if (this.TotalHits > ((this.CurrentPage + 1) * 10)) {
            page = this.CurrentPage + 1;
        }

        this.LoadDataForPage(page);
    }

    public PreviousPage(page: number) {
        var page = this.CurrentPage;

        if (this.CurrentPage > 0) {
            page = this.CurrentPage - 1;
        }

        this.LoadDataForPage(page);
    }

    private configurePagingDisplay(hits: number) {
        this.PagesCount = Math.floor(hits / 10);

        this.Pages = [];
        for (let i = 0; i <= this.PagesCount; i++) {
            this.Pages.push((i));
        }

        this.TotalHits = hits;

        if (this.PagesCount <= 1) {
            this.ShowPaging = false;
        } else {
            this.ShowPaging = true;
        }
    }
}

Now when characters are entered into the search input, records are searched for and returned with the amount of hits for the term.

searchaspnetcoreangular2_01

The paging can also be used, to do the server side paging.

searchaspnetcoreangular2_02

The search functions like a web search with which we have come to expect. If different results, searches are required, the server side index creation, query types can be changed as needed. For example, the autocomplete suggestions could be replaced with a fuzzy search, or a query string search.

Links:

https://github.com/oferh/ng2-completer

https://github.com/damienbod/Angular2WebpackVisualStudio

https://www.elastic.co/guide/en/elasticsearch/reference/current/query-dsl-query-string-query.html

https://www.elastic.co/products/elasticsearch

https://www.nuget.org/packages/ElasticsearchCRUD/

https://github.com/damienbod/ElasticsearchCRUD

http://www.bilyachat.com/2015/07/search-like-google-with-elasticsearch.html

http://stackoverflow.com/questions/29753971/elasticsearch-completion-suggest-search-with-multiple-word-inputs

http://rea.tech/implementing-autosuggest-in-elasticsearch/

https://qbox.io/blog/an-introduction-to-ngrams-in-elasticsearch

https://www.elastic.co/guide/en/elasticsearch/guide/current/_ngrams_for_partial_matching.html


Extending Identity in IdentityServer4 to manage users in ASP.NET Core

$
0
0

This article shows how Identity can be extended and used together with IdentityServer4 to implement application specific requirements. The application allows users to register and can access the application for 7 days. After this, the user cannot log in. Any admin can activate or deactivate a user using a custom user management API. Extra properties are added to the Identity user model to support this. Identity is persisted using EFCore and SQLite. The SPA application is implemented using Angular 2, Webpack 2 and Typescript 2.

Code: github

Other posts in this series:

Updating Identity

Updating Identity is pretty easy. The package provides the IdentityUser class implemented by the ApplicationUser. You can add any extra required properties to this class. This requires the Microsoft.AspNetCore.Identity.EntityFrameworkCore package which is included in the project as a NuGet package.

using System;
using Microsoft.AspNetCore.Identity.EntityFrameworkCore;

namespace IdentityServerWithAspNetIdentity.Models
{
    public class ApplicationUser : IdentityUser
    {
        public bool IsAdmin { get; set; }
        public string DataEventRecordsRole { get; set; }
        public string SecuredFilesRole { get; set; }
        public DateTime AccountExpires { get; set; }
    }
}

Identity needs to be added to the application. This is done in the startup class in the ConfigureServices method using the AddIdentity extension. SQLite is used to persist the data. The ApplicationDbContext which uses SQLite is then used as the store for Identity.

services.AddDbContext<ApplicationDbContext>(options =>
	options.UseSqlite(Configuration.GetConnectionString("DefaultConnection")));

services.AddIdentity<ApplicationUser, IdentityRole>()
.AddEntityFrameworkStores<ApplicationDbContext>()
.AddDefaultTokenProviders();

The configuration is read from the appsettings for the SQLite database. The configuration is read using the ConfigurationBuilder in the Startup constructor.

"ConnectionStrings": {
        "DefaultConnection": "Data Source=C:\\git\\damienbod\\AspNet5IdentityServerAngularImplicitFlow\\src\\ResourceWithIdentityServerWithClient\\usersdatabase.sqlite"
    },

The Identity store is then created using the EFCore migrations.

dotnet ef migrations add testMigration

dotnet ef database update

The new properties in the Identity are used in three ways; when creating a new user, when creating a token for a user and validating the token on a resource using policies.

Using Identity creating a new user

The Identity ApplicationUser is created in the Register method in the AccountController. The new extended properties which were added to the ApplicationUser can be used as required. In this example, a new user will have access for 7 days. If the user can set custom properties, the RegisterViewModel model needs to be extended and the corresponding view.

[HttpPost]
[AllowAnonymous]
[ValidateAntiForgeryToken]
public async Task<IActionResult> Register(RegisterViewModel model, string returnUrl = null)
{
	ViewData["ReturnUrl"] = returnUrl;
	if (ModelState.IsValid)
	{
		var dataEventsRole = "dataEventRecords.user";
		var securedFilesRole = "securedFiles.user";
		if (model.IsAdmin)
		{
			dataEventsRole = "dataEventRecords.admin";
			securedFilesRole = "securedFiles.admin";
		}

		var user = new ApplicationUser {
			UserName = model.Email,
			Email = model.Email,
			IsAdmin = model.IsAdmin,
			DataEventRecordsRole = dataEventsRole,
			SecuredFilesRole = securedFilesRole,
			AccountExpires = DateTime.UtcNow.AddDays(7.0)
		};

		var result = await _userManager.CreateAsync(user, model.Password);
		if (result.Succeeded)
		{
			await _signInManager.SignInAsync(user, isPersistent: false);
			_logger.LogInformation(3, "User created a new account with password.");
			return RedirectToLocal(returnUrl);
		}
		AddErrors(result);
	}

	return View(model);
}

Using Identity creating a token in IdentityServer4

The Identity properties need to be added to the claims so that the client SPA or whatever client it is can use the properties. In IdentityServer4, the IProfileService interface is used for this. Each custom ApplicationUser property is added as claims as required.

using System;
using System.Linq;
using System.Security.Claims;
using System.Threading.Tasks;
using IdentityModel;
using IdentityServer4.Extensions;
using IdentityServer4.Models;
using IdentityServer4.Services;
using IdentityServerWithAspNetIdentity.Models;
using Microsoft.AspNetCore.Identity;

namespace ResourceWithIdentityServerWithClient
{
    public class IdentityWithAdditionalClaimsProfileService : IProfileService
    {
        private readonly IUserClaimsPrincipalFactory<ApplicationUser> _claimsFactory;
        private readonly UserManager<ApplicationUser> _userManager;

        public IdentityWithAdditionalClaimsProfileService(UserManager<ApplicationUser> userManager,  IUserClaimsPrincipalFactory<ApplicationUser> claimsFactory)
        {
            _userManager = userManager;
            _claimsFactory = claimsFactory;
        }

        public async Task GetProfileDataAsync(ProfileDataRequestContext context)
        {
            var sub = context.Subject.GetSubjectId();

            var user = await _userManager.FindByIdAsync(sub);
            var principal = await _claimsFactory.CreateAsync(user);

            var claims = principal.Claims.ToList();
            if (!context.AllClaimsRequested)
            {
                claims = claims.Where(claim => context.RequestedClaimTypes.Contains(claim.Type)).ToList();
            }

            claims.Add(new Claim(JwtClaimTypes.GivenName, user.UserName));

            if (user.IsAdmin)
            {
                claims.Add(new Claim(JwtClaimTypes.Role, "admin"));
            }
            else
            {
                claims.Add(new Claim(JwtClaimTypes.Role, "user"));
            }

            if (user.DataEventRecordsRole == "dataEventRecords.admin")
            {
                claims.Add(new Claim(JwtClaimTypes.Role, "dataEventRecords.admin"));
                claims.Add(new Claim(JwtClaimTypes.Role, "dataEventRecords.user"));
                claims.Add(new Claim(JwtClaimTypes.Role, "dataEventRecords"));
            }
            else
            {
                claims.Add(new Claim(JwtClaimTypes.Role, "dataEventRecords.user"));
                claims.Add(new Claim(JwtClaimTypes.Role, "dataEventRecords"));
            }

            if (user.SecuredFilesRole == "securedFiles.admin")
            {
                claims.Add(new Claim(JwtClaimTypes.Role, "securedFiles.admin"));
                claims.Add(new Claim(JwtClaimTypes.Role, "securedFiles.user"));
                claims.Add(new Claim(JwtClaimTypes.Role, "securedFiles"));
            }
            else
            {
                claims.Add(new Claim(JwtClaimTypes.Role, "securedFiles.user"));
                claims.Add(new Claim(JwtClaimTypes.Role, "securedFiles"));
            }

            claims.Add(new System.Security.Claims.Claim(StandardScopes.Email.Name, user.Email));


            context.IssuedClaims = claims;
        }

        public async Task IsActiveAsync(IsActiveContext context)
        {
            var sub = context.Subject.GetSubjectId();
            var user = await _userManager.FindByIdAsync(sub);
            context.IsActive = user != null && user.AccountExpires > DateTime.UtcNow;
        }
    }
}

Using the Identity properties validating a token

The IsAdmin property is used to define whether a logged on user has the admin role. This was added to the token using the admin claim in the IProfileService. Now this can be used by defining a policy and validating the policy in a controller. The policies are added in the Startup class in the ConfigureServices method.

services.AddAuthorization(options =>
{
	options.AddPolicy("dataEventRecordsAdmin", policyAdmin =>
	{
		policyAdmin.RequireClaim("role", "dataEventRecords.admin");
	});
	options.AddPolicy("admin", policyAdmin =>
	{
		policyAdmin.RequireClaim("role", "admin");
	});
	options.AddPolicy("dataEventRecordsUser", policyUser =>
	{
		policyUser.RequireClaim("role", "dataEventRecords.user");
	});
});

The policy can then be used for example in a MVC Controller using the Authorize attribute. The admin policy is used in the UserManagementController.

[Authorize("admin")]
[Produces("application/json")]
[Route("api/UserManagement")]
public class UserManagementController : Controller
{

Now that users can be admin users and expire after 7 days, the application requires a UI to manage this. This UI is implemented in the Angular 2 SPA. The UI requires a user management API to get all the users and also update the users. The Identity EFCore ApplicationDbContext context is used directly in the controller to simplify things, but usually this would be separated from the Controller, or if you have a lot of users, some type of search logic would need to be supported with a filtered result list. I like to have no logic in the MVC controller.

using System;
using System.Collections.Generic;
using System.Linq;
using IdentityServerWithAspNetIdentity.Data;
using Microsoft.AspNetCore.Authorization;
using Microsoft.AspNetCore.Mvc;
using ResourceWithIdentityServerWithClient.Model;

namespace ResourceWithIdentityServerWithClient.Controllers
{
    [Authorize("admin")]
    [Produces("application/json")]
    [Route("api/UserManagement")]
    public class UserManagementController : Controller
    {
        private readonly ApplicationDbContext _context;

        public UserManagementController(ApplicationDbContext context)
        {
            _context = context;
        }

        [HttpGet]
        public IActionResult Get()
        {
            var users = _context.Users.ToList();
            var result = new List<UserDto>();

            foreach(var applicationUser in users)
            {
                var user = new UserDto
                {
                    Id = applicationUser.Id,
                    Name = applicationUser.Email,
                    IsAdmin = applicationUser.IsAdmin,
                    IsActive = applicationUser.AccountExpires > DateTime.UtcNow
                };

                result.Add(user);
            }

            return Ok(result);
        }

        [HttpPut("{id}")]
        public void Put(string id, [FromBody]UserDto userDto)
        {
            var user = _context.Users.First(t => t.Id == id);

            user.IsAdmin = userDto.IsAdmin;
            if(userDto.IsActive)
            {
                if(user.AccountExpires < DateTime.UtcNow)
                {
                    user.AccountExpires = DateTime.UtcNow.AddDays(7.0);
                }
            }
            else
            {
                // deactivate user
                user.AccountExpires = new DateTime();
            }

            _context.Users.Update(user);
            _context.SaveChanges();
        }
    }
}

Angular 2 User Management Component

The Angular 2 SPA is built using Webpack 2 with typescript. See https://github.com/damienbod/Angular2WebpackVisualStudio on how to setup a Angular 2, Webpack 2 app with ASP.NET Core.

The Angular 2 requires a service to access the ASP.NET Core MVC service. This is implemented in the UserManagementService which needs to be added to the app.module then.

import { Injectable } from '@angular/core';
import { Http, Response, Headers, RequestOptions } from '@angular/http';
import 'rxjs/add/operator/map';
import { Observable } from 'rxjs/Observable';
import { Configuration } from '../app.constants';
import { SecurityService } from '../services/SecurityService';
import { User } from './models/User';

@Injectable()
export class UserManagementService {

    private actionUrl: string;
    private headers: Headers;

    constructor(private _http: Http, private _configuration: Configuration, private _securityService: SecurityService) {
        this.actionUrl = `${_configuration.Server}/api/UserManagement/`;
    }

    private setHeaders() {

        console.log("setHeaders started");

        this.headers = new Headers();
        this.headers.append('Content-Type', 'application/json');
        this.headers.append('Accept', 'application/json');

        var token = this._securityService.GetToken();
        if (token !== "") {
            let tokenValue = 'Bearer ' + token;
            console.log("tokenValue:" + tokenValue);
            this.headers.append('Authorization', tokenValue);
        }
    }

    public GetAll = (): Observable<User[]> => {
        this.setHeaders();
        let options = new RequestOptions({ headers: this.headers, body: '' });

        return this._http.get(this.actionUrl, options).map(res => res.json());
    }

    public Update = (id: string, itemToUpdate: User): Observable<Response> => {
        this.setHeaders();
        return this._http
            .put(this.actionUrl + id, JSON.stringify(itemToUpdate), { headers: this.headers });
    }
}

The UserManagementComponent uses the service and displays all the users, and provides a way of updating each user.

import { Component, OnInit } from '@angular/core';
import { SecurityService } from '../services/SecurityService';
import { Observable } from 'rxjs/Observable';
import { Router } from '@angular/router';

import { UserManagementService } from '../user-management/UserManagementService';
import { User } from './models/User';

@Component({
    selector: 'user-management',
    templateUrl: 'user-management.component.html'
})

export class UserManagementComponent implements OnInit {

    public message: string;
    public Users: User[];

    constructor(
        private _userManagementService: UserManagementService,
        public securityService: SecurityService,
        private _router: Router) {
        this.message = "user-management";
    }

    ngOnInit() {
        this.getData();
    }

    private getData() {
        console.log('User Management:getData starting...');
        this._userManagementService
            .GetAll()
            .subscribe(data => this.Users = data,
            error => this.securityService.HandleError(error),
            () => console.log('User Management Get all completed'));
    }

    public Update(user: User) {
        this._userManagementService.Update(user.id, user)
            .subscribe((() => console.log("subscribed")),
            error => this.securityService.HandleError(error),
            () => console.log("update request sent!"));
    }

}

The UserManagementComponent template uses the Users data to display, update etc.

<div class="col-md-12" *ngIf="securityService.IsAuthorized">
    <div class="panel panel-default">
        <div class="panel-heading">
            <h3 class="panel-title">{{message}}</h3>
        </div>
        <div class="panel-body"  *ngIf="Users">
            <table class="table">
                <thead>
                    <tr>
                        <th>Name</th>
                        <th>IsAdmin</th>
                        <th>IsActive</th>
                        <th></th>
                    </tr>
                </thead>
                <tbody>
                    <tr style="height:20px;" *ngFor="let user of Users">
                        <td>{{user.name}}</td>
                        <td>
                            <input type="checkbox" [(ngModel)]="user.isAdmin" class="form-control" style="box-shadow:none" />
                        </td>
                        <td>
                            <input type="checkbox" [(ngModel)]="user.isActive" class="form-control" style="box-shadow:none" />
                        </td>
                        <td>
                            <button (click)="Update(user)" class="form-control">Update</button>
                        </td>
                    </tr>
                </tbody>
            </table>

        </div>
    </div>
</div>

The user-management component and the service need to be added to the module.

import { NgModule } from '@angular/core';
import { FormsModule } from '@angular/forms';
import { BrowserModule } from '@angular/platform-browser';

import { AppComponent } from './app.component';
import { Configuration } from './app.constants';
import { routing } from './app.routes';
import { HttpModule, JsonpModule } from '@angular/http';

import { SecurityService } from './services/SecurityService';
import { DataEventRecordsService } from './dataeventrecords/DataEventRecordsService';
import { DataEventRecord } from './dataeventrecords/models/DataEventRecord';

import { ForbiddenComponent } from './forbidden/forbidden.component';
import { HomeComponent } from './home/home.component';
import { UnauthorizedComponent } from './unauthorized/unauthorized.component';

import { DataEventRecordsListComponent } from './dataeventrecords/dataeventrecords-list.component';
import { DataEventRecordsCreateComponent } from './dataeventrecords/dataeventrecords-create.component';
import { DataEventRecordsEditComponent } from './dataeventrecords/dataeventrecords-edit.component';

import { UserManagementComponent } from './user-management/user-management.component';


import { HasAdminRoleAuthenticationGuard } from './guards/hasAdminRoleAuthenticationGuard';
import { HasAdminRoleCanLoadGuard } from './guards/hasAdminRoleCanLoadGuard';
import { UserManagementService } from './user-management/UserManagementService';

@NgModule({
    imports: [
        BrowserModule,
        FormsModule,
        routing,
        HttpModule,
        JsonpModule
    ],
    declarations: [
        AppComponent,
        ForbiddenComponent,
        HomeComponent,
        UnauthorizedComponent,
        DataEventRecordsListComponent,
        DataEventRecordsCreateComponent,
        DataEventRecordsEditComponent,
        UserManagementComponent
    ],
    providers: [
        SecurityService,
        DataEventRecordsService,
        UserManagementService,
        Configuration,
        HasAdminRoleAuthenticationGuard,
        HasAdminRoleCanLoadGuard
    ],
    bootstrap:    [AppComponent],
})

export class AppModule {}

Now the Identity users can be managed fro the Angular 2 UI.

extendingidentity_01

Links

https://github.com/IdentityServer/IdentityServer4

http://docs.identityserver.io/en/dev/

https://github.com/IdentityServer/IdentityServer4.Samples

https://docs.asp.net/en/latest/security/authentication/identity.html

https://github.com/IdentityServer/IdentityServer4/issues/349

ASP.NET Core, Angular2 with Webpack and Visual Studio


EF Core diagnosis and features with MS SQL Server

$
0
0

This article shows how Entity Framework Core messages can be logged, and compared using the SQL Profiler and also some of the cool new 1.1 features, but not all. All information can be found on the links at the bottom and especially the excellent docs for EF Core.

Code: https://github.com/damienbod/EFCoreFeaturesAndDiag

project.json with EF Core packages and tools

When using EF Core, you need to add the correct packages and tools to the project file. EF Core 1.1 has a lot of changes compared to 1.0. You should not mix the different versions from EF Core. Use either the LTS or the current version, but not both. The Microsoft.EntityFrameworkCore.Tools.DotNet is a new package which came with 1.1.

{
    "dependencies": {
        "Microsoft.AspNetCore.Diagnostics.EntityFrameworkCore": "1.1.0",
        "Microsoft.EntityFrameworkCore": "1.1.0",
        "Microsoft.EntityFrameworkCore.Relational": "1.1.0",
        "Microsoft.EntityFrameworkCore.SqlServer": "1.1.0",
        "Microsoft.EntityFrameworkCore.SqlServer.Design": {
            "version": "1.1.0",
            "type": "build"
        },
        "Microsoft.EntityFrameworkCore.Tools": "1.1.0-preview4-final",
        ...
    },

    "tools": {
        "Microsoft.EntityFrameworkCore.Tools.DotNet": "1.1.0-preview4",
        ...
    },

    ...

}

Startup ConfigureServices

The database and EF Core can be configured and usually is in the Startup ConfigureServices method for an ASP.NET Core application. The following code sets up EF Core to use a MS SQL server database and uses the new retry on failure method from version 1.1.

public void ConfigureServices(IServiceCollection services)
{
	var sqlConnectionString = Configuration.GetConnectionString("DataAccessMsSqlServerProvider");

	services.AddDbContext<DomainModelMsSqlServerContext>(
		options => options.UseSqlServer(
			sqlConnectionString,
			sqlServerOptions => sqlServerOptions.EnableRetryOnFailure()
		)
	);

	services.AddScoped<IDataAccessProvider, DataAccessMsSqlServerProvider>();

	services.AddMvc().AddJsonOptions(options =>
	{
		options.SerializerSettings.ReferenceLoopHandling = ReferenceLoopHandling.Ignore;
	});
}

Data Model

As with version 1.1, Entity Framework Core can now use backing fields to connect with the database and not just properties. This opens up a whole new world of possibilities of how entities can be designed or used. The _description field from the following DataEventRecord entity will be used for the database.

public class DataEventRecord
{
	private string _description;

	[Key]
	public long DataEventRecordId { get; set; }

	public string Name { get; set; }

	public string MadDescription {
		get { return _description; }
		set { _description = value;  }
	}

	public DateTime Timestamp { get; set; }

	[ForeignKey("SourceInfoId")]
	public SourceInfo SourceInfo { get; set; }

	public long SourceInfoId { get; set; }
}

DbContext with Field and Column mapping

In the OnModelCreating method from the DBContext, the description field is mapped to the column description for the MadDescription property. The context also configures shadow properties to add updated timestamps.

using System;
using System.Linq;
using Microsoft.EntityFrameworkCore;

namespace EFCoreFeaturesAndDiag.Model
{
    // >dotnet ef migration add testMigration
    public class DomainModelMsSqlServerContext : DbContext
    {
        public DomainModelMsSqlServerContext(DbContextOptions<DomainModelMsSqlServerContext> options) :base(options)
        { }

        public DbSet<DataEventRecord> DataEventRecords { get; set; }

        public DbSet<SourceInfo> SourceInfos { get; set; }

        protected override void OnModelCreating(ModelBuilder builder)
        {
            builder.Entity<DataEventRecord>().HasKey(m => m.DataEventRecordId);
            builder.Entity<SourceInfo>().HasKey(m => m.SourceInfoId);

            // shadow properties
            builder.Entity<DataEventRecord>().Property<DateTime>("UpdatedTimestamp");
            builder.Entity<SourceInfo>().Property<DateTime>("UpdatedTimestamp");

            builder.Entity<DataEventRecord>()
                .Property(b => b.MadDescription)
                .HasField("_description")
                .HasColumnName("_description");

            base.OnModelCreating(builder);
        }

        public override int SaveChanges()
        {
            ChangeTracker.DetectChanges();

            updateUpdatedProperty<SourceInfo>();
            updateUpdatedProperty<DataEventRecord>();

            return base.SaveChanges();
        }

        private void updateUpdatedProperty<T>() where T : class
        {
            var modifiedSourceInfo =
                ChangeTracker.Entries<T>()
                    .Where(e => e.State == EntityState.Added || e.State == EntityState.Modified);

            foreach (var entry in modifiedSourceInfo)
            {
                entry.Property("UpdatedTimestamp").CurrentValue = DateTime.UtcNow;
            }
        }
    }
}

Logging and diagnosis

Logging for EF Core is configured for this application as described here in the Entity Framework Core docs.

The EfCoreFilteredLoggerProvider.

using Microsoft.Extensions.Logging;
using System;
using System.Linq;
using Microsoft.EntityFrameworkCore.Storage.Internal;

namespace EFCoreFeaturesAndDiag.Logging
{
    public class EfCoreFilteredLoggerProvider : ILoggerProvider
    {
        private static string[] _categories =
        {
            typeof(Microsoft.EntityFrameworkCore.Storage.Internal.RelationalCommandBuilderFactory).FullName,
            typeof(Microsoft.EntityFrameworkCore.Storage.Internal.SqlServerConnection).FullName
        };

        public ILogger CreateLogger(string categoryName)
        {
            if (_categories.Contains(categoryName))
            {
                return new MyLogger();
            }

            return new NullLogger();
        }

        public void Dispose()
        { }

        private class MyLogger : ILogger
        {
            public bool IsEnabled(LogLevel logLevel)
            {
                return true;
            }

            public void Log<TState>(LogLevel logLevel, EventId eventId, TState state, Exception exception, Func<TState, Exception, string> formatter)
            {
                Console.WriteLine(formatter(state, exception));
            }

            public IDisposable BeginScope<TState>(TState state)
            {
                return null;
            }
        }

        private class NullLogger : ILogger
        {
            public bool IsEnabled(LogLevel logLevel)
            {
                return false;
            }

            public void Log<TState>(LogLevel logLevel, EventId eventId, TState state, Exception exception, Func<TState, Exception, string> formatter)
            { }

            public IDisposable BeginScope<TState>(TState state)
            {
                return null;
            }
        }
    }
}

The EfCoreLoggerProvider class:

using Microsoft.Extensions.Logging;
using System;
using System.IO;

namespace EFCoreFeaturesAndDiag.Logging
{
    public class EfCoreLoggerProvider : ILoggerProvider
    {
        public ILogger CreateLogger(string categoryName)
        {
            return new MyLogger();
        }

        public void Dispose()
        { }

        private class MyLogger : ILogger
        {
            public bool IsEnabled(LogLevel logLevel)
            {
                return true;
            }

            public void Log<TState>(LogLevel logLevel, EventId eventId, TState state, Exception exception, Func<TState, Exception, string> formatter)
            {
                File.AppendAllText(@"C:\temp\log.txt", formatter(state, exception));
                Console.WriteLine(formatter(state, exception));
            }

            public IDisposable BeginScope<TState>(TState state)
            {
                return null;
            }
        }
    }
}

The EfCoreLoggerProvider logger is then added in the DataAccessMsSqlServerProvider constructor.

public class DataAccessMsSqlServerProvider : IDataAccessProvider
{
	private readonly DomainModelMsSqlServerContext _context;
	private readonly ILogger _logger;

	public DataAccessMsSqlServerProvider(DomainModelMsSqlServerContext context, ILoggerFactory loggerFactory)
	{
		_context = context;
		loggerFactory.AddProvider(new EfCoreLoggerProvider());
		_logger = loggerFactory.CreateLogger("DataAccessMsSqlServerProvider");

	}

The EF Core logs

Here’s the logs produced for an insert command:

Executing action method AspNet5MultipleProject.Controllers.DataEventRecordsController.AddTest (EFCoreFeaturesAndDiag) with arguments ((null)) - ModelState is ValidOpening connection to database 'EfcoreTest' on server 'N275\MSSQLSERVER2014'.Beginning transaction with isolation level 'Unspecified'.Executed DbCommand (60ms) [Parameters=[@p0='?' (Size = 4000), @p1='?' (Size = 4000), @p2='?', @p3='?'], CommandType='Text', CommandTimeout='30']
SET NOCOUNT ON;
INSERT INTO [SourceInfos] ([Description], [Name], [Timestamp], [UpdatedTimestamp])
VALUES (@p0, @p1, @p2, @p3);
SELECT [SourceInfoId]
FROM [SourceInfos]
WHERE @@ROWCOUNT = 1 AND [SourceInfoId] = scope_identity();Executed DbCommand (1ms) [Parameters=[@p4='?' (Size = 4000), @p5='?' (Size = 4000), @p6='?', @p7='?', @p8='?'], CommandType='Text', CommandTimeout='30']
SET NOCOUNT ON;
INSERT INTO [DataEventRecords] ([_description], [Name], [SourceInfoId], [Timestamp], [UpdatedTimestamp])
VALUES (@p4, @p5, @p6, @p7, @p8);
SELECT [DataEventRecordId]
FROM [DataEventRecords]
WHERE @@ROWCOUNT = 1 AND [DataEventRecordId] = scope_identity();Committing transaction.Closing connection to database 'EfcoreTest' on server 'N275\MSSQLSERVER2014'.Executed action method AspNet5MultipleProject.Controllers.DataEventRecordsController.AddTest (EFCoreFeaturesAndDiag), returned result Microsoft.AspNetCore.Mvc.OkObjectResult.No information found on request to perform content negotiation.Selected output formatter 'Microsoft.AspNetCore.Mvc.Formatters.StringOutputFormatter' and content type 'text/plain; charset=utf-8' to write the response.Executing ObjectResult, writing value Microsoft.AspNetCore.Mvc.ControllerContext.Executed action AspNet5MultipleProject.Controllers.DataEventRecordsController.AddTest (EFCoreFeaturesAndDiag) in 1181.5083msConnection id "0HL13KIK3Q7QG" completed keep alive response.Request finished in 1259.1888ms 200 text/plain; charset=utf-8Request starting HTTP/1.1 GET http://localhost:46799/favicon.ico  The request path /favicon.ico does not match an existing fileRequest did not match any routes.Connection id "0HL13KIK3Q7QG" completed keep alive response.Request finished in 36.2143ms 404

MS SQL Profiler

And here’s the corresponding insert request in the SQL Profiler from MS SQL Server.

sqlprofiler_efcore_01

EF Core Find

One feature which was also implemented in EF Core 1.1 is the Find method, which is very convenient to use.

public DataEventRecord GetDataEventRecord(long dataEventRecordId)
{
	return _context.DataEventRecords.Find(dataEventRecordId);
}

EF Core is looking really good and with the promise of further features and providers, this is becoming really exciting.

Links:

https://docs.microsoft.com/en-us/ef/

https://docs.microsoft.com/en-us/ef/core/miscellaneous/logging

https://blogs.msdn.microsoft.com/dotnet/2016/11/16/announcing-entity-framework-core-1-1/

https://msdn.microsoft.com/en-us/library/ms181091.aspx

https://github.com/aspnet/EntityFramework/releases/tag/rel%2F1.1.0

Experiments with Entity Framework Core and ASP.NET Core 1.0 MVC

ASP.NET Core 1.0 with PostgreSQL and Entity Framework Core

ASP.NET Core 1.0 MVC File Upload with MS SQL SERVER FileTable

Setting the NLog database connection string in the ASP.NET Core appsettings.json


Implementing a Client White-list using ASP.NET Core Middleware

$
0
0

This article shows how a client white-list could be implemented using ASP.NET Core middleware checking the Remote IP address of the request. If the client IP is on the white-list, no restrictions exist.

Code: https://github.com/damienbod/ClientIpAspNetCoreIIS

The middleware uses an admin white-list parameter from the constructor to compare with the remote ip address from the HttpContext Connection property. This is different to previous versions of .NET. In the example, all GET requests are allowed. If any other request method is used, the remote IP is used to check if it exists in the white-list. If it does not exist, a 403 is returned.

using System;
using System.Collections.Generic;
using System.Linq;
using System.Net;
using System.Threading.Tasks;
using Microsoft.AspNetCore.Http;
using Microsoft.Extensions.Logging;

namespace ClientIpAspNetCore
{
    public class AdminWhiteListMiddleware
    {
        private readonly RequestDelegate _next;
        private readonly ILogger<AdminWhiteListMiddleware> _logger;
        private readonly string _adminWhiteList;

        public AdminWhiteListMiddleware(RequestDelegate next, ILogger<AdminWhiteListMiddleware> logger, string adminWhiteList)
        {
            _adminWhiteList = adminWhiteList;
            _next = next;
            _logger = logger;
        }

        public async Task Invoke(HttpContext context)
        {
            if (context.Request.Method != "GET")
            {
                var remoteIp = context.Connection.RemoteIpAddress;
                _logger.LogInformation($"Request from Remote IP address: {remoteIp}");

                string[] ip = _adminWhiteList.Split(';');
                if (!ip.Any(option => option == remoteIp.ToString()))
                {
                    _logger.LogInformation($"Forbidden Request from Remote IP address: {remoteIp}");
                    context.Response.StatusCode = (int)HttpStatusCode.Forbidden;
                    return;
                }
            }

            await _next.Invoke(context);

        }
    }
}

The white-list is configured in the appsettings.config. This is a ‘;’ separated list which is split in the middleware class.

{
    "AdminWhiteList":  "127.0.0.1;192.168.1.5",
    "Logging": {
        "IncludeScopes": false,
        "LogLevel": {
            "Default": "Debug",
            "System": "Information",
            "Microsoft": "Information"
        }
    }
}

In the startup class, the AdminWhiteListMiddleware type is added using the appsettings configuration.

public void Configure(IApplicationBuilder app, IHostingEnvironment env, ILoggerFactory loggerFactory)
{
	...

	app.UseStaticFiles();

	app.UseMiddleware<AdminWhiteListMiddleware>(Configuration["AdminWhiteList"]);
	app.UseMvc();
}

If a request is sent, other that a GET method, and it is not in the white-list, the 403 response is returned to the client and logged.

2016-12-18 16:45:42.8891|0|ClientIpAspNetCore.AdminWhiteListMiddleware|INFO|  Request from Remote IP address: 192.168.1.4
2016-12-18 16:45:42.9031|0|ClientIpAspNetCore.AdminWhiteListMiddleware|INFO|  Forbidden Request from Remote IP address: 192.168.1.4

An ActionFilter could also be used to implement this, for example if more specific logic is required.

using System.Threading.Tasks;
using Microsoft.AspNetCore.Authorization;
using Microsoft.AspNetCore.Mvc.Authorization;
using Microsoft.AspNetCore.Mvc.Filters;
using Microsoft.Extensions.Logging;

namespace ClientIpAspNetCore.Filters
{
    public class ClientIdCheckFilter : ActionFilterAttribute
    {
        private readonly ILogger _logger;

        public ClientIdCheckFilter(ILoggerFactory loggerFactory)
        {
            _logger = loggerFactory.CreateLogger("ClassConsoleLogActionOneFilter");
        }

        public override void OnActionExecuting(ActionExecutingContext context)
        {
            _logger.LogInformation($"Remote IpAddress: {context.HttpContext.Connection.RemoteIpAddress}");

            // TODO implement some business logic for this...

            base.OnActionExecuting(context);
        }
    }
}

The ActionFilter can be added to the services.

public void ConfigureServices(IServiceCollection services)
{
	services.AddScoped<ClientIdCheckFilter>();

	services.AddMvc();
}

And can be used specifically on any controller as required.

[ServiceFilter(typeof(ClientIdCheckFilter))]
[Route("api/[controller]")]
public class ValuesController : Controller

Note: I have not tested this with all the different possible hops, forward headers. Only tested with IIS and kestrel.

Links:

https://docs.microsoft.com/en-us/aspnet/core/fundamentals/middleware

http://odetocode.com/blogs/scott/archive/2016/11/22/asp-net-core-and-the-enterprise-part-3-middleware.aspx


Creating an ASP.NET Core 1.1 VS2017 Docker application

$
0
0

This blog shows how to setup a basic ASP.NET Core 1.1 application using Visual studio 2017 and Docker.

Code: https://github.com/damienbod/AspNetCoreVS2017Docker

This article from Swaminathan Vetri demonstates how to setup everything for an ASP.NET Core 1.0 application.

Now the application needs to be updated to ASP.NET Core 1.1. Open the csproj file and update the PackageReference and also the TargetFramework to the 1.1 packages and target. At present, there is no help when updating the packages, like the project.json file had, so you need to know exactly what packages to use when updating directly.

<Project ToolsVersion="15.0" Sdk="Microsoft.NET.Sdk.Web">
  <PropertyGroup>
    <OutputType>Exe</OutputType>
    <TargetFramework>netcoreapp1.1</TargetFramework>
    <PreserveCompilationContext>true</PreserveCompilationContext>
  </PropertyGroup>
  <ItemGroup>
    <Folder Include="wwwroot\" />
  </ItemGroup>
  <ItemGroup>
    <PackageReference Include="Microsoft.NETCore.App" Version="1.1.0" />
    <PackageReference Include="Microsoft.AspNetCore.Mvc" Version="1.1.0" />
    <PackageReference Include="Microsoft.AspNetCore.Routing" Version="1.1.0" />
    <PackageReference Include="Microsoft.AspNetCore.Server.IISIntegration" Version="1.1.0" />
    <PackageReference Include="Microsoft.AspNetCore.Server.Kestrel" Version="1.1.0" />
    <PackageReference Include="Microsoft.Extensions.Configuration.EnvironmentVariables" Version="1.1.0" />
    <PackageReference Include="Microsoft.Extensions.Configuration.FileExtensions" Version="1.1.0" />
    <PackageReference Include="Microsoft.Extensions.Configuration.Json" Version="1.1.0" />
    <PackageReference Include="Microsoft.Extensions.Logging" Version="1.1.0" />
    <PackageReference Include="Microsoft.Extensions.Logging.Console" Version="1.1.0" />
    <PackageReference Include="Microsoft.Extensions.Logging.Debug" Version="1.1.0" />
    <PackageReference Include="Microsoft.Extensions.Options.ConfigurationExtensions" Version="1.1.0" />
  </ItemGroup>
  <ItemGroup>
    <Content Update=".dockerignore">
      <DependentUpon>Dockerfile</DependentUpon>
    </Content>
    <Content Update="docker-compose.override.yml">
      <DependentUpon>docker-compose.yml</DependentUpon>
    </Content>
    <Content Update="docker-compose.vs.debug.yml">
      <DependentUpon>docker-compose.yml</DependentUpon>
    </Content>
    <Content Update="docker-compose.vs.release.yml">
      <DependentUpon>docker-compose.yml</DependentUpon>
    </Content>
  </ItemGroup>
</Project>

Then update the docker-compose.ci.build.yml file. You need to select the required image which can be found on Docker Hub. The microsoft/aspnetcore-build:1.1.0-msbuild image is used here.

version: '2'

services:
  ci-build:
    image: microsoft/aspnetcore-build:1.1.0-msbuild
    volumes:
      - .:/src
    working_dir: /src
    command: /bin/bash -c "dotnet restore && dotnet publish -c Release -o ./bin/Release/PublishOutput"

Now update the DockerFile to target the 1.1.0 version.

FROM microsoft/aspnetcore:1.1.0
ARG source
WORKDIR /app
EXPOSE 80
COPY ${source:-bin/Release/PublishOutput} .
ENTRYPOINT ["dotnet", "AspNetCoreVS2017Docker.dll"]

Start the application using Docker. You can debug the application which is running inside Docker, all in Visual Studio 2017. Very neat.

vs2017_docker_basic_1

Notes:

When setting up Docker, you need to share the C drive in Docker.

Links:

Debugging Asp.Net core apps running in Docker Containers using VS 2017

https://www.sesispla.net/blog/language/en/2016/05/running-asp-net-core-1-0-rc2-in-docker/

https://hub.docker.com/r/microsoft/aspnetcore-build/tags/

https://blogs.msdn.microsoft.com/webdev/2016/11/16/new-docker-tools-for-visual-studio/

https://blogs.msdn.microsoft.com/stevelasker/2016/06/14/configuring-docker-for-windows-volumes/


Viewing all 269 articles
Browse latest View live